介紹一些更美觀的辦法:
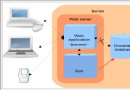
spring中有一個AbstractRoutingDataSource的抽象類可以很好的支持多數據源,我們只需要繼續它即可。
1 2 3 4 5 6 7 8 9 10 11 12package com.cnblogs.yjmyzz.utils;
import org.springframework.jdbc.datasource.lookup.AbstractRoutingDataSource;
public class RoutingDataSource extends AbstractRoutingDataSource {
@Override
protected Object determineCurrentLookupKey() {
return DBContext.getDBKey();
}
}
很簡單,就一個方法。其中DBContext的代碼如下:
1 2 3 4 5 6 7 8 9 10 11 12 13 14 15 16 17 18 19 20 21 22package com.cnblogs.yjmyzz.utils;
public class DBContext {
//define count of database and it must match with resources/properties/jdbc.properties
private static final int DB_COUNT = 2;
private static final ThreadLocal<String> tlDbKey = new ThreadLocal<String>();
public static String getDBKey() {
return tlDbKey.get();
}
public static void setDBKey(String dbKey) {
tlDbKey.set(dbKey);
}
public static String getDBKeyByUserId(int userId) {
int dbIndex = userId % DB_COUNT;
return "db_" + (++dbIndex);
}
}
主要利用了ThreadLocal這個類在每個線程中保持自己私有的變量。
這裡我模擬了一個分庫的場景:假設一個應用允許用戶注冊,但是用戶數量太多,全都放在一個數據庫裡,記錄過多,會導致數據庫性能瓶頸,比較容易想到的辦法,把用戶的數據分散到多個數據庫中保存(注:可能馬上有同學會說了,分開存了,要查詢所有用戶怎麼辦?這確實是分庫帶來的一個弊端,但也有相應的解決方案,本文先不討論這個,以免跑題)。
假設我們有二個數據庫,裡面的表結構完全相同,有一張表T_USER用於保存用戶數據,問題來了,如果有N個用戶要注冊,id分別是1、2、3...,服務端接到參數後,怎麼知道把這些數據分別插入到這二個庫中,必然要有一個規則 ,比較簡單的辦法就是取模,所以上面的getDBKeyByUserId就是干這個的。
然後是jdbc的屬性配置文件:
1 2 3 4 5 6 7 8 9 10 11jdbc-driver=com.mysql.jdbc.Driver
jdbc-key-1=db_1
jdbc-url-1=jdbc:mysql://default:3306/db_1?useUnicode=true&characterEncoding=utf8
jdbc-user-1=test
jdbc-password-1=123456
jdbc-key-2=db_2
jdbc-url-2=jdbc:mysql://default:3306/db_2?useUnicode=true&characterEncoding=utf8
jdbc-user-2=test
jdbc-password-2=123456
接下來是spring的配置文件:


 1 <?xml version="1.0" encoding="UTF-8"?>
 2 <beans xmlns="http://www.springframework.org/schema/beans"
 3        xmlns:xsi="http://www.w3.org/2001/XMLSchema-instance"
 4        xmlns:context="http://www.springframework.org/schema/context"
 5        xsi:schemaLocation="http://www.springframework.org/schema/beans
 6        http://www.springframework.org/schema/beans/spring-beans.xsd
 7          http://www.springframework.org/schema/context http://www.springframework.org/schema/context/spring-context.xsd">
 8
 9
10     <context:annotation-config/>
11
12     <context:component-scan base-package="com.cnblogs.yjmyzz"/>
13
14     <bean id="propertiesFactoryBean"
15           class="org.springframework.beans.factory.config.PropertiesFactoryBean">
16         <property name="locations">
17             <list>
18                 <value>classpath:properties/jdbc.properties</value>
19             </list>
20         </property>
21     </bean>
22
23     <context:property-placeholder properties-ref="propertiesFactoryBean" ignore-unresolvable="true"/>
24
25     <bean id="parentDataSource" class="com.alibaba.druid.pool.DruidDataSource" init-method="init"
26           destroy-method="close">
27         <property name="driverClassName" value="${jdbc-driver}"/>
28         <property name="url" value="${jdbc-url-1}"/>
29         <property name="username" value="${jdbc-user-1}"/>
30         <property name="password" value="${jdbc-password-1}"/>
31         <property name="filters" value="stat"/>
32         <property name="maxActive" value="20"/>
33         <property name="initialSize" value="1"/>
34         <property name="maxWait" value="60000"/>
35         <property name="minIdle" value="1"/>
36         <property name="timeBetweenEvictionRunsMillis" value="3000"/>
37         <property name="minEvictableIdleTimeMillis" value="300000"/>
38         <property name="validationQuery" value="SELECT 'x'"/>
39         <property name="testWhileIdle" value="true"/>
40         <property name="testOnBorrow" value="false"/>
41         <property name="testOnReturn" value="false"/>
42         <property name="poolPreparedStatements" value="true"/>
43         <property name="maxPoolPreparedStatementPerConnectionSize" value="20"/>
44         <property name="connectionInitSqls" value="set names utf8mb4;"/>
45     </bean>
46
47     <bean id="dataSource1" parent="parentDataSource">
48         <property name="url" value="${jdbc-url-1}"/>
49         <property name="username" value="${jdbc-user-1}"/>
50         <property name="password" value="${jdbc-password-1}"/>
51     </bean>
52
53     <bean id="dataSource2" parent="parentDataSource">
54         <property name="url" value="${jdbc-url-2}"/>
55         <property name="username" value="${jdbc-user-2}"/>
56         <property name="password" value="${jdbc-password-2}"/>
57     </bean>
58
59     <!-- config switch routing db -->
60     <bean id="dataSource" class="com.cnblogs.yjmyzz.utils.RoutingDataSource">
61         <property name="targetDataSources">
62             <map key-type="java.lang.String">
63                 <entry key="${jdbc-key-1}" value-ref="dataSource1"/>
64                 <entry key="${jdbc-key-2}" value-ref="dataSource2"/>
65             </map>
66         </property>
67     </bean>
68
69     <bean id="sqlSessionFactory" class="org.mybatis.spring.SqlSessionFactoryBean">
70         <property name="configLocation" value="classpath:mybatis-config.xml"></property>
71         <property name="dataSource" ref="dataSource"/>
72         <property name="mapperLocations">
73             <array>
74                 <value>classpath:mybatis/*.xml</value>
75             </array>
76         </property>
77     </bean>
78
79     <bean class="org.mybatis.spring.mapper.MapperScannerConfigurer">
80         <property name="basePackage" value="com.cnblogs.yjmyzz.mapper"/>
81     </bean>
82
83 </beans>
關鍵的是parentDataSource,dataSource1,dataSource2,dataSource這幾個bean的配置,一看就懂。
服務端的核心代碼:
1 2 3 4 5 6 7 8 9 10 11 12 13 14 15 16 17 18 19 20 21 22 23 24 25 26 27 28 29 30 31 32 33 34 35package com.cnblogs.yjmyzz.service.impl;
import com.cnblogs.yjmyzz.entity.UserEntity;
import com.cnblogs.yjmyzz.mapper.UserEntityMapper;
import com.cnblogs.yjmyzz.service.UserService;
import com.cnblogs.yjmyzz.utils.DBContext;
import org.springframework.beans.factory.annotation.Autowired;
import org.springframework.stereotype.Service;
/**
* Created by yangjunming on 2/15/16.
* author: yangjunming@huijiame.com
*/
@Service("userService")
public class UserServiceImpl implements UserService {
@Autowired
UserEntityMapper userEntityMapper;
@Override
public void addUser(UserEntity userEntity) {
//switch db
DBContext.setDBKey(DBContext.getDBKeyByUserId(userEntity.getUserId()));
userEntityMapper.insertSelective(userEntity);
}
@Override
public UserEntity getUser(int userId) {
//switch db
DBContext.setDBKey(DBContext.getDBKeyByUserId(userId));
return userEntityMapper.selectByPrimaryKey(userId);
}
}
注意:25,32行在調用mybatis操作數據庫前,先根據需要切換到不同的數據庫,然後再操作。
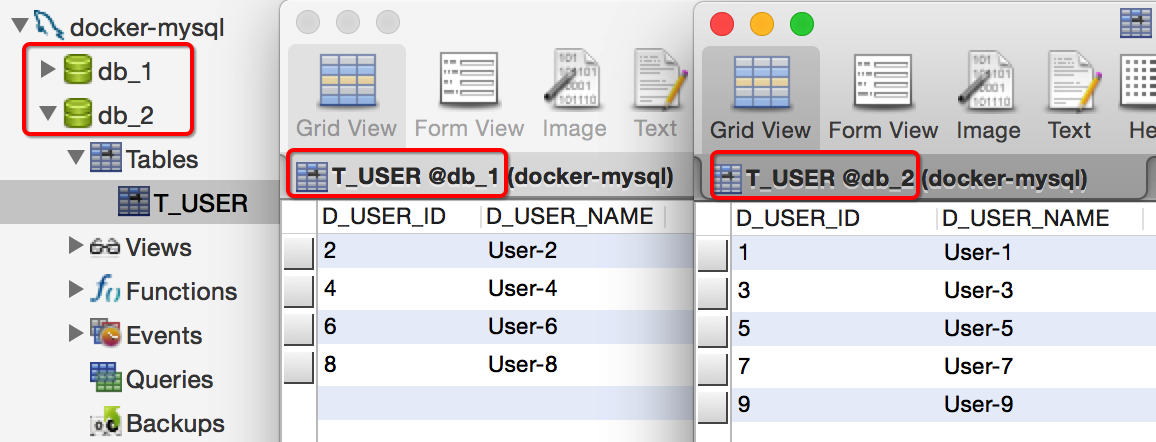
運行完成後,可以看下db_1,db_2這二個數據庫,確認數據是否已經分散存儲到每個庫中:
如果不喜歡在代碼裡手動切換db,也可以用注解的方式自動切換,比如:我們又增加了一個db_main
1 2 3 4 5 6 7 8 9 10 11 12 13 14 15 16jdbc-driver=com.mysql.jdbc.Driver
jdbc-key-1=db_1
jdbc-url-1=jdbc:mysql://default:3306/db_1?useUnicode=true&characterEncoding=utf8
jdbc-user-1=test
jdbc-password-1=123456
jdbc-key-2=db_2
jdbc-url-2=jdbc:mysql://default:3306/db_2?useUnicode=true&characterEncoding=utf8
jdbc-user-2=test
jdbc-password-2=123456
jdbc-key-main=db_main
jdbc-url-main=jdbc:mysql://default:3306/db_main?useUnicode=true&characterEncoding=utf8
jdbc-user-main=test
jdbc-password-main=123456
然後在spring配置文件裡,要做些調整:
 1     <bean id="parentDataSource" class="com.alibaba.druid.pool.DruidDataSource" init-method="init"
 2           destroy-method="close">
 3         <property name="driverClassName" value="${jdbc-driver}"/>
 4         <property name="url" value="${jdbc-url-1}"/>
 5         <property name="username" value="${jdbc-user-1}"/>
 6         <property name="password" value="${jdbc-password-1}"/>
 7         <property name="filters" value="stat"/>
 8         <property name="maxActive" value="20"/>
 9         <property name="initialSize" value="1"/>
10         <property name="maxWait" value="60000"/>
11         <property name="minIdle" value="1"/>
12         <property name="timeBetweenEvictionRunsMillis" value="3000"/>
13         <property name="minEvictableIdleTimeMillis" value="300000"/>
14         <property name="validationQuery" value="SELECT 'x'"/>
15         <property name="testWhileIdle" value="true"/>
16         <property name="testOnBorrow" value="false"/>
17         <property name="testOnReturn" value="false"/>
18         <property name="poolPreparedStatements" value="true"/>
19         <property name="maxPoolPreparedStatementPerConnectionSize" value="20"/>
20         <property name="connectionInitSqls" value="set names utf8mb4;"/>
21     </bean>
22
23     <bean id="dataSource1" parent="parentDataSource">
24         <property name="url" value="${jdbc-url-1}"/>
25         <property name="username" value="${jdbc-user-1}"/>
26         <property name="password" value="${jdbc-password-1}"/>
27     </bean>
28
29     <bean id="dataSource2" parent="parentDataSource">
30         <property name="url" value="${jdbc-url-2}"/>
31         <property name="username" value="${jdbc-user-2}"/>
32         <property name="password" value="${jdbc-password-2}"/>
33     </bean>
34
35     <bean id="dataSourceMain" parent="parentDataSource">
36         <property name="url" value="${jdbc-url-main}"/>
37         <property name="username" value="${jdbc-user-main}"/>
38         <property name="password" value="${jdbc-password-main}"/>
39     </bean>
40
41     <!-- method 1:  config switch routing db -->
42     <bean id="dataSource" class="com.cnblogs.yjmyzz.utils.RoutingDataSource">
43         <property name="targetDataSources">
44             <map key-type="java.lang.String">
45                 <entry key="${jdbc-key-1}" value-ref="dataSource1"/>
46                 <entry key="${jdbc-key-2}" value-ref="dataSource2"/>
47                 <entry key="${jdbc-key-main}" value-ref="dataSourceMain"/>
48             </map>
49         </property>
50     </bean>
51
52     <bean id="sqlSessionFactory" class="org.mybatis.spring.SqlSessionFactoryBean">
53         <property name="configLocation" value="classpath:mybatis-config.xml"></property>
54         <property name="dataSource" ref="dataSource"/>
55         <property name="mapperLocations">
56             <array>
57                 <value>classpath:mybatis/*.xml</value>
58             </array>
59         </property>
60     </bean>
61
62     <bean id="userScannerConfigurer" class="org.mybatis.spring.mapper.MapperScannerConfigurer">
63         <property name="basePackage" value="com.cnblogs.yjmyzz.mapper.user"/>
64         <property name="sqlSessionFactoryBeanName" value="sqlSessionFactory"/>
65     </bean>
66
67     <!-- method 2: config annotation auto switch-->
68     <bean id="sqlSessionFactoryMain" class="org.mybatis.spring.SqlSessionFactoryBean">
69         <property name="configLocation" value="classpath:mybatis-config.xml"></property>
70         <property name="dataSource" ref="dataSourceMain"/>
71         <property name="mapperLocations">
72             <array>
73                 <value>classpath:mybatis/*.xml</value>
74             </array>
75         </property>
76     </bean>
77
78     <bean id="orderScannerConfigurer" class="org.mybatis.spring.mapper.MapperScannerConfigurer">
79         <property name="basePackage" value="com.cnblogs.yjmyzz.mapper.order"/>
80         <property name="sqlSessionFactoryBeanName" value="sqlSessionFactoryMain"/>
81     </bean>
注意:67-81行,主要是增加了一個單獨的sqlSessionFactoryMain,然後將一個新的MapperScannerConfigurer關聯到它。
新庫裡對應表的Mapper類可以這麼寫:
1 2 3@Resource(name = "orderScannerConfigurer")
public interface OrderEntityMapper extends Mapper<OrderEntity> {
}
注解裡name對應的值,必須與剛才spring文件裡新增的MapperScannerConfigurer對應。
這樣,服務層就可以省去手動切換的代碼了,即:
1 2 3 4 5 6 7 8 9 10 11 12 13 14 15 16 17 18 19 20 21 22 23 24 25 26 27 28 29 30 31 32 33 34 35 36 37 38public class UserServiceImpl implements UserService {
@Autowired
UserEntityMapper userEntityMapper;
@Autowired
OrderEntityMapper orderEntityMapper;
@Override
public void addUser(UserEntity userEntity) {
//switch db
DBContext.setDBKey(DBContext.getDBKeyByUserId(userEntity.getUserId()));
userEntityMapper.insertSelective(userEntity);
}
@Override
public UserEntity getUser(int userId) {
//switch db
DBContext.setDBKey(DBContext.getDBKeyByUserId(userId));
return userEntityMapper.selectByPrimaryKey(userId);
}
@Override
public void addOrder(OrderEntity orderEntity) {
//since orderEntityMapper can auto switch db by annotation
//so we don't need to switch db manually
orderEntityMapper.insertSelective(orderEntity);
}
@Override
public OrderEntity getOrder(int orderId) {
//since orderEntityMapper can auto switch db by annotation
//so we don't need to switch db manually
return orderEntityMapper.selectByPrimaryKey(orderId);
}
}