本篇對於Python操作MySQL主要使用兩種方式:
pymsql是Python中操作MySQL的模塊,其使用方法和MySQLdb幾乎相同。
下載安裝
pip3 install pymysql
使用操作
1、執行SQL
#!/usr/bin/env python
# -*- coding:utf-8 -*-
import pymysql

# 創建連接
conn = pymysql.connect(host='127.0.0.1', port=3306, user='root', passwd='123', db='t1')
# 創建游標
cursor = conn.cursor()

# 執行SQL,並返回收影響行數
effect_row = cursor.execute("update hosts set host = '1.1.1.2'")

# 執行SQL,並返回受影響行數
#effect_row = cursor.execute("update hosts set host = '1.1.1.2' where nid > %s", (1,))

# 執行SQL,並返回受影響行數
#effect_row = cursor.executemany("insert into hosts(host,color_id)values(%s,%s)", [("1.1.1.11",1),("1.1.1.11",2)])


# 提交,不然無法保存新建或者修改的數據
conn.commit()

# 關閉游標
cursor.close()
# 關閉連接
conn.close()
2、獲取新創建數據自增ID
#!/usr/bin/env python
# -*- coding:utf-8 -*-
import pymysql

conn = pymysql.connect(host='127.0.0.1', port=3306, user='root', passwd='123', db='t1')
cursor = conn.cursor()
cursor.executemany("insert into hosts(host,color_id)values(%s,%s)", [("1.1.1.11",1),("1.1.1.11",2)])
conn.commit()
cursor.close()
conn.close()

# 獲取最新自增ID
new_id = cursor.lastrowid
3、獲取查詢數據
#!/usr/bin/env python
# -*- coding:utf-8 -*-
import pymysql

conn = pymysql.connect(host='127.0.0.1', port=3306, user='root', passwd='123', db='t1')
cursor = conn.cursor()
cursor.execute("select * from hosts")

# 獲取第一行數據
row_1 = cursor.fetchone()

# 獲取前n行數據
# row_2 = cursor.fetchmany(3)
# 獲取所有數據
# row_3 = cursor.fetchall()

conn.commit()
cursor.close()
conn.close()
注:在fetch數據時按照順序進行,可以使用cursor.scroll(num,mode)來移動游標位置,如:
4、fetch數據類型
關於默認獲取的數據是元祖類型,如果想要或者字典類型的數據,即:
#!/usr/bin/env python
# -*- coding:utf-8 -*-
import pymysql

conn = pymysql.connect(host='127.0.0.1', port=3306, user='root', passwd='123', db='t1')

# 游標設置為字典類型
cursor = conn.cursor(cursor=pymysql.cursors.DictCursor)
r = cursor.execute("call p1()")

result = cursor.fetchone()

conn.commit()
cursor.close()
conn.close()
SQLAlchemy是Python編程語言下的一款ORM框架,該框架建立在數據庫API之上,使用關系對象映射進行數據庫操作,簡言之便是:將對象轉換成SQL,然後使用數據API執行SQL並獲取執行結果。
安裝:
pip3 install SQLAlchemy
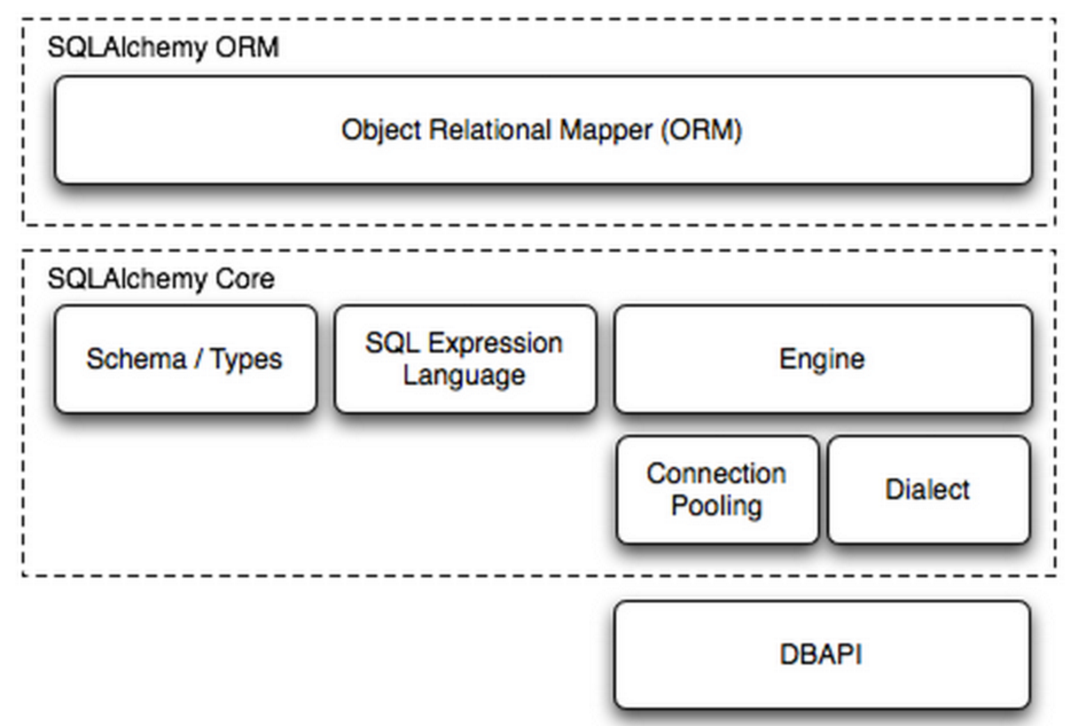
SQLAlchemy本身無法操作數據庫,其必須以來pymsql等第三方插件,Dialect用於和數據API進行交流,根據配置文件的不同調用不同的數據庫API,從而實現對數據庫的操作,如:
MySQL-Python
    mysql+mysqldb://<user>:<password>@<host>[:<port>]/<dbname>

pymysql
    mysql+pymysql://<username>:<password>@<host>/<dbname>[?<options>]

MySQL-Connector
    mysql+mysqlconnector://<user>:<password>@<host>[:<port>]/<dbname>

cx_Oracle
    oracle+cx_oracle://user:pass@host:port/dbname[?key=value&key=value...]

更多詳見:http://docs.sqlalchemy.org/en/latest/dialects/index.html
一、內部處理
使用 Engine/ConnectionPooling/Dialect 進行數據庫操作,Engine使用ConnectionPooling連接數據庫,然後再通過Dialect執行SQL語句。
#!/usr/bin/env python
# -*- coding:utf-8 -*-
from sqlalchemy import create_engine


engine = create_engine("mysql+pymysql://root:123@127.0.0.1:3306/t1", max_overflow=5)

# 執行SQL
# cur = engine.execute(
#     "INSERT INTO hosts (host, color_id) VALUES ('1.1.1.22', 3)"
# )

# 新插入行自增ID
# cur.lastrowid

# 執行SQL
# cur = engine.execute(
#     "INSERT INTO hosts (host, color_id) VALUES(%s, %s)",[('1.1.1.22', 3),('1.1.1.221', 3),]
# )


# 執行SQL
# cur = engine.execute(
#     "INSERT INTO hosts (host, color_id) VALUES (%(host)s, %(color_id)s)",
#     host='1.1.1.99', color_id=3
# )

# 執行SQL
# cur = engine.execute('select * from hosts')
# 獲取第一行數據
# cur.fetchone()
# 獲取第n行數據
# cur.fetchmany(3)
# 獲取所有數據
# cur.fetchall()
二、ORM功能使用
使用 ORM/Schema Type/SQL Expression Language/Engine/ConnectionPooling/Dialect 所有組件對數據進行操作。根據類創建對象,對象轉換成SQL,執行SQL。
1、創建表
#!/usr/bin/env python
# -*- coding:utf-8 -*-
from sqlalchemy.ext.declarative import declarative_base
from sqlalchemy import Column, Integer, String, ForeignKey, UniqueConstraint, Index
from sqlalchemy.orm import sessionmaker, relationship
from sqlalchemy import create_engine

engine = create_engine("mysql+pymysql://root:123@127.0.0.1:3306/t1", max_overflow=5)

Base = declarative_base()

# 創建單表
class Users(Base):
    __tablename__ = 'users'
    id = Column(Integer, primary_key=True)
    name = Column(String(32))
    extra = Column(String(16))

    __table_args__ = (
    UniqueConstraint('id', 'name', name='uix_id_name'),
        Index('ix_id_name', 'name', 'extra'),
    )


# 一對多
class Favor(Base):
    __tablename__ = 'favor'
    nid = Column(Integer, primary_key=True)
    caption = Column(String(50), default='red', unique=True)


class Person(Base):
    __tablename__ = 'person'
    nid = Column(Integer, primary_key=True)
    name = Column(String(32), index=True, nullable=True)
    favor_id = Column(Integer, ForeignKey("favor.nid"))


# 多對多
class Group(Base):
    __tablename__ = 'group'
    id = Column(Integer, primary_key=True)
    name = Column(String(64), unique=True, nullable=False)
    port = Column(Integer, default=22)


class Server(Base):
    __tablename__ = 'server'

    id = Column(Integer, primary_key=True, autoincrement=True)
    hostname = Column(String(64), unique=True, nullable=False)


class ServerToGroup(Base):
    __tablename__ = 'servertogroup'
    nid = Column(Integer, primary_key=True, autoincrement=True)
    server_id = Column(Integer, ForeignKey('server.id'))
    group_id = Column(Integer, ForeignKey('group.id'))


def init_db():
    Base.metadata.create_all(engine)


def drop_db():
    Base.metadata.drop_all(engine)
注:設置外檢的另一種方式 ForeignKeyConstraint(['other_id'], ['othertable.other_id'])
2、操作表

更多功能參見文檔,猛擊這裡下載PDF