第七章 springboot + retrofit,springbootretrofit
retrofit:一套RESTful架構的Android(Java)客戶端實現。
好處:
- 基於注解
- 提供JSON to POJO,POJO to JSON,網絡請求(POST,GET,PUT,DELETE等)封裝
- 可以看做是對HttpClient的再次封裝
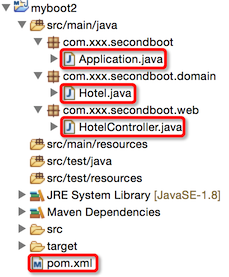
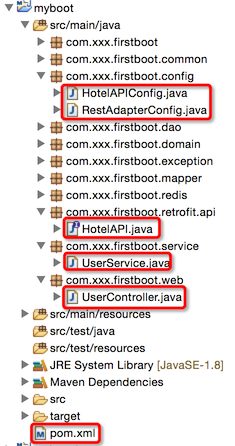
1、為了做測試,建立了一個新的springboot項目"myboot2",項目結構如下:
1.1、pom.xml

![]()
1 <?xml version="1.0" encoding="UTF-8"?>
2 <project xmlns="http://maven.apache.org/POM/4.0.0" xmlns:xsi="http://www.w3.org/2001/XMLSchema-instance"
3 xsi:schemaLocation="http://maven.apache.org/POM/4.0.0 http://maven.apache.org/maven-v4_0_0.xsd">
4
5 <modelVersion>4.0.0</modelVersion>
6
7 <groupId>com.xxx</groupId>
8 <artifactId>myboot2</artifactId>
9 <version>1.0-SNAPSHOT</version>
10
11 <properties>
12 <java.version>1.8</java.version><!-- 官方推薦 -->
13 </properties>
14
15 <parent>
16 <groupId>org.springframework.boot</groupId>
17 <artifactId>spring-boot-starter-parent</artifactId>
18 <version>1.2.5.RELEASE</version>
19 </parent>
20
21 <!-- 引入實際依賴 -->
22 <dependencies>
23 <dependency>
24 <groupId>org.springframework.boot</groupId>
25 <artifactId>spring-boot-starter-web</artifactId>
26 </dependency>
27 <!-- 使用swagger -->
28 <dependency>
29 <groupId>io.springfox</groupId>
30 <artifactId>springfox-swagger2</artifactId>
31 <version>2.2.2</version>
32 </dependency>
33 <dependency>
34 <groupId>io.springfox</groupId>
35 <artifactId>springfox-swagger-ui</artifactId>
36 <version>2.2.2</version>
37 </dependency>
38 </dependencies>
39
40 <build>
41 <plugins>
42 <plugin>
43 <groupId>org.springframework.boot</groupId>
44 <artifactId>spring-boot-maven-plugin</artifactId>
45 </plugin>
46 </plugins>
47 </build>
48 </project>
View Code
1.2、Application.java
![]()
1 package com.xxx.secondboot;
2
3 import org.springframework.boot.SpringApplication;
4 import org.springframework.boot.autoconfigure.SpringBootApplication;
5 import org.springframework.boot.context.embedded.ConfigurableEmbeddedServletContainer;
6 import org.springframework.boot.context.embedded.EmbeddedServletContainerCustomizer;
7
8 import springfox.documentation.swagger2.annotations.EnableSwagger2;
9
10 @SpringBootApplication
11 @EnableSwagger2
12 public class Application implements EmbeddedServletContainerCustomizer{
13
14 public static void main(String[] args) {
15 SpringApplication.run(Application.class, args);
16 }
17
18 /**
19 * EmbeddedServletContainerCustomizer接口的未實現方法
20 * 指定容器的啟動端口,之後再浏覽器輸入localhost:8081/swagger-ui.html即可
21 */
22 public void customize(ConfigurableEmbeddedServletContainer container) {
23 container.setPort(8081);
24 }
25
26 }
View Code
說明:
- 實現了EmbeddedServletContainerCustomizer接口,並實現了其方法customize(ConfigurableEmbeddedServletContainer container),指定了該服務的啟動端口是8081,這樣在服務myboot(啟動端口:8080)啟動時,就不會存在端口沖突問題了.
1.3、Hotel.java
![]()
1 package com.xxx.secondboot.domain;
2
3 public class Hotel {
4 private int id;
5 private String hotelname;
6
7 public Hotel() {
8 }
9
10 public Hotel(int id, String hotelname) {
11 this.id = id;
12 this.hotelname = hotelname;
13 }
14
15 public int getId() {
16 return id;
17 }
18
19 public void setId(int id) {
20 this.id = id;
21 }
22
23 public String getHotelname() {
24 return hotelname;
25 }
26
27 public void setHotelname(String hotelname) {
28 this.hotelname = hotelname;
29 }
30 }
View Code
1.4、HotelController.java
![]()
1 package com.xxx.secondboot.web;
2
3 import java.util.ArrayList;
4 import java.util.List;
5
6 import org.springframework.web.bind.annotation.RequestBody;
7 import org.springframework.web.bind.annotation.RequestMapping;
8 import org.springframework.web.bind.annotation.RequestMethod;
9 import org.springframework.web.bind.annotation.RequestParam;
10 import org.springframework.web.bind.annotation.RestController;
11
12 import com.xxx.secondboot.domain.Hotel;
13
14 import io.swagger.annotations.Api;
15 import io.swagger.annotations.ApiOperation;
16
17 @RestController
18 @RequestMapping("/hotel")
19 @Api("HotelController相關api")
20 public class HotelController {
21
22 @ApiOperation("獲取酒店Hotel信息:getHotelWithQueryParameter")
23 @RequestMapping(value="/getHotelWithQueryParameter",method=RequestMethod.GET)
24 public Hotel getHotelWithQueryParameter(@RequestParam("hotelname") String hotelname) {
25 if(hotelname.equals("nana")){
26 return new Hotel(777, "假日酒店");
27 }
28 return new Hotel(1314, "玫瑰酒店");
29 }
30
31 @ApiOperation("獲取酒店Hotel信息:getHotelList")
32 @RequestMapping(value="/getHotelList",method=RequestMethod.POST)
33 public List<Hotel> getHotelList() {
34 List<Hotel> hotelList = new ArrayList<>();
35 hotelList.add(new Hotel(1314, "玫瑰酒店"));
36 hotelList.add(new Hotel(2046, "2046酒店"));
37 return hotelList;
38 }
39
40 @ApiOperation("獲取酒店Hotel信息:getHotelListWithBody")
41 @RequestMapping(value="/getHotelListWithBody",method=RequestMethod.POST)
42 public List<Hotel> getHotelListWithBody(@RequestBody Hotel hotel) {
43 List<Hotel> hotelList = new ArrayList<>();
44 if(hotel.getHotelname().equals("武林酒店")){
45 hotelList.add(new Hotel(13141, "玫瑰酒店1"));
46 hotelList.add(new Hotel(20461, "2046酒店1"));
47 return hotelList;
48 }
49 hotelList.add(new Hotel(1314, "玫瑰酒店"));
50 hotelList.add(new Hotel(2046, "2046酒店"));
51 return hotelList;
52 }
53 }
View Code
說明:該類提供了三個方法,也是將來myboot服務遠程調用的三個方法。
2、myboot項目基於上一節的結構繼續編寫
2.1、pom.xml
![]()
1 <!-- retrofit -->
2 <dependency>
3 <groupId>com.squareup.retrofit</groupId>
4 <artifactId>retrofit</artifactId>
5 <version>1.9.0</version>
6 </dependency>
View Code
說明:引入retrofit1.9.0依賴,與2.0的差別很大。
2.2、RestAdapterConfig.java
![]()
1 package com.xxx.firstboot.config;
2
3 import org.springframework.context.annotation.Bean;
4 import org.springframework.context.annotation.Configuration;
5
6 import retrofit.RestAdapter;
7
8 @Configuration
9 public class RestAdapterConfig {
10
11 /**
12 * 獲取RestAdapter單例Bean
13 * @return
14 */
15 @Bean
16 public RestAdapter getRestAdapter(){
17 /**
18 * setEndpoint("http://localhost:8081"):指定基本的URL,
19 * API接口中的URL是相對於該URL的路徑的,
20 * 不能少了協議名,例如寫成:localhost:8081就不行
21 */
22 RestAdapter adapter = new RestAdapter.Builder()
23 .setEndpoint("http://localhost:8081")
24 .build();
25 return adapter;
26 }
27
28 }
View Code
說明:
- 使用 @Configuration+@Bean 構建RestAdapter單例。
- 在構建的過程中,一定要有setEndpoint("http://localhost:8081")方法,該方法指定了基本的URL(即:指定協議+IP+port)
2.3、HotelAPI.java
![]()
1 package com.xxx.firstboot.retrofit.api;
2
3 import java.util.List;
4
5 import com.xxx.firstboot.domain.Hotel;
6
7 import retrofit.http.Body;
8 import retrofit.http.GET;
9 import retrofit.http.POST;
10 import retrofit.http.Query;
11
12 public interface HotelAPI {
13
14 /**
15 * GET請求帶查詢參數
16 */
17 @GET("/hotel/getHotelWithQueryParameter")
18 public Hotel getHotelWithQueryParameter(@Query("hotelname") String hotelname);
19
20 /**
21 * POST請求
22 */
23 @POST("/hotel/getHotelList")
24 public List<Hotel> getHotelList();
25
26 /**
27 * POST請求,帶參數JavaBean
28 */
29 @POST("/hotel/getHotelListWithBody")
30 public List<Hotel> getHotelListWithBody(@Body Hotel hotel);
31
32 }
View Code
說明:
- 該接口指定了調用遠程服務的方法的基本路徑與參數以及返回值等
- 路徑都是相對路徑,相對於setEndpoint("http://localhost:8081")指定的路徑
- 方式有@GET/@POST/@PUT/@DELETE等
- 傳遞參數在get方式中可以直接將參數連到URL上去
- 傳遞參數使用@Query(服務被調用方使用@RequestParam接收),路徑中的傳遞參數使用@Path(Restful風格),還可以直接傳遞一個對象@Body(服務被調用方使用@RequestBody接收)
- 依舊要建一個Hotel類,最好與myboot2中的相同,不同也沒關系
2.4、HotelAPIConfig.java
![]()
1 package com.xxx.firstboot.config;
2
3 import org.springframework.beans.factory.annotation.Autowired;
4 import org.springframework.context.annotation.Bean;
5 import org.springframework.context.annotation.Configuration;
6
7 import com.xxx.firstboot.retrofit.api.HotelAPI;
8
9 import retrofit.RestAdapter;
10
11 @Configuration
12 public class HotelAPIConfig {
13 @Autowired
14 private RestAdapter adapter;
15
16 @Bean
17 public HotelAPI getHotelAPI(){
18 return adapter.create(HotelAPI.class);
19 }
20 }
View Code
說明:
- 使用 @Configuration+@Bean 構建HotelAPI單例。
- HotelAPI接口實例是由RestAdapter來構建的,所以需要注入了RestAdapter
經過以上步驟後,之後就可以直接在其他類中注入HotelAPI實例來像普通的bean進行操作了。
2.5、UserService.java
![]()
1 @Autowired
2 private HotelAPI hotelApi;
3
4 public Hotel getHotelFromMyboot2WithQueryParameter(String hotelname){
5 return hotelApi.getHotelWithQueryParameter(hotelname);
6 }
7
8 public List<Hotel> getHotelFromMyboot2List(){
9 return hotelApi.getHotelList();//測試post請求
10 }
11
12 public List<Hotel> getHotelFromMyboot2ListWithBody(Hotel hotel){
13 return hotelApi.getHotelListWithBody(hotel);//測試post請求
14 }
View Code
說明:
- service中注入了HotelAPI實例,使用該實例調用接口方法
- 其實,retrofit的接口的注入和使用與mybatis的注解方式的mapper接口的使用相似
2.6、UserController.java
![]()
1 @Autowired
2 private UserService userService;
3
4 @ApiOperation("獲取酒店信息,測試GETWithQueryParameter")
5 @RequestMapping(value="/getHotelWithQueryParameter",method=RequestMethod.GET)
6 public Hotel getHotel(@RequestParam("hotelname") String hotelname) {
7 return userService.getHotelFromMyboot2WithQueryParameter(hotelname);
8 }
9
10 @ApiOperation("獲取酒店信息,測試POST")
11 @RequestMapping(value="/getHotelList",method=RequestMethod.GET)
12 public List<Hotel> getHotelList() {
13 return userService.getHotelFromMyboot2List();
14 }
15
16 @ApiOperation("獲取酒店信息,測試POST")
17 @RequestMapping(value="/getHotelListWithBody",method=RequestMethod.GET)
18 public List<Hotel> getHotelListWithBody() {
19 return userService.getHotelFromMyboot2ListWithBody(new Hotel(888, "武林酒店"));
20 }
View Code
測試:
首先,啟動服務myboot2,浏覽器輸入"localhost:8081/swagger-ui.html"可以查看服務是否啟動成功。
其次,啟動服務myboot,浏覽器輸入"localhost:8080/swagger-ui.html",再進行相應接口的測試即可。
參考自:
http://www.tuicool.com/articles/26jUZjv