動機
在 UNIX 和 Linux 環境中,您可以使用 mkfifo 命令來創建管道。然後,您可以通過 DB2 LOAD 命令來使用管道。但是,Windows 操作系統不允許您使用類似於 mkfifo 的外部命令來創建指定管道。在 Windows 中,您需要通過 Windows API 來創建指定管道,並且該管道的作用域僅限於創建它時所處的會話。此外,使用 Java 創建的指定管道不能與 Windows shell 交互,因此不能由 DB2 LOAD 命令使用。
本文 下載 部分提供了 pipeload.zip 文件的下載鏈接,其中的示例代碼可幫助您解決此問題。使用該示例代碼,您可以創建供 DB2 LOAD 命令使用的 Windows 管道。為此,您將創建一些 Java Native Interface (JNI) 包裝器,它們可通過 C 程序調用 Windows API 以創建和使用指定管道。然後,您可以使用 Java 程序將數據發送給 Windows 管道。
示例代碼概述
從較高的層面來說,示例代碼使用 Java 驅動程序(TestPipe.java 或 TestUnixPipe.Java)將數據發送給指定管道。然後,db2load.sql 通過單獨命令 shell 中的管道來使用數據。IBM Data Movement Tool 演示了這一概念。
pipeload.zip 下載 文件中各主要文件的描述如下:
Pipe.c — 使用 Windows APIs 創建、使用和關閉 Windows 指定管道的 C 代碼。
Pipes.java — 為 Pipe.c 中使用的所有 Windows 本地方法聲明包裝器的 Java Native Interface (JNI)。
TestPipe.Java — 創建、使用和關閉 Windows 指定管道的 JNI 調用。
TestUnixPipe.Java — 包含對 mkfifo 命令的指紋調用,用於創建、使用和拋棄 UNIX 中的指定管道
db2load.sql — 包含使用管道的 DB2 LOAD 命令。
Windows 中的指定管道
在 Windows 中創建的指定管道並不如在 UNIX 和 Linux 中創建的管道那樣持久,並且您采用與特殊文件相似的方式來創建它們。Windows 指定管道的訪問更像是文件,但管道在 Windows Explorer 中並不可見。Windows 管道將加載到一種特殊的文件系統。您可以使用 Windows SDK 功能(如 CreateFile、ReadFile、 WriteFile 和 CloseHandle)來打開、讀取、寫入和關閉管道。
UNIX 和 Linux 中的指定管道
在 UNIX 或 Linux 中,您可以使用 mkfifo 或 mknod 命令來創建指定管道。兩個獨立的進程可以訪問創建的管道。mkfifo 命令將創建一個 First In First Out (FIFO) 文件。然後,您可以使用此 FIFO 文件將信息從一個應用程序移到另一個應用程序,而不需要將數據存儲在中間文件中。因此,您可以節省原本用於存儲臨時文件的空間。如果為類型指定了 p 選項,則 mknod 命令還將創建一個指定管道。
以下命令示例將通過兩個步驟創建一個指定管道,並在 Unix 或 Linux 環境中載入數據。
步驟 1 — 將創建一個指定管道,並將未壓縮的數據發送給管道:
$ mkfifo db2pipe
$ gunzip tabledata.gz > db2pipe
步驟 2 — 使用管道將未壓縮的數據載入到 DB2:
$ db2 connect to sample
$ db2 "LOAD FROM db2pipe OF DEL INSERT INTO mytable"
$ db2 terminate
使用 JNI 訪問 Windows 本機方法
Pipes.java 程序中的代碼將聲明指回通過 Pipe.c 程序實現的 Windows 本地 API 調用的 Java 方法。您可以通過 javah 程序運行 Pipes.Java 來創建頭文件,其中的 C 程序規范將匹配 C 方法的簽名。
注意,提供 JNI 的完整描述不在本文范圍之內。
清單 1. Pipes.Java 文件中的 JNI 方法聲明
public class Pipes
{
  static
  {
   System.loadLibrary("Pipe");
  }

  public static final native int CreateNamedPipe(String pipeName,
   int ppenMode, int pipeMode, int maxInstances,
  int outBufferSize, int inBufferSize, int defaultTimeOut,
   int securityAttributes);

  public static final native boolean ConnectNamedPipe(int namedPipeHandle,
   int overlapped);
  public static final native int GetLastError();
  public static final native boolean CloseHandle(int bbject);
  public static final native byte[] ReadFile(int file, int numberOfBytesToRead);
  public static final native int WriteFile(int file, byte[] buffer,
   int numberOfBytesToWrite);
  public static final native boolean FlushFileBuffers(int file);
  public static final native boolean DisconnectNamedPipe(int namedPipeHandle);
  public static final native int CreateFile(String fileName,
   int desiredAccess, int shareMode, int securityAttributes,
   int creationDisposition, int flagsAndAttributes,
   int templateFile);

  public static final native boolean WaitNamedPipe(String namedPipeName, int timeOut);
  public static final native String FormatMessage(int errorCode);
  public static final native void Print(String message);
}
創建 JNI 頭文件
使用以下代碼為 Pipes.Java 編譯和創建 JNI 頭文件:
javac ibm/Pipes.Java
Javah -jni ibm.Pipes
將 ibm_Pipes.h 文件從示例代碼復制到 C 程序文件夾中。
封裝 Windows 方法的 C 代碼
清單 2 中的示例 C 代碼來自下載示例中的 Pipe.c 文件。該代碼創建的 C 函數將與您在上一步驟中使用 Javah 程序創建的頭文件中的聲明相匹配。
清單 2. JNI 示例代碼清單
#include <Windows.h>
#include <strsafe.h>
#include <jni.h>
#include "ibm_Pipes.h"

#define DEBUG 0

JNIEXPORT jint JNICALL Java_ibm_Pipes_CreateNamedPipe
(
  JNIEnv *env,
  jclass className,
  JString sPipeName,
  jint dwOpenMode,
  jint dwPipeMode,
  jint nMaxInstances,
  jint nOutBufferSize,
  jint nInBufferSize,
  jint nDefaultTimeOut,
  jint lpSecurityAttributes
 )
{
  HANDLE pipeHandler;
  LPCSTR pipeName;
  pipeName = (*env)->GetStringUTFChars(env, sPipeName, NULL);
  if (pipeName == NULL)
   return -1;

  if (DEBUG)
  {
   printf("Native: Pipe Name %s\n", pipeName);
   printf("Native: dwOpenMode %d\n", dwOpenMode);
   printf("Native: dwPipeMode %d\n", dwPipeMode);
   printf("Native: nMaxInstances %d\n", nMaxInstances);
   printf("Native: nOutBufferSize %d\n", nOutBufferSize);
   printf("Native: nInBufferSize %d\n", nInBufferSize);
   printf("Native: nDefaultTimeOut %d\n", nDefaultTimeOut);
  }

  pipeHandler = CreateNamedPipe((LPCSTR)pipeName, dwOpenMode,
           dwPipeMode, nMaxInstances, nOutBufferSize,
           nInBufferSize, nDefaultTimeOut,
          (LPSECURITY_ATTRIBUTES) lpSecurityAttributes);

  (*env)->ReleaseStringUTFChars(env, sPipeName, pipeName);
  return (jint) pipeHandler;
}

JNIEXPORT jboolean JNICALL Java_ibm_Pipes_ConnectNamedPipe
(
  JNIEnv *env,
  jclass className,
  jint hNamedPipe,
  jint lpOverlapped
 )
{
  BOOL fConnected;
  HANDLE pipeHandler = (HANDLE) hNamedPipe;
  fConnected = ConnectNamedPipe(pipeHandler,
              (LPOVERLAPPED) lpOverlapped);
  return fConnected;
}

JNIEXPORT jint JNICALL Java_ibm_Pipes_GetLastError
(
  JNIEnv *env,
  jclass className
 )
{
  DWord errorNumber = GetLastError();
  return (jint) errorNumber;
}

JNIEXPORT jboolean JNICALL Java_ibm_Pipes_CloseHandle
(
  JNIEnv *env,
  jclass className,
  jint hNamedPipe
 )
{
  BOOL result;
  HANDLE pipeHandler = (HANDLE) hNamedPipe;
  result = CloseHandle(pipeHandler);
  return result;
}

JNIEXPORT jbyteArray JNICALL Java_ibm_Pipes_ReadFile
(
  JNIEnv *env,
  jclass className,
  jint hNamedPipe,
  jint nNumberOfBytesToRead
 )
{
  int bytesRead = 0;
  BOOL result;
  HANDLE pipeHandler = (HANDLE) hNamedPipe;
  LPVOID buffer;
  jbyteArray lpBuffer;

  buffer = (LPVOID)LocalAlloc(LMEM_ZEROINIT, nNumberOfBytesToRead);

  if (DEBUG)
  {
   printf("Native: Before ReadFile pipeHandler %d
     nNumberOfBytesToRead %d\n", pipeHandler, nNumberOfBytesToRead);
  }
  result = ReadFile(pipeHandler, (LPVOID) buffer,
           (DWord) nNumberOfBytesToRead,
           &bytesRead, (LPOVERLAPPED) 0);
  if (result)
  {
   lpBuffer = (*env)->NewByteArray(env, (JSize) bytesRead);
   (*env)->SetByteArrayRegion(env, lpBuffer, 0,
               (JSize) bytesRead, (jbyte *) buffer);
  } else
   bytesRead = 0;

  LocalFree(buffer);

  if (DEBUG)
  {
   printf("Native: After ReadFile BytesRead %d\n", bytesRead);
  }
  return lpBuffer;
}

JNIEXPORT jint JNICALL Java_ibm_Pipes_WriteFile
(
  JNIEnv *env,
  jclass className,
  jint hNamedPipe,
  jbyteArray lpBuffer,
  jint nNumberOfBytesToWrite
 )
{
  int bytesWritten = 0;
  BOOL result;
  HANDLE pipeHandler = (HANDLE) hNamedPipe;
  LPVOID buffer;

  buffer = (LPVOID)LocalAlloc(LMEM_ZEROINIT, nNumberOfBytesToWrite);

  (*env)->GetByteArrayRegion(env, lpBuffer, 0,
          nNumberOfBytesToWrite, buffer);
  result = WriteFile(pipeHandler, buffer,
           (DWord) nNumberOfBytesToWrite,
           (LPDWord) &bytesWritten, (LPOVERLAPPED) 0);
  LocalFree(buffer);

  if (DEBUG)
  {
   printf("Native: After WriteFile BytesReadWritten %d\n",
       bytesWritten);
  }

  if (!result)
  {
   if (GetLastError() != ERROR_IO_PENDING)
     result = 0;
   else
     result = 1;
  }
  if (!result)
  {
   bytesWritten = -1;
  }
  return bytesWritten;
}

JNIEXPORT jboolean JNICALL Java_ibm_Pipes_FlushFileBuffers
(
  JNIEnv *env,
  jclass className,
  jint hNamedPipe
 )
{
  BOOL result;
  HANDLE pipeHandler = (HANDLE) hNamedPipe;
  result = FlushFileBuffers(pipeHandler);
  return result;
}

JNIEXPORT jboolean JNICALL Java_ibm_Pipes_DisconnectNamedPipe
(
  JNIEnv *env,
  jclass className,
  jint hNamedPipe
 )
{
  BOOL result;
  HANDLE pipeHandler = (HANDLE) hNamedPipe;
  result = DisconnectNamedPipe(pipeHandler);
  return result;
}

JNIEXPORT jint JNICALL Java_ibm_Pipes_CreateFile
(
  JNIEnv *env,
  jclass className,
  JString lpFileName,
  jint dwDesiredAccess,
  jint dwShareMode,
  jint lpSecurityAttributes,
  jint dwCreationDisposition,
  jint dwFlagsAndAttributes,
  jint hTemplateFile
 )
{
  HANDLE pipeHandler;
  const jbyte *fileName;
  fileName = (*env)->GetStringUTFChars(env, lpFileName, NULL);
  if (fileName == NULL)
   return -1;
  pipeHandler = CreateFile((LPCSTR) fileName,
              (DWord) dwDesiredAccess, (DWord) dwShareMode,
   (LPSECURITY_ATTRIBUTES) lpSecurityAttributes,
              (DWord) dwCreationDisposition,
              (DWord) dwFlagsAndAttributes,
              (HANDLE) hTemplateFile);
  return (jint) pipeHandler;
}

JNIEXPORT jboolean JNICALL Java_ibm_Pipes_WaitNamedPipe
(
  JNIEnv *env,
  jclass className,
  JString lpNamedPipeName,
  jint nTimeOut
 )
{
  BOOL result;
  const jbyte *pipeName;
  pipeName = (*env)->GetStringUTFChars(env, lpNamedPipeName, NULL);
  if (pipeName == NULL)
   return 0;
  result = WaitNamedPipe((LPCSTR) pipeName, (DWord) nTimeOut);
  return result;
}

JNIEXPORT JString JNICALL Java_ibm_Pipes_FormatMessage
(
  JNIEnv *env,
  jclass className,
  jint errorCode
)
{
  LPVOID lpMsgBuf;
  LPVOID lpDisplayBuf;
  DWORD dw = (DWord) errorCode;

  FormatMessage(
    FORMAT_MESSAGE_ALLOCATE_BUFFER |
    FORMAT_MESSAGE_FROM_SYSTEM |
    FORMAT_MESSAGE_IGNORE_INSERTS,
    NULL,
    dw,
    MAKELANGID(LANG_NEUTRAL, SUBLANG_DEFAULT),
    (LPTSTR) &lpMsgBuf,
    0, NULL );

  lpDisplayBuf = (LPVOID)LocalAlloc(LMEM_ZEROINIT,
    (lstrlen((LPCTSTR)lpMsgBuf) + 40) * sizeof(TCHAR));
  StringCchPrintf((LPTSTR)lpDisplayBuf,
          LocalSize(lpDisplayBuf) / sizeof(TCHAR),
    TEXT("Failed with error %d: %s"), dw, lpMsgBuf);
  return (JString) (*env)->NewStringUTF(env, lpDisplayBuf);
}

JNIEXPORT void JNICALL Java_ibm_Pipes_Print(JNIEnv *env,
                      jclass className,
                      JString lpMsgBuf)
{
  const jbyte *str;
  str = (*env)->GetStringUTFChars(env, lpMsgBuf, NULL);
  if (str == NULL)
   return;
  printf("Native: %s\n", str);
  (*env)->ReleaseStringUTFChars(env, lpMsgBuf, str);
  return;
}
在 Windows 中編譯 C 程序
要編譯和創建動態鏈接庫 (DLL),您需要使用 Windows cl.exe 編譯器。如果還沒有 cl.exe,請下載 Microsoft Visual Studio Express Edition 獲取它。有關如何使用 Visual Studio 來編譯 C 程序的詳細步驟並不在本文的討論范圍之內。但是,您可以在命令行中使用 cl.exe 來創建 DLL,如下所示:
cl -I"C:\Program Files\IBM\Java50\include" -I"C:\Program Files\IBM\Java50\include\win32"
    -LD Pipe.c -FePipe.dll
使用 cl.exe 創建 DLL 時,記住將 ibm_Pipes.h 文件復制到當前目錄,並將到 Java include 目錄的引用替換為系統上該目錄的實際位置。
使用 Windows 管道的示例 Java 程序
使用清單 3 中的代碼在 Windows 上創建一個指定管道(使用在 Pipes.h 頭文件中聲明並在 Pipe.c 代碼中實現的本機方法。)
清單 3. 使用 Windows 管道的示例 TestPipe.Java 程序
package ibm;

import Java.io.File;
import Java.io.FileInputStream;
import Java.io.IOException;
import Java.io.InputStream;

public class TestPipe
{
  static final int ERROR_PIPE_CONNECTED = 535;
  static final int ERROR_BROKEN_PIPE = 109;
  private int namedPipeHandle;
  private String pipeName, srcFile;
  private int pipeBuffer = 131072, fileBuffer = 8192;

  public TestPipe(String pipeName, String srcFile)
  {
   this.pipeName = pipeName;
   this.srcFile = srcFile;
  }

  private void log(String message)
  {
   System.out.println(message);
  }

  private boolean createPipe()
  {
   boolean ok = false;
   namedPipeHandle = Pipes.CreateNamedPipe(pipeName,
        0x00000003, 0x00000000, 2, pipeBuffer,
        pipeBuffer, 0xffffffff, 0);
   if (namedPipeHandle == -1)
   {
     log("CreateNamedPipe failed for " + pipeName +
        " for error " + " Message " +
          Pipes.FormatMessage(Pipes.GetLastError()));
     ok = false;
   } else
   {
     log("Named Pipe " + pipeName +
       " created successfully Handle=" + namedPipeHandle);
     ok = true;
   }
   return ok;
  }

  private boolean connectToPipe()
  {
   log("Waiting for a clIEnt to connect to pipe " + pipeName);
   boolean connected = Pipes.ConnectNamedPipe(namedPipeHandle, 0);
   if (!connected)
   {
     int lastError = Pipes.GetLastError();
     if (lastError == ERROR_PIPE_CONNECTED)
      connected = true;
   }
   if (connected)
   {
     log("Connected to the pipe " + pipeName);
   } else
   {
     log("FalIEd to connect to the pipe " + pipeName);
   }
   return connected;
  }

  public void runPipe()
  {
   if (createPipe())
   {
     if (!connectToPipe())
     {
      log("Connect ConnectNamedPipe failed : " +
         Pipes.FormatMessage(Pipes.GetLastError()));
      return;
     } else
     {
      log("ClIEnt connected.");
     }

     try
     {
      File f1 = new File(this.srcFile);
      InputStream in = new FileInputStream(f1);
      log("Sending data to the pipe");
      byte[] buf = new byte[fileBuffer];
      int len, bytesWritten;
      while ((len = in.read(buf)) > 0)
      {
       bytesWritten = Pipes.WriteFile(namedPipeHandle, buf, len);
       log("Sent " + len + "/" + bytesWritten +
                " bytes to the pipe");
       if (bytesWritten == -1)
       {
         int errorNumber = Pipes.GetLastError();
         log("Error Writing to pipe " +
              Pipes.FormatMessage(errorNumber));
       }
      }
      in.close();
      Pipes.FlushFileBuffers(namedPipeHandle);
      Pipes.CloseHandle(namedPipeHandle);
      Pipes.DisconnectNamedPipe(namedPipeHandle);
      log("Writing to the pipe completed.");
     } catch (Exception e)
     {
      e.printStackTrace();
     }
   }
  }

  public static void main(String[] args) throws IOException,
        InterruptedException
  {
   String pipeName = "\\\\.\\pipe\\mynamedpipe";
   String fileName = "C:\\db2tabledata.txt";;
   TestPipe testPipe = new TestPipe(pipeName, fileName);
   testPipe.runPipe();
  }
}
使用 UNIX 管道的示例 Java 程序
在 UNIX 中,您不需要通過 Java 代碼來調用 C 程序和創建指定管道。這是因為 UNIX 可以直接使用 mkfifo 或 mknod 命令來創建指定管道。清單 4 中的代碼展示了在 UNIX 中使用指定管道的示例。
清單 4. 使用指定 UNIX 管道的示例 TestUnixPipe.Java 程序
package ibm;

import Java.io.File;
import Java.io.FileInputStream;
import Java.io.FileOutputStream;
import Java.io.IOException;
import Java.io.InputStream;
import Java.nio.ByteBuffer;
import Java.nio.channels.FileChannel;

public class TestUnixPipe
{
  FileChannel fc;
  int multiTables[] = new int[1];
  String filesep = System.getProperty("file.separator");
  String fileName, OUTPUT_DIR = ".", pipeName;
  int pipeBuffer = 131072, fileBuffer = 8192;

  public TestUnixPipe(String fileName, String output)
  {
   this.fileName = fileName;
   this.OUTPUT_DIR = output;
   multiTables[0] = 0;
  }

  private void log(String message)
  {
   System.out.println(message);
  }

  public void runPipe()
  {
   int bytesReturn;
   pipeName = OUTPUT_DIR + "data" + filesep + pipeName + ".pipe";
   File pipeFile = new File(pipeName);
   pipeFile.deleteOnExit();
   if (!pipeFile.exists())
   {
     try
     {
      Runtime.getRuntime().exec("mkfifo " +
        pipeFile.getAbsolutePath());
     } catch (Exception e)
     {
      e.printStackTrace();
     }
   }
   FileOutputStream fos = null;
   try
   {
     if (multiTables[0] == 0)
     {
      fos = new FileOutputStream(pipeFile);
      fc = fos.getChannel();
     } else
     {
      fc = fc;
     }
   } catch (Exception e)
   {
     e.printStackTrace();
   }
   try
   {
     File f1 = new File(this.fileName);
     InputStream in = new FileInputStream(f1);
     log("Sending data to the pipe");
     byte[] buf = new byte[fileBuffer];
     int len;
     while ((len = in.read(buf)) > 0)
     {
      bytesReturn = fc.write(ByteBuffer.wrap(buf));
      log("Sent " + len + "/" + bytesReturn +
          " bytes to the pipe");
      if (bytesReturn == -1)
      {
        log("Error Writing to pipe " + pipeName);
      }
     }
     in.close();
     log("Writing to the pipe completed.");
   } catch (Exception e)
   {
     e.printStackTrace();
   }
  }

  public static void main(String[] args) throws IOException,
       InterruptedException
  {
   String output = ".";
   String fileName = "/home/db2inst1/db2tabledata.txt";;
   TestUnixPipe testPipe = new TestUnixPipe(fileName, output);
   testPipe.runPipe();
  }
}
運行 TestPipe.Java 程序以使用 Windows 管道
使用以下命令編譯和運行示例 TestPipe.Java 程序(清單 3)。
javac TestPipe.Java
java -DJava.library.path=".." ibm.TestPipe
在上述示例中,您將 Java.library.path 系統屬性傳遞給 JVM,用於指示 Pipe.dll 的位置,以便於 JVM 通過 Pipe.dll 調用 Windows 本地方法。在本例中,Pipe.dll 位於比當前目錄高一級的目錄中。
運行 TestPipe 時,它將創建一個指定管道 \\.\pipe\mynamedpipe,並連接到該管道。隨後,它將等待另一個程序(在本例中為 DB2 LOAD 命令)連接到它,然後再開始向管道寫入數據。 當 DB2 LOAD 連接到管道之後,Java 程序會開始將 db2tabledata.txt 文件的內容發送給管道以及使用該數據的 DB2 LOAD。
圖 1. 在 Windows 命令提示中運行 Java 示例代碼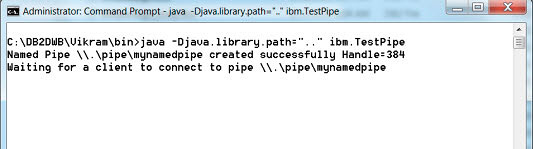
使用管道的 DB2 Load 腳本
如上一節所述,在 TestPipe 程序連接到管道之後,它會等待另一個程序連接到它。要建立這個連接,請運行示例 db2load.sql DB2 腳本(清單 5)。這將創建一個表,並開始調用 LOAD 載入 mynamedpipe。
清單 5. 創建表並啟動 LOAD 的示例 DB2 腳本
CONNECT TO SAMPLE;

CREATE TABLE PIPE_TABLE
(
"ID" NUMBER(10) NOT NULL ,
"NAME" VARCHAR2(35) ,
"LOC_ID" NUMBER(4)
)
;

LOAD FROM
"\\.\pipe\mynamedpipe"
OF DEL
MODIFIED BY CODEPAGE=1208 COLDEL~ ANYORDER
  USEDEFAULTS CHARDEL"" DELPRIORITYCHAR NOROWWARNINGS
METHOD P (1,2,3)
MESSAGES "db2tabledata.txt"
REPLACE INTO PIPE_TABLE
(
"ID",
"NAME",
"LOC_ID"
)
 NONRECOVERABLE
INDEXING MODE AUTOSELECT
;

TERMINATE;
要調用 db2load.sql 腳本,請打開一個 DB2 命令行處理器 (CLP) 窗口並運行以下命令:
db2 -tf db2load.sql
圖 2 表示 db2load.sql 腳本和 TestPipe.java 程序之間的同步處理。注意,當 DB2 LOAD 命令連接到 Windows 指定管道之後,Java 程序會開始將數據寫入到管道。同時,DB2 LOAD 將使用該數據並將其加載到 DB2 中。
圖 2. 運行 db2load.sql 的 DB2 CLP 窗口以及運行 TestPipe.Java(運行 TestPipe)的 Windows 命令提示 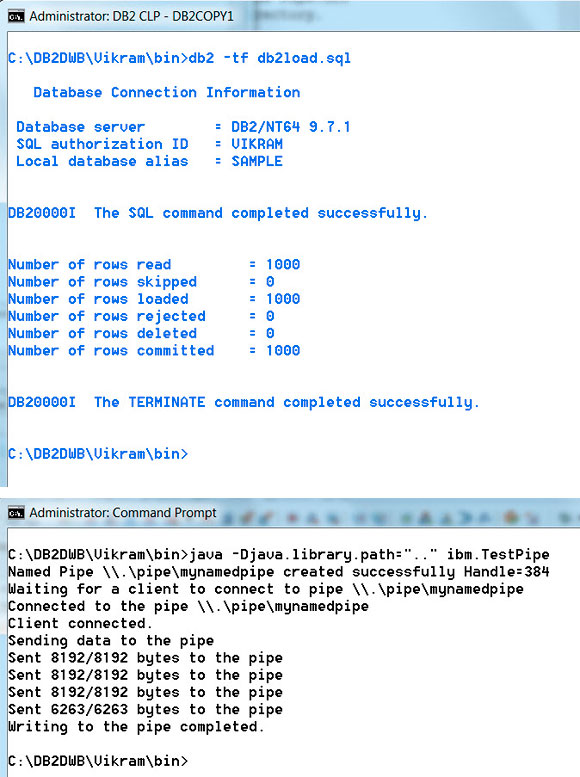
查看原圖(大圖)
運行 TestUnixPipe.Java 程序以使用 UNIX 管道
您可以在 UNIX 系統中運行 TestUnixPipe.Java 程序,並且將看到與上述 Windows 環境相同的行為。當然,不同之處在於,您將使用 UNIX 功能直接創建管道。
通過 IBM Data Movement Tool 來使用管道
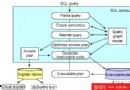
當您需要通過 Java 或 C/C++ 程序來處理數據時,而主要目標是避免使用中間文件時,可以定制並使用本文中的示例代碼。但是,如果您的動機僅僅是使用管道將源數據庫中的數據加載到 DB2,則可以使用 IBM Data Movement Tool 並指定 Use Pipe 選項,如圖 3 所示。
借助 IBM Data Movement Tool,您首先從源數據庫中提取表並創建表定義,然後使用管道選項載入數據。加載操作與卸載操作將同時執行。您可以同時加載和卸載一個或多個表。
圖 3. IBM Data Movement Tool 的屏幕快照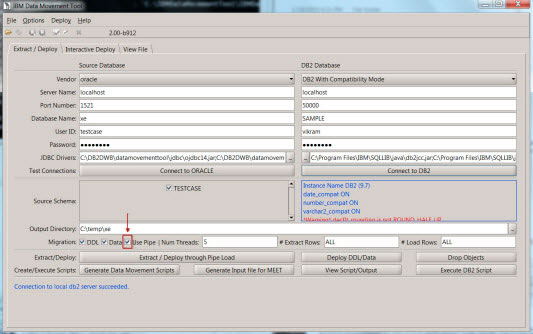
結束語
DB2 LOAD 是一個極為強大的實用工具,可允許您充分利用服務器硬件來加載數據。但是,在大型數據庫環境中,存入中間數據的空間便成了一個問題。您可以使用管道功能來解決此問題。在各平台中使用管道的方法大致相同,就像使用普通文件一樣,只是在 Windows 環境中需要額外創建管道,並且 Java 程序必須使用 JNI 來訪問 Windows API。本文的詳細說明以及示例包括在下載文件中,從而降低了文章的復雜度,並且可幫助您更加輕松地完成此類任務。
本文示例源代碼或素材下載