最近決定學習數據庫,在比較了各個數據庫之後,選擇從mysql入手,主要原因:
•開源
•成熟,通用
•用戶量多,社區完善
•入門簡單
一、下載安裝
mysql的官網下載地址:http://dev.mysql.com/downloads/mysql/
mysql官網有倆種版本可供下載,分別是客戶端版本(Recommended Download,也是官網的推薦版本)和解壓縮版本(Archive)。我這裡選擇的是解壓縮版本,點擊download進行下載,下載完畢後直接將壓縮包解壓到您想要安裝mysql的目標路徑即可。
我下載的是5.7.13版本,解壓後,得到一個mysql-5.7.13-winx64的文件夾,它包含如下文件:
2016/07/18 14:34 <DIR> .
2016/07/18 14:34 <DIR> ..
2016/07/18 14:34 <DIR> bin
2016/05/25 13:50 17,987 COPYING
2016/07/18 14:34 <DIR> docs
2016/07/18 14:33 <DIR> include
2016/07/18 14:34 <DIR> lib
2016/05/25 14:08 1,141 my-default.ini
2016/05/25 13:50 2,478 README
2016/07/18 14:34 <DIR> share
3 個文件 21,606 字節
7 個目錄 118,994,726,912 可用字節
至此,下載安裝完畢
二、配置mysql
1.配置my.ini
我這裡將mysql-5.7.13-winx64文件重命名為mysql(原文件名太長了),該文件下的my-default.ini是默認的配置文件,我們這裡需要自己重新實現配置:將my-default.ini復制一份並重命名為my.ini,並將最將basedir、datadir等參數的文件目錄替換成你自己mysql所在目錄的路徑。
 # For advice on how to change settings please see
 # http://dev.mysql.com/doc/refman/5.7/en/server-configuration-defaults.html
 # *** DO NOT EDIT THIS FILE. It's a template which will be copied to the
 # *** default location during install, and will be replaced if you
 # *** upgrade to a newer version of MySQL.
 [mysqld]

# Remove leading # and set to the amount of RAM for the most important data
# cache in MySQL. Start at 70% of total RAM for dedicated server, else 10%.
# innodb_buffer_pool_size = 128M

# Remove leading # to turn on a very important data integrity option: logging
# changes to the binary log between backups.
# log_bin

# These are commonly set, remove the # and set as required.
basedir = C:\mysql
datadir = C:\mysql\data
# port = .....
# server_id = .....


# Remove leading # to set options mainly useful for reporting servers.
# The server defaults are faster for transactions and fast SELECTs.
# Adjust sizes as needed, experiment to find the optimal values.
# join_buffer_size = 128M
# sort_buffer_size = 2M
# read_rnd_buffer_size = 2M

sql_mode=NO_ENGINE_SUBSTITUTION,STRICT_TRANS_TABLES
我這裡的mysql文件放在c盤下,所以只要把上面文件中“c:/mysql”的地方填入你自己的文件路徑就ok了。
2.配置環境變量
將你的mysql bin文件夾的路徑添加到PATH中,很簡單,不多說了。
三、運行mysql
以管理員身份運行cmd(一定要用管理員身份運行),並進入到mysql的bin文件中
mysqld --remove
mysqld --install
mysqld --initialize //會生成一個data文件夾
net start mysql //啟動mysql服務
依次執行這三個命令後,打開data文件夾,找到其下error文件類型的文件打開,該文件是本次mysql初始化的log日志,包括初始化密碼。如果顯示“root@localhost is created with an empty password !”,則為空。然後執行
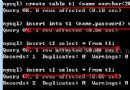
mysql -uroot -p
輸入用戶名和密碼,顯示“ Type 'help;' or '\h' for help. Type '\c' to clear the current input statement. ”,則表示連接成功。
四、登錄出錯
如果登錄的時候存在問題,顯示“ Access denied for user 'root'@'localhost'”,可以嘗試重新設置設置root密碼:
1.修改/my.ini文件,在[mysqld]下添加 skip-grant-tables , 再啟動mysql
2.然後用空密碼方式使用root用戶登錄 MySQL;
mysql -u root
3.修改root用戶的密碼;
 mysql> update mysql.user set password=PASSWORD('新密碼') where User='root'
mysql> flush privileges;
mysql> quit
4.重新啟動MySQL,就可以使用新密碼登錄了。
以上就是本文的全部內容,希望對大家的學習有所幫助,也希望大家多多支持。