這篇博文接著上篇文章《使用 python 管理 mysql 開發工具箱 - 1》,繼續寫下自己學習 python 管理 MySQL 中的知識記錄。
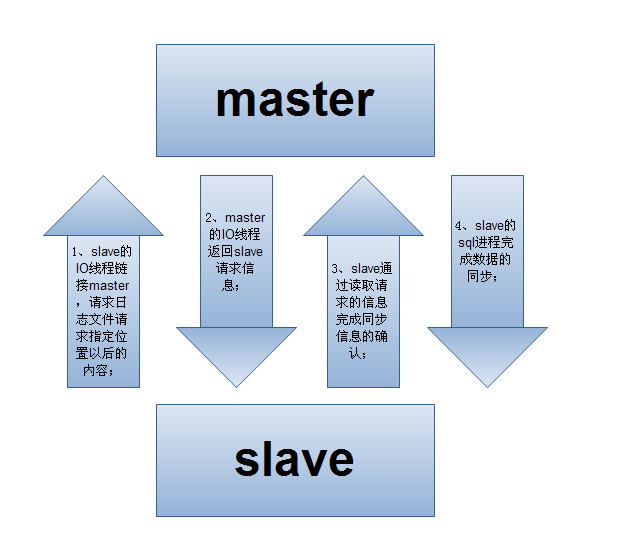
學習完 MySQL 主從復制之後,可以考慮實現 MySQL 的讀寫分離,從而提高 MySQL 系統的整體性能。具體控制讀寫的路由功能可以交給應用程序或者MySQL-Proxy 程序來實現。讀寫分離其實就是讓 Client 寫入 master,而讀數據從 slave 節點,這樣減少了 master 既寫又讀的壓力。這裡沒有具體介紹如何實現讀寫分離的功能,後續研究一下 MySQL Proxy 程序,這是 MySQL 官方提供的實現讀寫分離的程序。
1. 使用 DNS 來實現負載均衡
往往 slave 節點是多個,實現 slave 節點的負載均衡是非常重要的。其實可以采用 dns 的功能,一個域名指向多個 slave 的 IP 地址,這樣 Client 每次解析到的 slave 地址都是平均分布的,簡單的實現了負載均衡的功能。
2. 健康檢查監控
我們自己需要實現一個監控程序,檢查 slave 的健康情況,包括如下幾個方面:
監控程序掃描所有 slave 節點,判斷上述指標,把健康的 slave 節點加入到 DNS 解析記錄裡邊,有問題的剔除出去。
1. 安裝 rpm 包
[root@vip ~]# yum install bind -y
2. 修改配置文件named.conf
options {
    listen-on port 53 { any; };    # 修改為any
    listen-on-v6 port 53 { ::1; };
    ... ... ... ...
    allow-query     { any; };      # 修改為any
添加內容:
zone "example.com" IN {
    type master;
    file "example.com.zone";
};
3. 添加設置區域zone文件
[root@vip ~]# vim /var/named/example.com.zone     # 添加如下內容
$TTL 1D
@   IN SOA  ns.example.com. root.example.com. (
                    0   ; serial
                    1D  ; refresh
                    1H  ; retry
                    1W  ; expire
                    3H ); minimum
    NS  ns.example.com.
ns  A   192.168.0.8
www A   192.168.0.2
4. 啟動named服務
[root@vip ~]# service named start
5. 測試dns解析
[root@vip ~]# host www.example.com. localhost
Using domain server:
Name: localhost
Address: :: 1 #53
Aliases:     # 成功解析OK。
www.example.com has address 192.168.0.2
DNS動態更新必要性:
考慮:類似keepalived的健康檢查。
1. 生成key文件
[root@vip ~]# dnssec-keygen -a HMAC-MD5 -b 256 -n HOST -r /dev/urandom dnskey
生成 2 個文件:
[root@vip ~]# ls Kexample.com.+157+46922.*
Kexample.com.+157+46922.key  Kexample.com.+157+46922.private
2. 修改配置文件named.conf,讓dns支持更新:添加如下代碼
key "example.com" {    # 該key為新增加內容
    algorithm HMAC-MD5;
    secret "25z/5wjwD4GsMgQluWagfkQ9TSqpoJzYbh/I/QEZo2M=";   # secret內容參考Kexample.com.+157+46922.key文件內容
};

zone "example.com" IN {
    type master;
    file "example.com.zone";
    allow-update { key "example.com"; };   # 增加一行
};
3. 創建update.txt文件
使用nsupdate前需要創建個文件,告訴nsupdate怎麼樣去更新update.txt,內容如下:
server 127.0.0.1
debug yes
zone example.com.
update delete s.db.example.com. A
update add s.db.example.com. 86499 A 192.168.0.1
update add s.db.example.com. 86499 A 192.168.0.2
update add s.db.example.com. 86499 A 192.168.0.8
update add s.db.example.com. 86499 A 127.0.0.1
show
send
4. 賦予/var/named目錄寫權限
chmod g+w /var/named
5. 手動更新dns記錄
[root@vip ~]# nsupdate -k Kdnskey.+157+42183.key update.txt
6. 驗證
[root@vip ~]# host s.db.example.com localhost
Using domain server:
Name: localhost
Address: ::1#53
Aliases:
s.db.example.com has address 192.168.0.1
s.db.example.com has address 192.168.0.2
s.db.example.com has address 192.168.0.8
s.db.example.com has address 127.0.0.1
7. 問題總結
需要使用到 dnspython 模塊,需要執行 pip install dnspython 安裝此模塊。
參考:http://blog.chinaunix.net/uid-24690947-id-1747409.html
代碼參考:
# 動態更新dns記錄
def dnsUpdate(zone, name, rdlist):
    key = dns.tsigkeyring.from_text({zone:keyring})
    up = dns.update.Update(zone, keyring=key)
    rdata_list = [dns.rdata.from_text(dns.rdataclass.IN, dns.rdatatype.A, i) for i in rdlist]
    ttl = 60
    rdata_set  = dns.rdataset.from_rdata_list(ttl, rdata_list)
    up.replace(name, rdata_set)
    q = dns.query.tcp(up, '127.0.0.1')
# 調用
dnsUpdate('example.com', 's.db', alive)
按照檢查的要求,對 slave 進行健康檢查,代碼如下:
#!/usr/bin/env python
#encoding: utf-8

import MySQLdb

# 通過shell命令獲取key列表格式
# mysql -S /tmp/slave01.sock -e "show slave status\G" | awk -F: 'NR!=1{print $1}' | awk '{printf "\""$1"\",\n"}' > a.txt
keys = (
    "Slave_IO_State",
    "Master_Host",
    "Master_User",
    "Master_Port",
    "Connect_Retry",
    "Master_Log_File",
    "Read_Master_Log_Pos",
    "Relay_Log_File",
    "Relay_Log_Pos",
    "Relay_Master_Log_File",
    "Slave_IO_Running",
    "Slave_SQL_Running",
    "Replicate_Do_DB",
    "Replicate_Ignore_DB",
    "Replicate_Do_Table",
    "Replicate_Ignore_Table",
    "Replicate_Wild_Do_Table",
    "Replicate_Wild_Ignore_Table",
    "Last_Errno",
    "Last_Error",
    "Skip_Counter",
    "Exec_Master_Log_Pos",
    "Relay_Log_Space",
    "Until_Condition",
    "Until_Log_File",
    "Until_Log_Pos",
    "Master_SSL_Allowed",
    "Master_SSL_CA_File",
    "Master_SSL_CA_Path",
    "Master_SSL_Cert",
    "Master_SSL_Cipher",
    "Master_SSL_Key",
    "Seconds_Behind_Master",
    "Master_SSL_Verify_Server_Cert",
    "Last_IO_Errno",
    "Last_IO_Error",
    "Last_SQL_Errno",
    "Last_SQL_Error",
)

# 模擬一下slave節點列表, 設置注意實驗時設置某些實例為不健康狀態
conf = {
    'master':'127.0.0.1:3306',
    'slave':[
            '127.0.0.1:3307',
            '192.168.0.8:3307',
            '127.0.0.1:3308',
            '192.168.0.8:3308',
            '127.0.0.1:3309',
            '192.168.0.8:3309',
    ]
}

# 檢查slave節點的狀態是否正常
def checkSlaveStatus(host, port):
    try:
        conn = MySQLdb.connect(host=host, port=port, user='root', connect_timeout=1)
    except Exception, e:
        print e
        return False
    cur = conn.cursor()
    cur.execute('show slave status')
    data = cur.fetchall()    # 只獲取到了冒號後邊的value, key沒有獲取到, 和sql shell顯示不同.

    # 將keys和data組合為字典的結構
    data = dict(zip(keys, data[0]))

    # IO/SQL Running 是否正常
    if data['Slave_IO_Running'] == 'No' or data['Slave_SQL_Running'] == 'No':
        return False
    elif data['Seconds_Behind_Master'] > 2:  # 主從復制時間持續超過2秒, 太慢了
        return False

    # 到這裡肯定是沒問題的了
    return True

# 將ip:port解析為主機+端口
def parseIP(s):
    host, port = s.split(':')
    return host, int(port)

if __name__ == '__main__':
    #host = '127.0.0.1' # 寫IP好像連不上, 需要授權相應的主機
    #port = 3307
    alive = []
    for ip in conf['slave']:
        host, port = parseIP(ip)
        print checkSlaveStatus(host, port)
對 slave 健康狀態檢查後,將健康的節點列表記錄,更新到 DNS 記錄中。代碼如下:
#!/usr/bin/env python
#encoding: utf-8

import MySQLdb
import dns.query
import dns.update
import dns.tsigkeyring

# 通過shell命令獲取key列表格式
# mysql -S /tmp/slave01.sock -e "show slave status\G" | awk -F: 'NR!=1{print $1}' | awk '{printf "\""$1"\",\n"}' > a.txt
keys = (
    "Slave_IO_State",
    "Master_Host",
    "Master_User",
    "Master_Port",
    "Connect_Retry",
    "Master_Log_File",
    "Read_Master_Log_Pos",
    "Relay_Log_File",
    "Relay_Log_Pos",
    "Relay_Master_Log_File",
    "Slave_IO_Running",
    "Slave_SQL_Running",
    "Replicate_Do_DB",
    "Replicate_Ignore_DB",
    "Replicate_Do_Table",
    "Replicate_Ignore_Table",
    "Replicate_Wild_Do_Table",
    "Replicate_Wild_Ignore_Table",
    "Last_Errno",
    "Last_Error",
    "Skip_Counter",
    "Exec_Master_Log_Pos",
    "Relay_Log_Space",
    "Until_Condition",
    "Until_Log_File",
    "Until_Log_Pos",
    "Master_SSL_Allowed",
    "Master_SSL_CA_File",
    "Master_SSL_CA_Path",
    "Master_SSL_Cert",
    "Master_SSL_Cipher",
    "Master_SSL_Key",
    "Seconds_Behind_Master",
    "Master_SSL_Verify_Server_Cert",
    "Last_IO_Errno",
    "Last_IO_Error",
    "Last_SQL_Errno",
    "Last_SQL_Error",
)

# 模擬一下slave節點列表, 設置注意實驗時設置某些實例為不健康狀態
conf = {
    'master':'127.0.0.1:3306',
    'slave':[
            '127.0.0.1:3307',
            '192.168.0.8:3307',
            '127.0.0.1:3308',
            '192.168.0.8:3308',
            '127.0.0.1:3309',
            '192.168.0.8:3309',
    ]
}

keyring = '25z/5wjwD4GsMgQluWagfkQ9TSqpoJzYbh/I/QEZo2M='

# 檢查slave節點的狀態是否正常
def checkSlaveStatus(host, port):
    try:
        conn = MySQLdb.connect(host=host, port=port, user='root', connect_timeout=1)
    except Exception, e:
        print e
        return False
    cur = conn.cursor()
    cur.execute('show slave status')
    data = cur.fetchall()    # 只獲取到了冒號後邊的value, key沒有獲取到, 和sql shell顯示不同.

    # 將keys和data組合為字典的結構
    data = dict(zip(keys, data[0]))

    # IO/SQL Running 是否正常
    if data['Slave_IO_Running'] == 'No' or data['Slave_SQL_Running'] == 'No':
        return False
    elif data['Seconds_Behind_Master'] > 2:  # 主從復制時間持續超過2秒, 太慢了
        return False

    # 到這裡肯定是沒問題的了
    return True

# 將ip:port解析為主機+端口
def parseIP(s):
    host, port = s.split(':')
    return host, int(port)


# 動態更新dns記錄
def dnsUpdate(zone, name, rdlist):
    key = dns.tsigkeyring.from_text({zone:keyring})
    up = dns.update.Update(zone, keyring=key)
    rdata_list = [dns.rdata.from_text(dns.rdataclass.IN, dns.rdatatype.A, i) for i in rdlist]
    ttl = 60
    rdata_set  = dns.rdataset.from_rdata_list(ttl, rdata_list)
    up.replace(name, rdata_set)
    q = dns.query.tcp(up, '127.0.0.1')
    #print q


if __name__ == '__main__':
    #host = '127.0.0.1' # 寫IP好像連不上, 需要授權相應的主機
    #port = 3307
    alive = []
    for ip in conf['slave']:
        host, port = parseIP(ip)
        if checkSlaveStatus(host, port):
            alive.append(host)
    # 解釋下這裡為什麼要設置slave的alive集群阈值
    # 如果不設置阈值, 那麼存在健康的slave過少, 會導致slave的雪崩現象
    # 反而會影響服務的正常運行, 保證只有在一定數量情況下才更新dns記錄.
    if float(len(alive))/len(conf['slave']) > 0.6:
        dnsUpdate('example.com', 's.db', alive)


# 注意:
# 1. dns服務一定要保證/var/named目錄組用戶有寫的權限
# 2. iptables 和 selinux 一定要設置好, 最好設置為關閉狀態.
通過上邊的代碼已經實現了 slave 的健康檢查,DNS 的動態更新。現在可以做一下測試:
> 執行:
[root@vip mysqlmanager]# python mysql_dns_monitor.py
> 結果:
[root@vip mysqlmanager]# host s.db.example.com localhost
Using domain server:
Name: localhost
Address: ::1#53
s.db.example.com has address 127.0.0.1   # 已經更新了記錄
s.db.example.com has address 192.168.0.8 # 更新了記錄,並解析到ip地址,表明已經成功OK.
> 擴展:
其實可以准備幾台獨立的虛擬機來做測試,每台虛擬機作為要給 slave 節點,模擬一些健康問題,看是否能夠正確檢測並更新到。
待更新。。。。