試驗環境:
master:192.168.1.210(CentOS6.5)
slave:192.168.1.211(CentOS6.5)
VIP:192.168.1.208
MySQL主主互備模式配置
step1:Master服務的/etc/my.cnf配置
[mysqld]
basedir=/usr/local/mysql
datadir=/var/lib/mysql
port=3306
socket=/var/lib/mysql/mysql.sock

server_id=1
log-bin=mysql-bin
relay-log=mysql-relay-bin
replicate-wild-ignore-table=mysql.%#指定不需要復制的庫,mysql.%表示mysql庫下的所有對象
replicate-wild-ignore-table=test.%
replicate-wild-ignore-table=information_schema.%
step2:Slave服務的/etc/my.cnf配置
[mysqld]
basedir=/usr/local/mysql
datadir=/var/lib/mysql
port=3306
socket=/var/lib/mysql/mysql.sock

server_id=2
log-bin=mysql-bin
relay-log=mysql-relay-bin
replicate-wild-ignore-table=mysql.%
replicate-wild-ignore-table=test.%
replicate-wild-ignore-table=information_schema.%
step3:重啟兩台主從mysql服務
[root@master~]#servicemysqldrestart
ShuttingdownMySQL..[OK]
StartingMySQL.[OK]
[root@slave~]#servicemysqldrestart
ShuttingdownMySQL..[OK]
StartingMySQL.[OK]
step4:查看主從的log-bin日志狀態
記錄File和Position的值
[root@master~]#mysql-uroot-ppasswd-e'showmasterstatus'
Warning:Usingapasswordonthecommandlineinterfacecanbeinsecure.
+------------------+----------+--------------+------------------+-------------------+
|File|Position|Binlog_Do_DB|Binlog_Ignore_DB|Executed_Gtid_Set|
+------------------+----------+--------------+------------------+-------------------+
|mysql-bin.000001|414||||
+------------------+----------+--------------+------------------+-------------------+
[root@slave~]#mysql-uroot-ppasswd-e'showmasterstatus'
Warning:Usingapasswordonthecommandlineinterfacecanbeinsecure.
+------------------+----------+--------------+------------------+-------------------+
|File|Position|Binlog_Do_DB|Binlog_Ignore_DB|Executed_Gtid_Set|
+------------------+----------+--------------+------------------+-------------------+
|mysql-bin.000001|414||||
+------------------+----------+--------------+------------------+-------------------+
step5:創建主從同步replication用戶
1、master
mysql>grantreplicationslaveon*.*to'replication'@'192.168.1.%'identifiedby'replication';
mysql>flushprivileges;
mysql>changemasterto
->master_host='192.168.1.211',
->master_user='replication',
->master_password='replication',
->master_port=3306,
->master_log_file='mysql-bin.000001',
->master_log_pos=414;
mysql>startslave;
2、slave
mysql>grantreplicationslaveon*.*to'replication'@'192.168.1.%'identifiedby'replication';
mysql>flushprivileges;
mysql>changemasterto
->master_host='192.168.1.210',
->master_user='replication',
->master_password='replication',
->master_port=3306,
->master_log_file='mysql-bin.000001',
->master_log_pos=414;
mysql>startslave;
同步失敗可能需要停止或重設slave
mysql> stop slave;
mysql> reset slave;
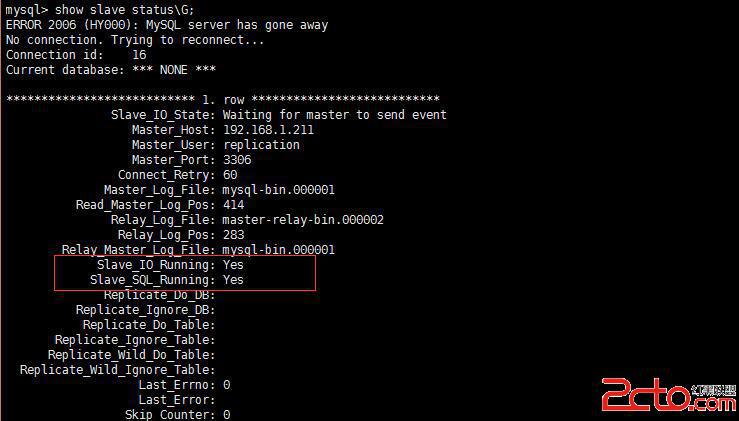
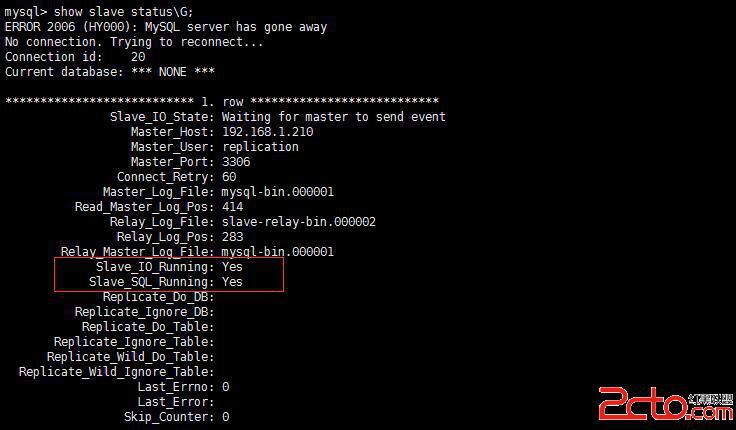
step6:分別在master和slave上查看slave狀態,驗證是否成功配置主主復制模式
1、master

2、slave

slave狀態同步過程可能需要重啟MySQL服務
[root@master ~]# service mysqld restart[root@slave ~]# service mysqld restart
step7:驗證,在master上創建test1數據庫,slave上查看是否同步
1、master上創建test1數據庫
[root@master~]#mysql-uroot-ppasswd-e'createdatabasetest1'
2、slave上查看是否同步創建test1
[root@slave~]#mysql-uroot-ppasswd-e'showdatabases'
+--------------------+
|Database|
+--------------------+
|information_schema|
|mysql|
|performance_schema|
|test1|
+--------------------+
安裝和配置keepalived實現MySQL雙主高可用
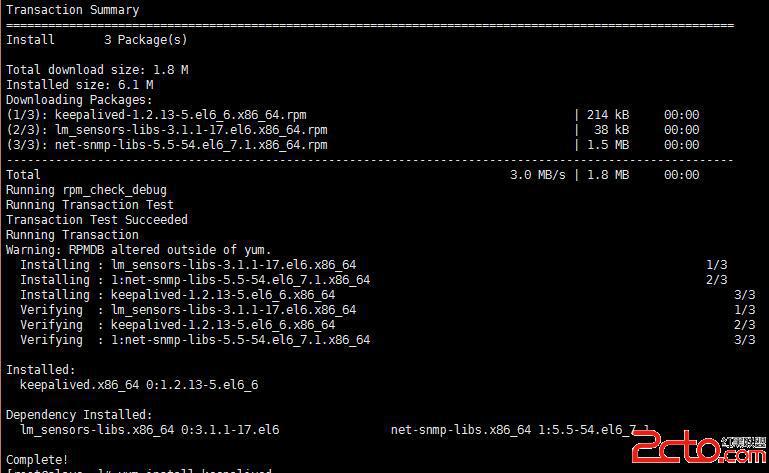
step1:安裝keepalived
方法一:使用yum安裝keepalived,需要安裝epel-release源
[root@master ~]# rpm -ivh http://mirrors.opencas.cn/epel/6/i386/epel-release-6-8.noarch.rpm[root@slave ~]# rpm -ivh http://mirrors.opencas.cn/epel/6/i386/epel-release-6-8.noarch.rpm
[root@slave ~]# yum -y install keepalived

查看keepalived相關目錄
[root@slave~]#ls/usr/sbin/keepalived
/usr/sbin/keepalived
[root@slave~]#ls/etc/init.d/keepalived
/etc/init.d/keepalived
[root@slave~]#ls/etc/keepalived/keepalived.conf
/etc/keepalived/keepalived.conf
方法二:從keepalived官方網站http://www.keepalived.org下載源代碼包編譯安裝
1、下載keepalived最新版
[root@master ~]# wget http://www.keepalived.org/software/keepalived-1.2.19.tar.gz
[root@slave ~]# wget http://www.keepalived.org/software/keepalived-1.2.19.tar.gz
2、安裝keepalived依賴軟件包
[root@master ~]# yum install pcre-devel openssl-devel popt-devel libnl-devel
3、解壓並安裝keepalived
[root@master~]#tarzxfkeepalived-1.2.19.tar.gz
[root@master~]#cdkeepalived-1.2.19

[[email protected]]#./configure--prefix=/usr/local/keepalived
--sysconf=/etc--with-kernel-dir=/usr/src/kernels/2.6.32-431.el6.x86_64

[[email protected]]#make
[[email protected]]#makeinstall
查看keepalived相關的文件
[[email protected]]#ls/etc/keepalived/
keepalived.confsamples
[[email protected]]#ls/etc/init.d/keepalived
/etc/init.d/keepalived
鏈接/usr/local/keepalived/sbin/keepalived到/sbin/目錄
[[email protected]]#ln-s/usr/local/keepalived/sbin/keepalived/sbin/
設置keepalived啟動級別
[[email protected]]#chkconfig--addkeepalived
[[email protected]]#chkconfig--level35keepalivedon
step2:配置keepalived
1、Master的keepalived.conf配置文件
!ConfigurationFileforkeepalived

global_defs{
notification_email{
[email protected]
[email protected]
}
notification_email_fromkeepalived@localhost
smtp_server127.0.0.1
smtp_connect_timeout30
router_idLVS_DEVEL
}

vrrp_instanceHA_1{
stateBACKUP#master和slave都配置為BACKUP
interfaceeth0#指定HA檢測的網絡接口
virtual_router_id80#虛擬路由標識,主備相同
priority100#定義優先級,slave設置90
advert_int2#設定master和slave之間同步檢查的時間間隔
nopreempt#不搶占模式。只在優先級高的機器上設置即可
authentication{
auth_typePASS
auth_pass1111
}

virtual_ipaddress{#設置虛擬IP,可以設置多個,每行一個
192.168.1.208/24deveth0#MySQL對外服務的IP,即VIP
}
}

virtual_server192.168.1.2083306{
delay_loop2
lb_algorr
lb_kinfDR
persistence_timeout50
protocolTCP

real_server192.168.1.2103306{#監聽本機的IP
weight3
notify_down/usr/local/keepalived/bin/mysql.sh
TCP_CHECK{
connect_timeout8
nb_get_retry3
delay_before_retry3
connect_port3306
}
}

}
keepalived檢測腳本,當其中一台MySQL服務出現故障down掉時,實現自動切換到正常的MySQL服務器繼續提供服務
[root@master~]#vim/usr/local/keepalived/bin/mysql.sh
#!/bin/bash
pkillkeepalived
2、Slave的keepalived.conf配置文件
!ConfigurationFileforkeepalived

global_defs{
notification_email{
[email protected]
[email protected]
}
notification_email_fromkeepalived@localhost
smtp_server127.0.0.1
smtp_connect_timeout30
router_idLVS_DEVEL
}

vrrp_instanceHA_1{
stateBACKUP#master和slave都配置為BACKUP
interfaceeth0#指定HA檢測的網絡接口
virtual_router_id80#虛擬路由標識,主備相同
priority90#定義優先級,slave設置90
advert_int2#設定master和slave之間同步檢查的時間間隔
authentication{
auth_typePASS
auth_pass1111
}

virtual_ipaddress{#設置虛擬IP,可以設置多個,每行一個
192.168.1.208/24deveth0#MySQL對外服務的IP,即VIP
}
}

virtual_server192.168.1.2083306{
delay_loop2
lb_algorr
lb_kinfDR
persistence_timeout50
protocolTCP

real_server192.168.1.2113306{#監聽本機的IP
weight3
notify_down/usr/local/mysql/bin/mysql.sh
TCP_CHECK{
connect_timeout8
nb_get_retry3
delay_before_retry3
connect_port3306
}
}

}
step3:授權VIP的root用戶權限
授權遠程主機可以通過VIP登錄MySQL,並測試數據復制功能
mysql>grantallon*.*toroot@'192.168.1.208'identifiedby'741616710';
mysql>flushprivileges;
step4:測試keepalived高可用功能
1、遠程主機登錄通過VIP192.168.1.208登錄MySQL,查看MySQL連接狀態
mysql>showvariableslike'hostname%';
+---------------+--------+
|Variable_name|Value|
+---------------+--------+
|hostname|master|
+---------------+--------+
1rowinset(0.00sec)

從上面查看的結果看樣看出在正常情況下連接的是master
2、故障測試,停止master的MySQL服務,再次查看是否轉移至slave服務器上
[root@master~]#servicemysqldstop
ShuttingdownMySQL....SUCCESS!
mysql>showvariableslike'hostname%';
ERROR2013(HY000):LostconnectiontoMySQLserverduringquery
mysql>showvariableslike'hostname%';
ERROR2006(HY000):MySQLserverhasgoneaway
Noconnection.Tryingtoreconnect...
Connectionid:1268
Currentdatabase:***NONE***

+---------------+-------+
|Variable_name|Value|
+---------------+-------+
|hostname|slave|
+---------------+-------+
1rowinset(0.01sec)

由測試結果可以看出,keepalived成功轉移MySQL服務