MySQL雙主配置
准備環境:服務器操作系統為RHEL6.4 x86_64,為最小化安裝。主機A和主機B均關閉防火牆和SELINUX ,IP地址分別為192.168.131.129和192.168.131.130,MySQL版本為5.6.26,為通用二進制包。
安裝MySQL
1.主機A操作
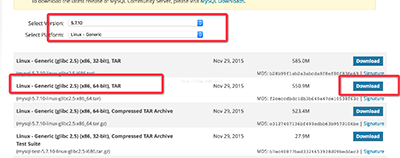
# tar xf mysql-5.6.26-linux-glibc2.5-x86_64.tar.gz
# mv mysql-5.6.26-linux-glibc2.5-x86_64 /usr/local/mysql
# useradd -M -s /sbin/nologin mysql
# chown -R root:root /usr/local/mysql/*
# chown -R mysql:mysql /usr/local/mysql/data/
# yum -y install libaio
# cd /usr/local/mysql/scripts/
# ./mysql_install_db --datadir=/usr/local/mysql/data/ --user=mysql --basedir=/usr/local/mysql/
# cp /usr/local/mysql/support-files/mysql.server /etc/init.d/mysqld
# echo 'export PATH=$PATH:/usr/local/mysql/bin' >>/etc/profile
# source /etc/profile
# vim /etc/my.cnf
[mysqld]
datadir=/usr/local/mysql/data
socket=/tmp/mysql.sock
user=mysql
symbolic-links=0
[mysqld_safe]
log-error=/var/log/mysqld.log
pid-file=/var/run/mysqld/mysqld.pid
# service mysqld start
#chkconfig mysqld on
# ss -tunlp | grep 3306

# mysqladmin -uroot password '123456' #設置數據庫密碼
2.主機B操作(同上)
二、配置雙主
1、主機A操作
# vim /etc/my.cnf
server-id=20
log-bin=mysql-bin
log-bin-index=mysql-bin.index
replicate-ignore-db=test
binlog-ignore-db=mysql
binlog-ignore-db=information_schema
auto-increment-increment=2
auto-increment-offset=1
# service mysqld restart
# mysql -uroot -p123456
mysql> flush tables with read lock;
再打開一個遠程終端窗口,執行以下操作
# mysqldump -uroot -p123456 -B test > test.sql
返回之前的終端窗口,做以下操作
mysql> unlock tables;
mysql> grant replication slave on *.* to 'wdd'@'192.168.131.130' identified by '123456';
mysql> flush privileges;
# scp test.sql 192.168.131.130:/root
2、主機B操作
# vim /etc/my.cnf
server-id = 21
log-bin=mysql-bin
log-bin-index= mysql-bin.index
replicate-do-db=test
binlog-ignore-db=mysql
binlog-ignore-db=information_schema
auto-increment-increment=2
auto-increment-offset=2
#service mysqld restart
# mysql -uroot -p123456 < test.sql
# mysql -uroot -p123456
mysql> grant replication slave on *.* to 'wdd'@'192.168.131.129' identified by '123456';
mysql> flush privileges;
3.主機A和主機B分別作如下操作
主機A
①# mysql -uroot -p123456
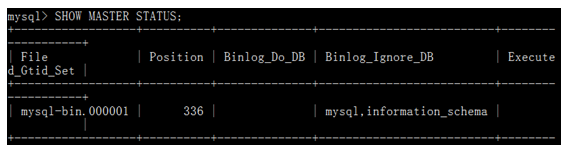
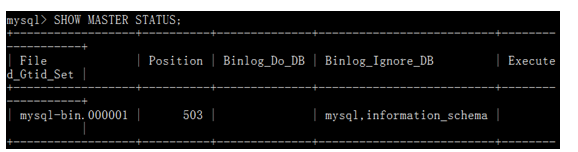
mysql> SHOW MASTER STATUS;
mysql> change master to
master_host='192.168.131.130',
master_user='wdd',
master_password='123456',
master_log_file=' mysql-bin.000002',
master_log_pos=420;
mysql> start slave;
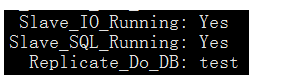
mysql> show slave status\G;
②# mysql -uroot -p123456
mysql> show master status;
mysql> change master to
master_host='192.168.131.129',
master_user='wdd',
master_password='123456',
master_log_file='mysql-bin.000002',
master_log_pos=689;
mysql> start slave;
mysql> show slave status\G;
三、測試
1、主機A進行一下操作
mysql> use test;
mysql> create table info(
-> id int(10) not null auto_increment primary key,
-> name char(20));
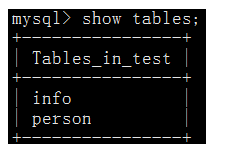
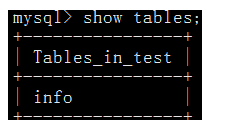
mysql> show tables;
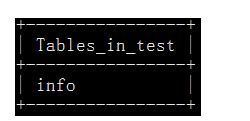
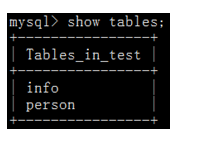
2、主機B進行操作
mysql> use test;
mysql> show tables;
mysql> create table person (
-> id int(20) unsigned not null auto_increment primary key,
-> name char(20));
mysql> show tables;
3.在主機A進行操作檢驗