MySQL數據庫安裝、配置及基本操作
1. MySQL數據庫:
在涉及到一些大型的Web系統或者嵌入式軟件的開發時,都少不了用數據庫來管理數據。在Windows操作系統下,使用過各種各樣的數據庫,如:sqlServer、Oracle、MySQL等等,我們知道,在Windows系統上的軟件安裝配置都是界面式,操作明顯而簡捷。 那麼在Linux操作系統上,對於數據庫的選用,好像首推的是MySQL,它是一個關系型數據庫管理系統,由瑞典MySQL AB公司開發,目前屬於Oracle公司。MySQL是一種關聯數據庫管理系統,關聯數據庫將數據保存在不同的表中,而不是將所有數據放在一個大倉庫內,這樣就增加了速度並提高了靈活性。MySQL的SQL語言是用於訪問數據庫的最常用標准化語言。MySQL軟件采用了雙授權政策(本詞條“授權政策”),它分為社區版和商業版,由於其體積小、速度快、總體擁有成本低,尤其是開放源碼這一特點,一般中小型網站的開發都選擇MySQL作為網站數據庫。由於其社區版的性能卓越,搭配PHP和Apache可組成良好的開發環境。 今天,閱讀了《Linux程序設計》的MySQL這一章節,根據自己在虛擬機中安裝配置的步驟,記錄於此,供於以後的學習回顧。
2. MySQL安裝步驟:
2.1 查看自己系統中是否已經存在
因為mysql數據庫在Linux上實在是太流行了,所以目前下載的主流Linux系統版本基本上都集成了mysql數據庫在裡面,我們可以通過如下命令來查看我們的操作系統上是否已經安裝了mysql數據庫:
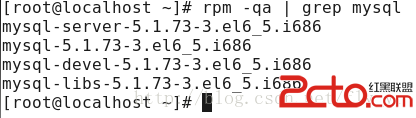
[root@localhost ~]# rpm -qa | grep mysql
我們使用root賬戶登錄系統,由於我的系統上已經安裝MySQL ,所以得到系統中已安裝版本信息:
若是未安裝過,則會出現沒有安裝的提示,此時即可跳過步驟2的卸載。
2.2 卸載原有的MySQL
使用下面命令,卸載現有MySQL:
[root@localhost ~]# rpm -e --nodeps mysql
此時,系統中已經不存在了MySQL的安裝記錄。
2.3 yum方式安裝MySQL
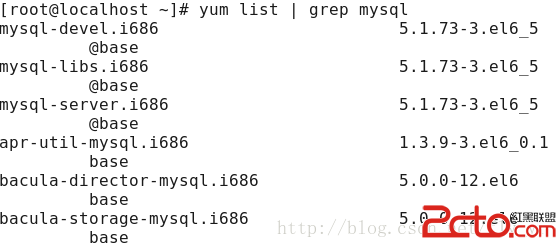
通過yum的方式來進行mysql的數據庫安裝,首先我們可以輸入 yum list | grep mysql 命令來查看yum上提供的mysql數據庫可下載的版本:
[root@localhost ~]#yum list | grep mysql
我們可以看到yum服務器上有很多MySQL的可下載版本:
然後,我們通過輸入 yum install -y mysql-server mysql mysql-devel 命令將mysql mysql-server mysql-devel都安裝
[root@localhost ~]# yum install -y mysql-server mysql mysql-devel
幾秒鐘時間過後,我們可以看到下面的信息:
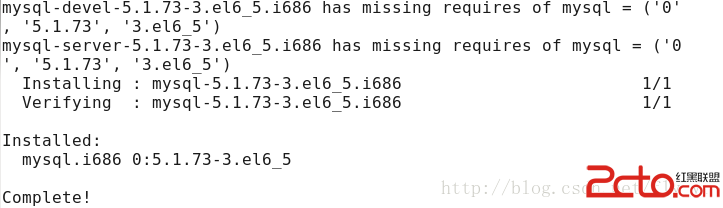
當我們看到complete這個賞心悅目的單詞時,說明我們已經成功的安裝了MySQL數據庫。
3. MySQL數據庫配置
3.1 MySQL服務設置
在安裝完mysql數據庫以後,會發現會多出一個mysqld的服務,這個就是咱們的數據庫服務,我們通過輸入 service mysqld start 命令就可以啟動我們的mysql服務。
一般我們將該數據庫的服務設置為開機自啟動,使用命令chkconfig mysqld on來設置,同時使用命令chkconfig --list | grep mysql來查看結果:
[root@localhost ~]# chkconfig mysqld on
[root@localhost ~]# chkconfig --list | grep mysql
mysqld         	0:off	1:off	2:on	3:on	4:on	5:on	6:of
3.2 賬戶密碼設置
在我們安裝完MySQL數據庫後,就默認有一個名稱為root的管理員賬戶,此時,需要手動設置密碼: 使用命令mysqladmin -u root password 'root' 設定密碼之後,我們可以通過命令mysql -u root -p來登錄數據庫:
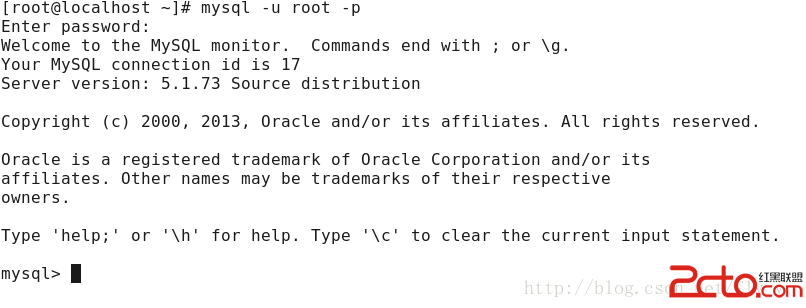
至此,對於MySQL數據庫配置,就可以結束了。
4. MySQL基本操作
4.1 基本配置文件
(1)在/etc/my.cnf內存儲了MySQL數據庫的主要配置信息,查看:
[root@localhost ~]# cat /etc/my.cnf
[mysqld]
datadir=/var/lib/mysql
socket=/var/lib/mysql/mysql.sock
user=mysql
# Disabling symbolic-links is recommended to prevent assorted security risks
symbolic-links=0

[mysqld_safe]
log-error=/var/log/mysqld.log
pid-file=/var/run/mysqld/mysqld.pid
[root@localhost ~]#
(2)在/var/lib/mysql內存儲了數據庫文件,查看:
[root@localhost mysql]# cd /var/lib/mysql
[root@localhost mysql]# ls -l
total 20500
-rw-r--r--. 1 root  root     10717 May 13 10:34 create
-rw-rw----. 1 mysql mysql 10485760 May 13 10:27 ibdata1
-rw-rw----. 1 mysql mysql  5242880 May 13 10:27 ib_logfile0
-rw-rw----. 1 mysql mysql  5242880 May 13 10:27 ib_logfile1
drwx------. 2 mysql mysql     4096 May 13 10:27 mysql
srwxrwxrwx. 1 mysql mysql        0 May 13 10:27 mysql.sock
drwx------. 2 mysql mysql     4096 May 13 10:27 test
[root@localhost mysql]#
4.2 數據庫基本操作
(1)創建一個數據庫 由上面的默認文件可以看出,我們的MySQL數據庫中有兩個默認database,一個是mysql,另一個是test。 我們創建一個自己的數據庫,命令如下:
[root@localhost mysql]# mysql -u root -p
Enter password:
Welcome to the MySQL monitor.  Commands end with ; or \g.
Your MySQL connection id is 21
Server version: 5.1.73 Source distribution

Copyright (c) 2000, 2013, Oracle and/or its affiliates. All rights reserved.

Oracle is a registered trademark of Oracle Corporation and/or its
affiliates. Other names may be trademarks of their respective
owners.

Type 'help;' or '\h' for help. Type '\c' to clear the current input statement.

mysql> create database yr;
Query OK, 1 row affected (0.00 sec)

mysql> exit
Bye
[root@localhost mysql]#
首先,我們用root賬戶登錄數據庫,可以看到mysql> 命令提示符號,執行創建數據庫命令create database name; 得到創建成功消息,退出數據庫使用命令exit。 現在,我們可以在/var/lib.mysql下面看到已經創建的數據庫yr:
[root@localhost mysql]# ls -l
total 20504
-rw-r--r--. 1 root  root     10717 May 13 10:34 create
-rw-rw----. 1 mysql mysql 10485760 May 13 10:27 ibdata1
-rw-rw----. 1 mysql mysql  5242880 May 13 10:27 ib_logfile0
-rw-rw----. 1 mysql mysql  5242880 May 13 10:27 ib_logfile1
drwx------. 2 mysql mysql     4096 May 13 10:27 mysql
srwxrwxrwx. 1 mysql mysql        0 May 13 10:27 mysql.sock
drwx------. 2 mysql mysql     4096 May 13 10:27 test
drwx------. 2 mysql mysql     4096 May 13 14:41 yr
[root@localhost mysql]#
(2)建表並添加數據 下面,再次登錄MySQL我們在上面創建的數據庫中建表,並添加幾條數據:
[root@localhost mysql]# mysql -u root -p
Enter password:
Welcome to the MySQL monitor.  Commands end with ; or \g.
Your MySQL connection id is 23
Server version: 5.1.73 Source distribution

Copyright (c) 2000, 2013, Oracle and/or its affiliates. All rights reserved.

Oracle is a registered trademark of Oracle Corporation and/or its
affiliates. Other names may be trademarks of their respective
owners.

Type 'help;' or '\h' for help. Type '\c' to clear the current input statement.

mysql> use yr;
Database changed
mysql> create table user(
    -> Id INTEGER AUTO_INCREMENT NOT NULL PRIMARY KEY,
    -> Name VARCHAR(50),
    -> age INTEGER);
Query OK, 0 rows affected (0.07 sec)

mysql>
至此,yr數據庫中便創建成功一個user表,有Id 、 Name 、age三個屬性,其中Id為主鍵。 添加並查詢數據:
mysql> insert into user(Id , Name , age)values(1,"aa",20);
Query OK, 1 row affected (0.10 sec)

mysql> insert into user(Id , Name , age)values(2,"bb",21);
Query OK, 1 row affected (0.00 sec)
mysql> select Id , Name , age from user;
+----+------+------+
| Id | Name | age  |
+----+------+------+
|  1 | aa   |   20 |
|  2 | bb   |   21 |
+----+------+------+
(3)從數據庫表中刪除數據 下面我們刪除一條Id=1的數據:
mysql> delete from user where Id=1;
Query OK, 1 row affected (0.05 sec)

mysql> select Id , Name , age from user;
+----+------+------+
| Id | Name | age  |
+----+------+------+
|  2 | bb   |   21 |
+----+------+------+
1 row in set (0.00 sec)

mysql>
(4)刪除數據庫表和數據庫 刪除數據庫表和數據庫使用drop命令:
mysql> drop table user;
Query OK, 0 rows affected (0.02 sec)
mysql> drop database yr;
Query OK, 0 rows affected (0.28 sec)

mysql> exit
Bye
[root@localhost mysql]# ll
total 20500
-rw-r--r--. 1 root  root     10717 May 13 10:34 create
-rw-rw----. 1 mysql mysql 10485760 May 13 10:27 ibdata1
-rw-rw----. 1 mysql mysql  5242880 May 13 10:27 ib_logfile0
-rw-rw----. 1 mysql mysql  5242880 May 13 10:27 ib_logfile1
drwx------. 2 mysql mysql     4096 May 13 10:27 mysql
srwxrwxrwx. 1 mysql mysql        0 May 13 10:27 mysql.sock
drwx------. 2 mysql mysql     4096 May 13 10:27 test
[root@localhost mysql]#
以上是linux系統有關mysql安裝、配置以及使用的全部內容。