Linux中使用最廣泛的數據庫就是MySQL,使用在線yum的方式安裝的版本落後MySQL網站好幾個小版本,本節親自測試安裝新版的MySQL。
VMware Workstation 10 虛擬機
內存:1G
Linux版本:CentOS MinimalCD 6.5
JAVA:JAVA_HOME=/opt/jdk
安裝mysql前需要查詢系統中含有的有關mysql的軟件。
rpm -qa | grep -i mysql //grep -i是不分大小寫字符查詢,只要含有mysql就顯示屏幕顯示:
mysql-libs-5.1.71-1.el6.i686  //它是好幾個軟件的依賴,其中在mini版本中postfix軟件依賴mysql-libs,網絡上很多建議都是直接刪除,
yum remove mysql-libs 或者 rpm -e --nodeps mysql-libs-5.1.71-1.el6.i686,總覺得這樣做不好。
查找mysql官方資料,得到安裝方法是用MySQL-shared-compat將mysql-libs-5.1.71-1.el6.i686替換為同版本後在安裝mysql。
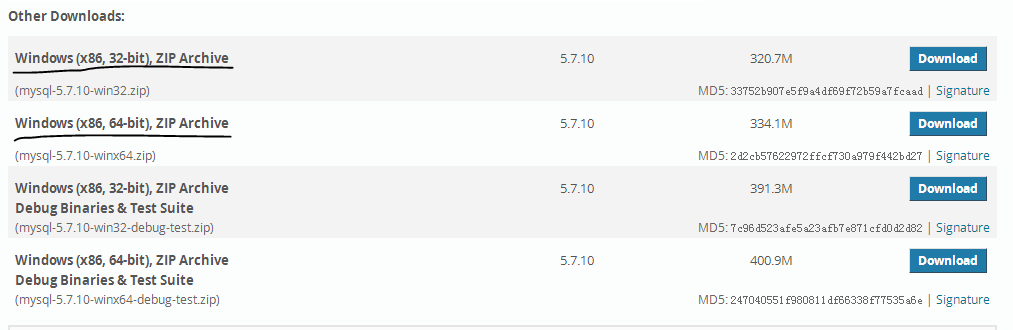
下載mysql地址:http://dev.mysql.com/downloads/mysql/
#tar xvf MySQL-5.6.21-1.el6.i686.rpm-bundle.tar
MySQL-client-5.6.21-1.el6.i686.rpm
MySQL-devel-5.6.21-1.el6.i686.rpm
MySQL-shared-5.6.21-1.el6.i686.rpm
MySQL-test-5.6.21-1.el6.i686.rpm
MySQL-server-5.6.21-1.el6.i686.rpm
MySQL-embedded-5.6.21-1.el6.i686.rpm
#ls -l
total 415068
-rw-r--r--. 1 root root 210442240 Nov 11 11:12 MySQL-5.6.21-1.el6.i686.rpm-bundle.tar
-rw-r--r--. 1 7155 wheel 17813608 Sep 12 16:25 MySQL-client-5.6.21-1.el6.i686.rpm
-rw-r--r--. 1 7155 wheel 3131328 Sep 12 16:25 MySQL-devel-5.6.21-1.el6.i686.rpm
-rw-r--r--. 1 7155 wheel 83106000 Sep 12 16:25 MySQL-embedded-5.6.21-1.el6.i686.rpm
-rw-r--r--. 1 7155 wheel 54611632 Sep 12 16:26 MySQL-server-5.6.21-1.el6.i686.rpm
-rw-r--r--. 1 7155 wheel 1878756 Sep 12 16:27 MySQL-shared-5.6.21-1.el6.i686.rpm
-rw-r--r--. 1 root root 4141488 Nov 18 14:42 MySQL-shared-compat-5.6.21-1.el6.i686.rpm
-rw-r--r--. 1 7155 wheel 49887932 Sep 12 16:27 MySQL-test-5.6.21-1.el6.i686.rpm
安裝MySQL-shared-compat替換mysql-libs,如果不替換,在刪除mysql-libs,會提示postfix依賴於mysql-libs:
# rpm -i MySQL-shared-compat-5.6.21-1.el6.i686.rpm
# rpm -qa | grep -i mysql
mysql-libs-5.1.71-1.el6.i686
MySQL-shared-compat-5.6.21-1.el6.i686
# yum remove mysql-libs
測試MySQL-server安裝,提示需要安裝perl:
# rpm -ivh --test MySQL-server-5.6.21-1.el6.i686.rpm
# yum install perl
安裝MySQL-server,MySQL-client:
# rpm -ivh  MySQL-server-5.6.21-1.el6.i686.rpm
Preparing...                ########################################### [100%]
   1:MySQL-server           ########################################### [100%]
………………
………………
A RANDOM PASSWORD HAS BEEN SET FOR THE MySQL root USER !
You will find that password in '/root/.mysql_secret'.
You must change that password on your first connect,
no other statement but 'SET PASSWORD' will be accepted.
See the manual for the semantics of the 'password expired' flag.
Also, the account for the anonymous user has been removed.
In addition, you can run:
  /usr/bin/mysql_secure_installation
………………
………………
# rpm -ivh  MySQL-client-5.6.21-1.el6.i686.rpm
Preparing...                ########################################### [100%]
   1:MySQL-client           ########################################### [100%]
在安裝MySQL-server,見上面的一段話,大意是全新安裝設置的root密碼在/root/.mysql_secret中,這是一個隨機密碼,你需要運行/usr/bin/mysql_secure_installation,刪除anonymous用戶。當然不建議用root用戶來運行,rpm包已經建了一個mysql用戶,可以使用這個用戶:
#more .mysql_secret
# The random password set for the root user at Tue Nov 18 22:57:46 2014 (local t
ime): NljqL63OYlGo5cqy <– 得到root訪問mysql的密碼:NljqL63OYlGo5cqy
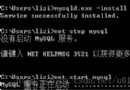
# service mysql start
Starting MySQL... SUCCESS!
# /usr/bin/mysql_secure_installation --user=mysql
NOTE: RUNNING ALL PARTS OF THIS SCRIPT IS RECOMMENDED FOR ALL MySQL
SERVERS IN PRODUCTION USE! PLEASE READ EACH STEP CAREFULLY!
In order to log into MySQL to secure it, we'll need the current
password for the root user. If you've just installed MySQL, and
you haven't set the root password yet, the password will be blank,
so you should just press enter here.
Enter current password for root (enter for none): <–使用剛才得到的root的密碼 NljqL63OYlGo5cqy
OK, successfully used password, moving on...
Setting the root password ensures that nobody can log into the MySQL
root user without the proper authorisation.
You already have a root password set, so you can safely answer 'n'.
Change the root password? [Y/n] y <– 是否更換root用戶密碼,輸入y並回車,強烈建議更換
New password: <– 設置root用戶的密碼
Re-enter new password: <– 再輸入一次你設置的密碼
Password updated successfully!
Reloading privilege tables..
... Success!
By default, a MySQL installation has an anonymous user, allowing anyone
to log into MySQL without having to have a user account created for
them. This is intended only for testing, and to make the installation
go a bit smoother. You should remove them before moving into a
production environment.
Remove anonymous users? [Y/n] y <– 是否刪除匿名用戶,生產環境建議刪除,所以輸入y並回車
... Success!
Normally, root should only be allowed to connect from 'localhost'. This
ensures that someone cannot guess at the root password from the network.
Disallow root login remotely? [Y/n] y <–是否禁止root遠程登錄,根據自己的需求選擇Y/n並回車,建議禁止
... Success!
By default, MySQL comes with a database named 'test' that anyone can
access. This is also intended only for testing, and should be removed
before moving into a production environment.
Remove test database and access to it? [Y/n] y <– 是否刪除test數據庫,輸入y並回車
- Dropping test database...
... Success!
- Removing privileges on test database...
... Success!
Reloading the privilege tables will ensure that all changes made so far
will take effect immediately.
Reload privilege tables now? [Y/n] y 是否重新加載權限表,輸入y並回車
... Success!
All done! If you've completed all of the above steps, your MySQL
installation should now be secure.
Thanks for using MySQL!
Cleaning up...
至此,MySQL已經安裝完成,最後看一下是否已將MySQL加到開機服務裡:
#  chkconfig
auditd          0:off   1:off   2:on    3:on    4:on    5:on    6:off
blk-availability        0:off   1:on    2:on    3:on    4:on    5:on    6:off
crond           0:off   1:off   2:on    3:on    4:on    5:on    6:off
ip6tables       0:off   1:off   2:on    3:on    4:on    5:on    6:off
iptables        0:off   1:off   2:on    3:on    4:on    5:on    6:off
iscsi           0:off   1:off   2:off   3:on    4:on    5:on    6:off
iscsid          0:off   1:off   2:off   3:on    4:on    5:on    6:off
lvm2-monitor    0:off   1:on    2:on    3:on    4:on    5:on    6:off
mdmonitor       0:off   1:off   2:on    3:on    4:on    5:on    6:off
multipathd      0:off   1:off   2:off   3:off   4:off   5:off   6:off
mysql           0:off   1:off   2:on    3:on    4:on    5:on    6:off   <-看到這個OK了
netconsole      0:off   1:off   2:off   3:off   4:off   5:off   6:off
netfs           0:off   1:off   2:off   3:on    4:on    5:on    6:off
network         0:off   1:off   2:on    3:on    4:on    5:on    6:off
postfix         0:off   1:off   2:on    3:on    4:on    5:on    6:off
rdisc           0:off   1:off   2:off   3:off   4:off   5:off   6:off
restorecond     0:off   1:off   2:off   3:off   4:off   5:off   6:off
rsyslog         0:off   1:off   2:on    3:on    4:on    5:on    6:off
saslauthd       0:off   1:off   2:off   3:off   4:off   5:off   6:off
sshd            0:off   1:off   2:on    3:on    4:on    5:on    6:off
udev-post       0:off   1:on    2:on    3:on    4:on    5:on    6:off
MySQL安裝後涉及的目錄如下: 目錄 目錄中的內容 /usr/bin 客戶端程序和腳本 /usr/sbin Mysqld服務器 /var/lib/mysql 數據庫的日志文件 /usr/share/info 信息格式手冊 /usr/share/man Unix 手冊頁 /usr/include/mysql 包括 (標題) 的文件 /usr/lib/mysql mysql的lib包 /usr/share/mysql 雜項的支持文件,包括錯誤消息) 字符設置的文件,示例配置文件,SQL 數據庫安裝 /usr/share/sql-bench 基准 現在好了,可以測試你的MySQL了。