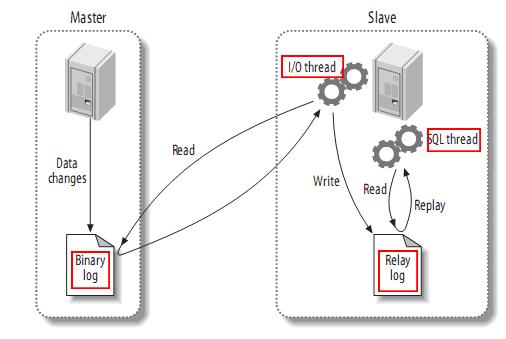
mysql復制主從集群搭建
最近搭了個主從復制,中間出了點小問題,排查搞定,記錄下來
1
環境:
虛擬機:
OS:
centos6.5
Linux host2 2.6.32-431.el6.x86_64 #1 SMP Fri Nov 22 03:15:09 UTC 2013 x86_64 x86_64 x86_64 GNU/Linux
服務器IP
192.168.18.66
192.168.18.67
DB:
mysql> select version();
+-----------+
| version() |
+-----------+
| 5.6.20 |
+-----------+
2
主機:192.168.18.66
從機:192.168.18.67
3
修改主服務器配置,添加如下內容:
server-id=10
log-bin=mysql-bin
binlog-ignore-db=mysql
binlog-ignore-db=information_schema
binlog-ignore-db=performance_schema
replicate-do-db=reptest
此時主服務器這個配置文件/etc/my.cnf內容如下:
[client]
#password = system
#port = 3306
default-character-set=utf8
[mysqld]
server-id=10
log-bin=mysql-bin
binlog-ignore-db=mysql
binlog-ignore-db=information_schema
binlog-ignore-db=performance_schema
replicate-do-db=reptest
sql_mode=NO_ENGINE_SUBSTITUTION,STRICT_TRANS_TABLES
port=3306
character_set_server=utf8
character_set_client=utf8
collation-server=utf8_general_ci
lower_case_table_names=1
max_connections=500
[mysql]
default-character-set=utf8
4
修改從服務器配置
server-id=20
relay_log=mysql-relay-bin
read_only
此時從服務器配置文件內容如下:
[client]
#password=system
#port=3306
default-character-set=utf8
[mysqld]
server-id=20
relay_log=mysql-relay-bin
#read_only
#log_slave_updates=1
#master-host=192.168.18.66
#master-user=repl
#master-password=123
#master-port=3306
#master-connect-retry=60
#replicate_do_db=reptest
#replicate_ignore_db=mysql,information_schema,performance_schema
sql_mode=NO_ENGINE_SUBSTITUTION,STRICT_TRANS_TABLES
port=3306
character_set_server=utf8
character_set_client=utf8
collation-server=utf8_general_ci
lower_case_table_names=1
max_connections=500
[mysql]
default-character-set=utf8
mysql復制的相關參數可參考下面的網頁:
http://dev.mysql.com/doc/refman/5.5/en/replication-options-slave.html
5
在主上增加復制用戶
mysql> grant replication slave on *.* to 'repl'@'%' identified by '123456';
flush privileges;
192.168.18.67是從服務器,就通過repl用戶密碼為空來同步復制
mysql> select host,user,Repl_slave_priv from mysql.user where user='repl';
+---------------+------+-----------------+
| host | user | Repl_slave_priv |
+---------------+------+-----------------+
| 192.168.18.67 | repl | Y |
+---------------+------+-----------------+
1 row in set (0.00 sec)
6
重啟主從服務器:
停主,停從
mysqladmin -uroot shutdown -psystem
起從,起主
/etc/init.d/mysql start
[root@host3 ~]# /etc/init.d/mysql start
Starting MySQL.. SUCCESS!
7
導出主數據庫數據,取快照
1)鎖主庫
flush tables with read lock;
2)
這一步比較重要,要記住File和Position值,在起從服務器上的slave線程時備用
mysql> show master status \G
*************************** 1. row ***************************
File: mysql-bin.000002
Position: 401
Binlog_Do_DB:
Binlog_Ignore_DB: mysql,information_schema,performance_schema
Executed_Gtid_Set:
1 row in set (0.00 sec)
3)
[root@host3 ~]# mysqldump -uroot -p reptest --triggers --routines --events > /home/zxw/master_reptest.sql
順便看一下,mysqldump的內容如下:
[root@host3 ~]# ll /home/zxw/
total 4
-rw-r--r--. 1 root root 1910 Aug 25 13:50 master_reptest.sql
[root@host3 ~]# nl /home/zxw/master_reptest.sql
1 -- MySQL dump 10.13 Distrib 5.6.20, for Linux (x86_64)
2 --
3 -- Host: localhost Database: reptest
4 -- ------------------------------------------------------
5 -- Server version 5.6.20-log
6 /*!40101 SET @OLD_CHARACTER_SET_CLIENT=@@CHARACTER_SET_CLIENT */;
7 /*!40101 SET @OLD_CHARACTER_SET_RESULTS=@@CHARACTER_SET_RESULTS */;
8 /*!40101 SET @OLD_COLLATION_CONNECTION=@@COLLATION_CONNECTION */;
9 /*!40101 SET NAMES utf8 */;
10 /*!40103 SET @OLD_TIME_ZONE=@@TIME_ZONE */;
11 /*!40103 SET TIME_ZONE='+00:00' */;
12 /*!40014 SET @OLD_UNIQUE_CHECKS=@@UNIQUE_CHECKS, UNIQUE_CHECKS=0 */;
13 /*!40014 SET @OLD_FOREIGN_KEY_CHECKS=@@FOREIGN_KEY_CHECKS, FOREIGN_KEY_CHECKS=0 */;
14 /*!40101 SET @OLD_SQL_MODE=@@SQL_MODE, SQL_MODE='NO_AUTO_VALUE_ON_ZERO' */;
15 /*!40111 SET @OLD_SQL_NOTES=@@SQL_NOTES, SQL_NOTES=0 */;
16 --
17 -- Table structure for table `tbldata`
18 --
19 DROP TABLE IF EXISTS `tbldata`;
20 /*!40101 SET @saved_cs_client = @@character_set_client */;
21 /*!40101 SET character_set_client = utf8 */;
22 CREATE TABLE `tbldata` (
23 `id` int(11) DEFAULT NULL
24 ) ENGINE=InnoDB DEFAULT CHARSET=utf8;
25 /*!40101 SET character_set_client = @saved_cs_client */;
26 --
27 -- Dumping data for table `tbldata`
28 --
29 LOCK TABLES `tbldata` WRITE;
30 /*!40000 ALTER TABLE `tbldata` DISABLE KEYS */;
31 INSERT INTO `tbldata` VALUES (1),(2),(3);
32 /*!40000 ALTER TABLE `tbldata` ENABLE KEYS */;
33 UNLOCK TABLES;
34 --
35 -- Dumping events for database 'reptest'
36 --
37 --
38 -- Dumping routines for database 'reptest'
39 --
40 /*!40103 SET TIME_ZONE=@OLD_TIME_ZONE */;
41 /*!40101 SET SQL_MODE=@OLD_SQL_MODE */;
42 /*!40014 SET FOREIGN_KEY_CHECKS=@OLD_FOREIGN_KEY_CHECKS */;
43 /*!40014 SET UNIQUE_CHECKS=@OLD_UNIQUE_CHECKS */;
44 /*!40101 SET CHARACTER_SET_CLIENT=@OLD_CHARACTER_SET_CLIENT */;
45 /*!40101 SET CHARACTER_SET_RESULTS=@OLD_CHARACTER_SET_RESULTS */;
46 /*!40101 SET COLLATION_CONNECTION=@OLD_COLLATION_CONNECTION */;
47 /*!40111 SET SQL_NOTES=@OLD_SQL_NOTES */;
48 -- Dump completed on 2014-08-25 13:50:48
4)
解鎖數據庫
mysql> unlock tables;
Query OK, 0 rows affected (0.00 sec)
############################
###拷貝數據文件目錄方式#####
############################
#第二種取主數據庫快照的方法
#mysqladmin -uroot shutdown
#打包數據庫數據目錄,例如數據目錄是/data/dbdata:
#cd /data
#tar zcvf dbdata.tar.gz dbdata
#備份後就可以啟動主服務器了:
#mysqld_safe –user=mysql &
8
在從服務器上恢復主庫快照
1)
在從庫上創建數據庫
mysql> create database reptest;
Query OK, 1 row affected (0.00 sec)
2)
拷貝備份腳本到從服務器
[root@host2 ~]# scp root@192.168.18.66:/home/zxw/master_reptest.sql /home/zxw/
3)
主庫快照導入到從庫
[root@host2 ~]# mysql -uroot -psystem reptest < /home/zxw/master_reptest.sql
Warning: Using a password on the command line interface can be insecure.
4)
驗證:
[root@host2 ~]# mysql -uroot -psystem
mysql> use reptest;
mysql>
mysql> show tables
-> ;
+-------------------+
| Tables_in_reptest |
+-------------------+
| tbldata |
+-------------------+
1 row in set (0.00 sec)
mysql> select * from tbldata;
+------+
| id |
+------+
| 1 |
| 2 |
| 3 |
+------+
3 rows in set (0.00 sec)
mysql>
############################
###拷貝數據文件目錄方式#####
############################
#備份文件方式的導入
#由於需要置換成主服務器的數據目錄,先關閉服務:
#mysqladmin -uroot shutdown
#備份數據目錄
#mv dbdata dbdata.bak
#解包從主服務器拷貝來的數據目錄
#tar zxvf dbdata.tar.gz
#要確保文件的權限屬主等設置沒問題,dbdata目錄應該是mysql:mysql用戶所有。
9
1)
在從服務器上操作,連接主服務器開始同步數據:
mysql> Change master to Master_host = '192.168.18.66', Master_port = 3306, Master_user = 'repl', Master_password = '123456', Master_log_file = 'mysql-bin.000002', Master_log_pos = 401;
Query OK, 0 rows affected, 2 warnings (0.11 sec)
mysql>
這裡包含的信息有主機的地址和端口、主機提供的復制帳號、主機的binlog位置信息。Master_log_file和Master_log_pos是主服務器的快照信息(就是第7不第2小步看到的值),從服務器從該binlog的相應位置開始從主服務器同步數據。
2)
啟動從服務器線程就可以開始同步了:
start slave;
一旦從服務器開始同步了,就能在數據文件目錄下找到2個文件master.info和relay-log.info。從服務器利用這2個文件來跟蹤處理了多少master的binlog。
分別在主從服務器show processlist查看連接,就可以看到repl用戶的連接,可證明復制已經生效。
從:
mysql> show slave status \G
*************************** 1. row ***************************
Slave_IO_State: Waiting for master to send event
Master_Host: 192.168.18.66
Master_User: usrep
Master_Port: 3306
Connect_Retry: 60
Master_Log_File: mysql-bin.000004
Read_Master_Log_Pos: 1264
Relay_Log_File: mysql-relay-bin.000021
Relay_Log_Pos: 283
Relay_Master_Log_File: mysql-bin.000004
Slave_IO_Running: Yes
Slave_SQL_Running: Yes
Replicate_Do_DB:
Replicate_Ignore_DB:
Replicate_Do_Table:
Replicate_Ignore_Table:
Replicate_Wild_Do_Table:
Replicate_Wild_Ignore_Table:
Last_Errno: 0
Last_Error:
Skip_Counter: 0
Exec_Master_Log_Pos: 1264
Relay_Log_Space: 1075
Until_Condition: None
Until_Log_File:
Until_Log_Pos: 0
Master_SSL_Allowed: No
Master_SSL_CA_File:
Master_SSL_CA_Path:
Master_SSL_Cert:
Master_SSL_Cipher:
Master_SSL_Key:
Seconds_Behind_Master: 0
Master_SSL_Verify_Server_Cert: No
Last_IO_Errno: 0
Last_IO_Error:
Last_SQL_Errno: 0
Last_SQL_Error:
Replicate_Ignore_Server_Ids:
Master_Server_Id: 10
Master_UUID: c03d6252-2a2f-11e4-9b48-000c291888ce
Master_Info_File: /var/lib/mysql/master.info
SQL_Delay: 0
SQL_Remaining_Delay: NULL
Slave_SQL_Running_State: Slave has read all relay log; waiting for the slave I/O thread to update it
Master_Retry_Count: 86400
Master_Bind:
Last_IO_Error_Timestamp:
Last_SQL_Error_Timestamp:
Master_SSL_Crl:
Master_SSL_Crlpath:
Retrieved_Gtid_Set:
Executed_Gtid_Set:
Auto_Position: 0
1 row in set (0.00 sec)
主:可以看到下面內容
mysql> show processlist \G
*************************** 2. row ***************************
Id: 11
User: usrep
Host: 192.168.18.67:48746
db: NULL
Command: Binlog Dump
Time: 179
State: Master has sent all binlog to slave; waiting for binlog to be updated
Info: NULL
2 rows in set (0.00 sec)
從服務器:
數據文件中相關文件如下
[root@host2 ~]# ll /var/lib/mysql/
-rw-rw----. 1 mysql mysql 128 Aug 28 11:32 master.info
-rw-rw----. 1 mysql mysql 59 Aug 28 11:32 relay-log.info
-rw-rw----. 1 mysql mysql 792 Aug 28 11:32 mysql-relay-bin.000020
-rw-rw----. 1 mysql mysql 283 Aug 28 11:32 mysql-relay-bin.000021
-rw-rw----. 1 mysql mysql 50 Aug 28 11:32 mysql-relay-bin.index
主服務器:
數據文件中相關文件如下
-rw-rw----. 1 mysql mysql 1036 Aug 28 09:32 mysql-bin.000003
-rw-rw----. 1 mysql mysql 1264 Aug 28 11:04 mysql-bin.000004
-rw-rw----. 1 mysql mysql 76 Aug 28 09:32 mysql-bin.index
到這兒就ok了
下面說一下在配置過程中遇到的問題:
問題1
1
剛搭完跑起來一看,有問題,Slave_IO_Running: Connecting,IO線程鏈接主服務進程沒有成功
mysql> show slave status \G;
*************************** 1. row ***************************
Slave_IO_State: Connecting to master
Master_Host: 192.168.18.66
Master_User: repl
Master_Port: 3306
Connect_Retry: 60
Master_Log_File: mysql-bin.000002
Read_Master_Log_Pos: 401
Relay_Log_File: host2-relay-bin.000001
Relay_Log_Pos: 4
Relay_Master_Log_File: mysql-bin.000002
Slave_IO_Running: Connecting
Slave_SQL_Running: Yes
Replicate_Do_DB:
Replicate_Ignore_DB:
Replicate_Do_Table:
Replicate_Ignore_Table:
Replicate_Wild_Do_Table:
Replicate_Wild_Ignore_Table:
Last_Errno: 0
Last_Error:
Skip_Counter: 0
Exec_Master_Log_Pos: 401
Relay_Log_Space: 120
Until_Condition: None
Until_Log_File:
Until_Log_Pos: 0
Master_SSL_Allowed: No
Master_SSL_CA_File:
Master_SSL_CA_Path:
Master_SSL_Cert:
Master_SSL_Cipher:
Master_SSL_Key:
Seconds_Behind_Master: NULL
Master_SSL_Verify_Server_Cert: No
Last_IO_Errno: 2003
Last_IO_Error: error connecting to master 'repl@192.168.18.66:3306' - retry-time: 60 retries: 1
Last_SQL_Errno: 0
Last_SQL_Error:
Replicate_Ignore_Server_Ids:
Master_Server_Id: 0
Master_UUID:
Master_Info_File: /var/lib/mysql/master.info
SQL_Delay: 0
SQL_Remaining_Delay: NULL
Slave_SQL_Running_State: Slave has read all relay log; waiting for the slave I/O thread to update it
Master_Retry_Count: 86400
Master_Bind:
Last_IO_Error_Timestamp: 140825 14:29:05
Last_SQL_Error_Timestamp:
Master_SSL_Crl:
Master_SSL_Crlpath:
Retrieved_Gtid_Set:
Executed_Gtid_Set:
Auto_Position: 0
1 row in set (0.00 sec)
問題1
2
查看日志有如下內容
[root@host2 ~]# tail -n 30 /var/lib/mysql/host2.err
2014-08-27 17:04:37 2384 [ERROR] Slave I/O: error connecting to master 'repl@192.168.18.66:3306' - retry-time: 60 retries: 1, Error_code: 2003
2014-08-27 17:04:37 2384 [Warning] Slave SQL: If a crash happens this configuration does not guarantee that the relay log info will be consistent, Error_code: 0
2014-08-27 17:04:37 2384 [Note] Slave SQL thread initialized, starting replication in log 'mysql-bin.000003' at position 120, relay log './mysql-relay-bin.000001' position: 4
2014-08-27 17:05:12 2384 [Note] Error reading relay log event: slave SQL thread was killed
2014-08-27 17:05:12 2384 [Note] Slave I/O thread killed while connecting to master
2014-08-27 17:05:12 2384 [Note] Slave I/O thread exiting, read up to log 'mysql-bin.000003', position 120
問題1
3
在主上新建一個全權用戶,在從上用這個用戶做復制,結果一致
主:
mysql> grant all on *.* to 'usrep'@'%' identified by '123456';
從
mysql> Change master to Master_host = '192.168.18.66', Master_port = 3306, Master_user = 'repl', Master_password = '123456', Master_log_file = 'mysql-bin.000002', Master_log_pos = 401;
用usrep在從上起slave復制線程,問題依舊
問題1
4
在主上mysql -uusrep -p直接登錄主數據庫,成功。
在從上mysql -h 192.168.18.67 -uusrep -p登錄主數據庫,失敗。
[root@host2 ~]# mysql -h 192.168.18.67 -uroot -psystem
Warning: Using a password on the command line interface can be insecure.
ERROR 2003 (HY000): Can't connect to MySQL server on '192.168.18.66' (113)
問題1
5
查看主的iptable
[root@host3 ~]# iptables -L
Chain INPUT (policy ACCEPT)
target prot opt source destination
ACCEPT all -- anywhere anywhere state RELATED,ESTABLISHED
ACCEPT icmp -- anywhere anywhere
ACCEPT all -- anywhere anywhere
ACCEPT tcp -- anywhere anywhere state NEW tcp dpt:ssh
REJECT all -- anywhere anywhere reject-with icmp-host-prohibited
Chain FORWARD (policy ACCEPT)
target prot opt source destination
REJECT all -- anywhere anywhere reject-with icmp-host-prohibited
Chain OUTPUT (policy ACCEPT)
target prot opt source destination
問題1
6
打開文件 /etc/sysconfig/iptables(該文件路徑因操作系統而異),文件內容如下:
[root@host3 ~]# nl /etc/sysconfig/iptables
1 # Firewall configuration written by system-config-firewall
2 # Manual customization of this file is not recommended.
3 *filter
4 :INPUT ACCEPT [0:0]
5 :FORWARD ACCEPT [0:0]
6 :OUTPUT ACCEPT [0:0]
7 -A INPUT -m state --state ESTABLISHED,RELATED -j ACCEPT
8 -A INPUT -p icmp -j ACCEPT
9 -A INPUT -i lo -j ACCEPT
10 -A INPUT -m state --state NEW -m tcp -p tcp --dport 22 -j ACCEPT
11 -A INPUT -j REJECT --reject-with icmp-host-prohibited
12 -A FORWARD -j REJECT --reject-with icmp-host-prohibited
13 COMMIT
編輯該文件增加一行,放開tcp的3306端口
-A INPUT -m state --state NEW -m tcp -p tcp --dport 3306 -j ACCEPT
結果如下
[root@host3 ~]# nl /etc/sysconfig/iptables
1 # Firewall configuration written by system-config-firewall
2 # Manual customization of this file is not recommended.
3 *filter
4 :INPUT ACCEPT [0:0]
5 :FORWARD ACCEPT [0:0]
6 :OUTPUT ACCEPT [0:0]
7 -A INPUT -m state --state ESTABLISHED,RELATED -j ACCEPT
8 -A INPUT -p icmp -j ACCEPT
9 -A INPUT -i lo -j ACCEPT
10 -A INPUT -m state --state NEW -m tcp -p tcp --dport 22 -j ACCEPT
11 -A INPUT -m state --state NEW -m tcp -p tcp --dport 3306 -j ACCEPT
12 -A INPUT -j REJECT --reject-with icmp-host-prohibited
13 -A FORWARD -j REJECT --reject-with icmp-host-prohibited
14 COMMIT
重啟iptable服務
[root@host3 ~]# /etc/init.d/iptables restart
查看現有iptables規則:
[root@host3 ~]# iptables -L
Chain INPUT (policy ACCEPT)
target prot opt source destination
ACCEPT all -- anywhere anywhere state RELATED,ESTABLISHED
ACCEPT icmp -- anywhere anywhere
ACCEPT all -- anywhere anywhere
ACCEPT tcp -- anywhere anywhere state NEW tcp dpt:ssh
ACCEPT tcp -- anywhere anywhere state NEW tcp dpt:mysql
REJECT all -- anywhere anywhere reject-with icmp-host-prohibited
Chain FORWARD (policy ACCEPT)
target prot opt source destination
REJECT all -- anywhere anywhere reject-with icmp-host-prohibited
Chain OUTPUT (policy ACCEPT)
target prot opt source destination
問題1
7
再在從上啟動slave復制線程,問題解決:
mysql> show slave status \G
*************************** 1. row ***************************
Slave_IO_State: Waiting for master to send event
Master_Host: 192.168.18.66
Master_User: usrep
Master_Port: 3306
Connect_Retry: 60
Master_Log_File: mysql-bin.000004
Read_Master_Log_Pos: 1264
Relay_Log_File: mysql-relay-bin.000021
Relay_Log_Pos: 283
Relay_Master_Log_File: mysql-bin.000004
Slave_IO_Running: Yes
Slave_SQL_Running: Yes
Replicate_Do_DB:
Replicate_Ignore_DB:
Replicate_Do_Table:
Replicate_Ignore_Table:
Replicate_Wild_Do_Table:
Replicate_Wild_Ignore_Table:
Last_Errno: 0
Last_Error:
Skip_Counter: 0
Exec_Master_Log_Pos: 1264
Relay_Log_Space: 1075
Until_Condition: None
Until_Log_File:
Until_Log_Pos: 0
Master_SSL_Allowed: No
Master_SSL_CA_File:
Master_SSL_CA_Path:
Master_SSL_Cert:
Master_SSL_Cipher:
Master_SSL_Key:
Seconds_Behind_Master: 0
Master_SSL_Verify_Server_Cert: No
Last_IO_Errno: 0
Last_IO_Error:
Last_SQL_Errno: 0
Last_SQL_Error:
Replicate_Ignore_Server_Ids:
Master_Server_Id: 10
Master_UUID: c03d6252-2a2f-11e4-9b48-000c291888ce
Master_Info_File: /var/lib/mysql/master.info
SQL_Delay: 0
SQL_Remaining_Delay: NULL
Slave_SQL_Running_State: Slave has read all relay log; waiting for the slave I/O thread to update it
Master_Retry_Count: 86400
Master_Bind:
Last_IO_Error_Timestamp:
Last_SQL_Error_Timestamp:
Master_SSL_Crl:
Master_SSL_Crlpath:
Retrieved_Gtid_Set:
Executed_Gtid_Set:
Auto_Position: 0
1 row in set (0.00 sec)
此時主從復制搭建完成,測試了可以正常運行。
問題2
想把從數據庫搞成只讀的,在配置文件中加read_only參數及各種賦值和啟停從庫n次,沒有達到預期效果,依然可以直接連從庫進行增刪改。
此處特詭異,改日再試
災難恢復
主從不同步
如果主從同步出現了不一致,就需要重新實施主從復制。步驟和上面相同,只是省略了修改配置文件和創建用戶的步驟。
重新配置之前,需要在從服務器停止同步線程:stop slave;
從從服務器恢復
如果主機掛了,可以把從服務器提升為主機,把原主服務器作為備機。
先在從服務器停止同步線程:
stop slave;
在從服務器上添加同步用戶:
grant replication slave on *.* to repl@'從服務器ip' identified by '123456';
flush privileges;
配置文件中my.cnf的server-id可以不修改,只要保證id不沖突就行了。
然後,按照主從復制的步驟來進行操作。
-----------------
轉載請著明出處:
blog.csdn.net/beiigang