環境:RedHat AS3 U5
說明:如果不做說明,一般安裝命令均使用ROOT權限,用 # 表示;一般命令用$表示。
特別說明:無
以下文章介紹Liunx 環境下的MySQL+Apache安全備份模式的實現方法
一、前言
目前,Linux系統+MySQL數據庫已成為眾多中小企業及個人搭建網站環境的首選,因為它是完全免費的,而且性能相當不錯。不過我見過的很多網站都是在單機上搭建此環境,然後購買價格相對較貴的備份產品及設備,其實如果我們熟悉一下apache和MySQL,把購買備份產品及設備的錢省下再買幾台服務器的話,完全可以解決問題。服務器只是個代詞,也可以根據你網站的規模選購性能好一點的PC機,都是沒有問題的)
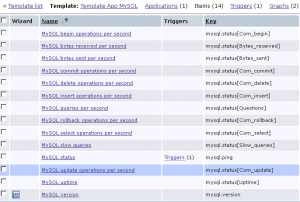
二、MySQL+Apache安全備份模式圖
見圖1
從上圖我們可以看出,用戶通過訪問http LVS服務器,獲取Web服務,其實這個LVS服務器是個虛擬機,真正的Web服務是由這個虛擬機底下的兩個http服務器提供的,這樣,如果這兩個http服務器有一個有問題,那麼可以改變Lvs模式,只讓好的那台提供服務,為我們恢復故障節省了很多時間;而MySQL數據庫采用Master及Slave模式,避免由於單點故障而全盤皆輸的窘迫局面,建議訪問量較大的網站采用全服務器配置或至少LVS及MySQL服務器采用全服務器配置,而訪問量屬於中等偏下網站全部采用PC機都是沒有問題的。LVS服務器使用雙網卡eth0和eth1)。eth0為 虛擬服務器的IP地址公網IP),eth1為內網IP地址,其他均為內網地址,這樣可以更安全。
我們假定MySQL及http服務器均已安裝完成,並且在http服務器上跑的站點可以調用MySQL數據庫,MySQL主數據庫Master)為192.168.1.4,從數據庫(slave)為192.168.1.5,站點調用的數據庫名稱為hello。如果你不知道怎麼安裝apache及MySQL,請參閱我寫的《MySQL環境下安裝PHP504及apache2054》
三、實現方法
1)下載RedHat_Cluster_Suite.tgz軟件包,地址如下:
http://www.d-1701.com/tools/RedHat_Cluster_Suite.tgz
這個其實是redhat AS3自帶的拓展服務包,用RPM安裝也可以,但我們一般都只有前四張,後七張很少有人有,那我就把我手頭上這個安裝包給大家共享一下 :)
2)開啟系統vnc 服務並安裝
- # vncserver
連入linux系統,開一個終端
- # cd /home/xuchen
- # tar xzvf RedHat_Cluster_Suite.tgz
- # cd RedHat_Cluster_Suite
- # ./autorun
這將開啟安裝界面,沒什麼好說,直接安裝就是了。
3)配置前的准備
修改集群服務器的IP轉發設置
- # /sbin/sysctl -w net.ipv4.ip_forward=1
修改當前會話的值
- # vi /etc/sysctl.conf
- net.ipv4.ip_forward = 1
這樣下次重啟時設置可以自動生效
系統安裝上Red hat cluster suite 集群軟件後,使用一個名為Piranha的配置工具配置集群服務器,此配置工具使用 apache 作web Server 來提供基於web頁面的配置接口。此配置接口的web頁面站點的配置文件網頁文件及其他相關文件存放在/etc/sysconfig/ha/ 目錄中。
- # vi /etc/sysconfig/ha/conf/httpd.conf
配置接口頁面站點的相關參數。缺省的監聽端口是3636,你可以改成其他的端口
Listen 3636
訪問Piranha配置接口頁面需要有帳號和密碼,
帳號默認為piranha,用以下命令配置密碼
- # /usr/sbin/piranha-passwd //設置 piranha 的登錄口令。
- # /sbin/service piranha-gui start //啟動Piranha配置接口頁面站點
訪問http://Your’s IP:3636/ 登錄 Piranha。利用此頁面直接配置接口配置集群服務。
配置之前要明白的幾個概念:
虛擬服務器:用戶訪問http服務器(LVS服務器IP),感覺上就是訪問一台高效的服務器。此台“高效的服務器”,我們稱之為“虛擬服務器”,實際上就是這裡的集群服務器。
真實服務器:即真實提供服務的服務器,此類服務器可以有多台,而且可以增加。
4)配置LVS
選擇GLOBAL SETTINGS 選項卡。進行全局設置。
Primary server public IP: 211.100.1.1 集群服務器的外網ip
Primary server private IP::為空
本例中采用LVS NAT模式的集群,以下是集群的不同模式區別:
1. Virtual Server via Network Address TranslationVS/NAT)
通過網絡地址轉換,調度器重寫請求報文的目標地址,根據預設的調度算法,將請求分派給後端的真實服務器;真實服務器的響應報文通過調度器時,報文的源地址被重寫,再返回給客戶,完成整個負載調度過程。
2. Virtual Server via IP TunnelingVS/TUN)
采用NAT技術時,由於請求和響應報文都必須經過調度器地址重寫,當客戶請求越來越多時,調度器的處理能力將成為瓶頸。為了解決這個問題,調度器把請求報文通過IP隧道轉發至真實服務器,而真實服務器將響應直接返回給客戶,所以調度器只處理請求報文。由於一般網絡服務應答比請求報文大許多,采用VS/TUN技術後,集群系統的最大吞吐量可以提高10倍。
3. Virtual Server via Direct RoutingVS/DR)
VS/DR通過改寫請求報文的MAC地址,將請求發送到真實服務器,而真實服務器將響應直接返回給客戶。同VS/TUN技術一樣,VS/DR技術可極大地提高集群系統的伸縮性。這種方法沒有IP隧道的開銷,對集群中的真實服務器也沒有必須支持IP隧道協議的要求,但是要求調度器與真實服務器都有一塊網卡連在同一物理網段上。
點擊NAT按鈕,出現NAT網絡設置:
NAT Router IP:192.168.1.2 NAT路徑名稱
NAT Router netmask:255.255.255.0 NAT掩碼
NAT Router device:eth1 NAT 路徑裝置
選擇VIRTUAL SERVERS 選項卡。
點擊ADD按鈕,添加虛擬服務器:
點擊EDIT按鈕,配置該虛擬服務器:
Name:http 此虛擬服務器的名,可以隨意,建議以提供的服務命名。
Application port:80 應用監聽端口。Web服務為80端口
Protocol:tcp 采用tcp協議通信
Virtual IP Address:211.100.1.1 此虛擬服務器的有效外網ip地址,供用戶訪問
Virtual IP Network Mask:255.255.255.0 此虛擬服務器的子網掩碼,請查看網卡設置。
Firewall Mask:空)
Device:eth0 外網通信網卡
Re-entry timeout:15 重入時間S)
Service timeoute:6 服務延時S)
Quiesce server:NO
Load monitoring tool:none 不加載監控工具
Scheduling:Weighted least-connections 調度策略權重最小連接)
Persistence:1440 持續性S)
Persistence Network Mask:255.255.255.0 持續性屏蔽
配置完畢,點擊ACCEPT將配置寫入配置文檔 /etc/sysconfig/ha/lvs.cf
如果想要讓同一個IP在一段時間內只訪問同一個真實服務器,就要設置Persistence 值,在這指定時間內,無論采用何種負載均衡算法,同一個IP都會訪問同一個真實服務器。
虛擬服務器配置完後,為此虛擬服務器添加真實服務器。
點擊子選項卡REAL SERVER:
點擊ADD按鈕添加真實服務器:
點擊EDIT按鈕配置此真實服務器:
Weight 為該真實服務器的權重。虛擬服務器按調度策略根據此設置值進行調度。
配置完點擊ACCEPT按鈕將配置寫入配置文檔 /etc/sysconfig/ha/lvs.cf 。
重新點擊子選項卡REAL SERVER可添加多個真實服務器。
點擊DE)ACTIVATE按鈕可使真實服務器生效UP)。不過建議在完成所有配置後再啟動。
點擊子選項卡MONITORING SCRIPTS :
配置發送和接收字符串,讓lvs確定real server是否存在。因為當前lvs模式有弊端,確定包文在網絡流量大的時候,會丟包,從而造成real server掉線的假象,所以現在采取腳本send.sh發送和確認,保證每次都能返回確認字符串。
/root/send.sh 的內容很簡單:
- #!/bin/sh
- echo "http"
echo 的內容就是期待的內容。
至此,已經為虛擬服務器添加完畢真實服務器。啟動真實服務器的apache服務。進入LVS配置的相關界面,點擊DE)ACTIVATE按鈕使設備UP起來。
以上所有的配置結果都ACCEPT後,將寫入配置文件/etc/sysconfig/ha/lvs.cf 中。如果你熟悉了LVS 的配置,可以直接修改此配置文件,而不需要使用piranha配置工具。
- # /sbin/service piranha-gui stop //關閉配置界面,增強安全性
- # /sbin/service pulse start //啟動lvs服務,此時進程列表裡應含用 pulse 和 lvs 的進程名。
- # ipvsadm //查看當前的路由表
- IP Virtual Server version 1.0.8 (size=65536)
- Prot LocalAddressort Scheduler Flags
- ->; RemoteAddressort Forward Weight ActiveConn InActConn
- TCP 211.100.1.1:http wlc persistent 1440 mask 255.255.255.0
- ->; 192.168.1.2:http Masq 100 128 24929
- ->; 192.168.1.3:http Masq 100 137 21351
如果上述的192.168.1.2:http真實服務器顯示的是主機名而不是ip地址,為了加快路由轉發,把它們的主機名對應的ip解析加在了負載均衡器的/etc/hosts中。最好把每一個真實服務器的域名解析都放到此文件中。
當然你要把所有機器的apache都起來,如果有一個沒有起來,上面的列表中就會少一行。Lvs每隔一段時間會檢測一下真實服務器即上述的發包監控)。
注意!!!
如果修改了/etc/sysconfig/ha/lvs.cf無論是手工編輯還是通過Piranha)只有重新啟動pulse服務才會起作用。
實踐操作中,pulse服務起來之後如果被停止掉,它會把外網和內網的兩個網卡全部down掉,只好通過控制台再啟動兩個網卡和pulse服務。
所以在遠程控制lvs集群負載機的時候,如果要重新啟動pulse,應該直接reboot機器,以防止網卡down掉,無法訪問遠程機器。
改動當前的配置,還可以使用 ipvsadm直接修改內核路由表,相關操作命令請查閱ipvsadm的命令行幫助。
例如:假設當前已經有了websvr1192.168.1.2)和websvr2192.168.1.3)兩個真實服務器,擴容需要新增另外一台websvr3192.168.1.6)真實服務器。直接在/etc/sysconfig/ha/lvs.cf 中加入了websvr3的信息,但是無法立即生效,這時可以用以下命令:
ipvsadm -a -t 211.100.1.1:http -r 192.168.1.3:http -m -w 100
這樣就可以加入到內核路由表並立即生效。
以上就是一個典型的集群服務器的安裝和配置過程,大家可以參考配置自己的集群服務器。
5)配置MySQL數據庫的Master-Slave 模式
MySQL數據庫的Master-Slave機制
MySQL數據庫支持Master-Slave主從數據庫的集群模式。Slave (從)數據庫根據Master主)數據庫的日志文件master_log_file)及日志位置master_log_pos)實時從Master數據庫讀取數據,自動實現數據同步。
MySQL數據庫Master-Slave實現
①Slave數據庫服務器要擁有訪問Master資源的權限,因此首先要在Master上為Slave創建訪問帳號並賦予文檔復制權限。
- #MySQL -h192.168.1.4 –uroot –p –D hello
- MySQL>;GRANT REPLICATION SLAVE ON *.* TO 'testbak'@'%' IDENTIFIED BY 'testbak';
②根據MySQL數據庫的Master-Slave機制,Slave數據庫實施數據同步操作的依據是Master數據庫的日志文件及該日志文件的日志位置。因此,在為Master新增一台Slave服務器的時候要確保為Slave配置的參數master_log_file及master_log_pos)就是Master當前使用的日志文件及當前的操作節點。如果Master數據庫的數據一直處於運營狀態即有插入、修改、刪除等操作),將不能滿足上述要求。所以目前的維護操作是:系統擴容為Master增加一台Slave的時候,要停止整個業務系統,以停止對Master數據庫數據的讀寫操作,然後查看Master當前的日志文件及日志位置。
- #MySQL -h192.168.1.4 –uroot –p –D hello
- MySQL>; show master status;
有個改進的操作,可以將Master數據庫鎖住為只讀,防止數據的更新。此時不用停止業務系統,但用戶將不能進行信息修改、注冊等操作。待測試驗證)
③將與當前Master數據庫master_log_file、master_log_pos的值匹配的數據從Master拷貝到Slave上。可以采用MySQLdump方法,也可以直接拷貝數據文件。注意,拷貝數據之前要用
- # MySQLadmin –u root –p shutdown
關閉主數據庫。這裡我們直接把數據文件壓縮為MySQL.tar.gz
④修改Master數據庫的配置文件
一般在/etc/my.cnf
以192.168.1.4 Master數據庫的配置文件為例:
修改/etc/my.cnf ,在[MySQLd]區段內加入參數
- # vi /etc/my.cnf
- log-bin
- server-id=1
- sql-bin-update-same
- binlog-do-db=hello
- ******************************************************************************
- # Example MySQL config file for very large systems.
- #
- # This is for large system with memory of 1G-2G where the system runs mainly
- # MySQL.
- #
- # You can copy this file to
- # /etc/my.cnf to set global options,
- # MySQL-data-dir/my.cnf to set server-specific options (in this
- # installation this directory is /usr/local/MySQL/var) or
- # ~/.my.cnf to set user-specific options.
- #
- # One can in this file use all long options that the program supports.
- # If you want to know which options a program support, run the program
- # with --help option.
- # The following options will be passed to all MySQL clients
- [client]
- #password = your_password
- port = 3306
- socket = /tmp/MySQL.sock
- # Here follows entries for some specific programs
- # The MySQL server
- [MySQLd]
- port = 3306
- socket = /tmp/MySQL.sock
- skip-locking
- set-variable = key_buffer=384M
- set-variable = max_allowed_packet=1M
- set-variable = table_cache=512
- set-variable = sort_buffer=2M
- set-variable = record_buffer=2M
- set-variable = thread_cache=8
- # Try number of CPU's*2 for thread_concurrency
- set-variable = thread_concurrency=8
- set-variable = myisam_sort_buffer_size=64M
- log-bin
- server-id = 1
- sql-bin-update-same
- binlog-do-db=hello
- # Replication Master Server (default)
- #log-bin # required for replication
- #server-id = 1 # required unique id between 1 and 2^32 - 1
- # defaults to 1 if master-host is not set
- # but will not function as a master if omitted
- # Replication Slave Server (comment out master section to use this)
- #master-host = # MUST BE SET
- #master-user = # MUST BE SET
- #master-password = # MUST BE SET
- #master-port = # optional--defaults to 3306
- #log-bin # not required for slaves, but recommended
- #server-id = 2 # required unique id between 2 and 2^32 - 1
- # (and different from the master)
- # defaults to 2 if master-host is set
- # but will not function as a slave if omitted
- # Point the following paths to different dedicated disks
- #tmpdir = /tmp/
- #log-update = /path-to-dedicated-directory/hostname
- # Uncomment the following if you are using BDB tables
- #set-variable = bdb_cache_size=384M
- #set-variable = bdb_max_lock=100000
- # Uncomment the following if you are using InnoDB tables
- #innodb_data_home_dir = /usr/local/MySQL/var/
- #innodb_data_file_path = ibdata1:2000M;ibdata2:10M:autoextend
- #innodb_log_group_home_dir = /usr/local/MySQL/var/
- #innodb_log_arch_dir = /usr/local/MySQL/var/
- # You can set .._buffer_pool_size up to 50 - 80 %
- # of RAM but beware of setting memory usage too high
- #set-variable = innodb_buffer_pool_size=384M
- #set-variable = innodb_additional_mem_pool_size=20M
- # Set .._log_file_size to 25 % of buffer pool size
- #set-variable = innodb_log_file_size=100M
- #set-variable = innodb_log_buffer_size=8M
- #innodb_flush_log_at_trx_commit=1
- #set-variable = innodb_lock_wait_timeout=50
- [MySQLdump]
- quick
- set-variable = max_allowed_packet=16M
- [MySQL]
- no-auto-rehash
- # Remove the next comment character if you are not familiar with SQL
- #safe-updates
- [isamchk]
- set-variable = key_buffer=256M
- set-variable = sort_buffer=256M
- set-variable = read_buffer=2M
- set-variable = write_buffer=2M
- [myisamchk]
- set-variable = key_buffer=256M
- set-variable = sort_buffer=256M
- set-variable = read_buffer=2M
- set-variable = write_buffer=2M
- [MySQLhotcopy]
- interactive-timeout
- *********************************************************************
⑤修改Slave數據庫的配置文件
以192.168.1.5 Slave數據庫的配置文件為例
修改/etc/my.cnf ,在[MySQLd]區段內加入參數
- # vi /etc/my.cnf
- master-host=192.168.1.3
- master-user=testbak
- master-password=**** //自己指定
- master-port=3306
- server-id=2
- master-connect-retry=60 預設重試間隔60秒
- replicate-do-db=hello 告訴slave只做ephd數據庫的更新
- log-slave-updates
- *******************************************************************************
- # Example MySQL config file for very large systems.
- #
- # This is for large system with memory of 1G-2G where the system runs mainly
- # MySQL.
- #
- # You can copy this file to
- # /etc/my.cnf to set global options,
- # MySQL-data-dir/my.cnf to set server-specific options (in this
- # installation this directory is /usr/local/MySQL/var) or
- # ~/.my.cnf to set user-specific options.
- #
- # One can in this file use all long options that the program supports.
- # If you want to know which options a program support, run the program
- # with --help option.
- # The following options will be passed to all MySQL clients
- [client]
- #password = your_password
- port = 3306
- socket = /tmp/MySQL.sock
- # Here follows entries for some specific programs
- # The MySQL server
- [MySQLd]
- port = 3306
- socket = /tmp/MySQL.sock
- skip-locking
- set-variable = key_buffer=384M
- set-variable = max_allowed_packet=1M
- set-variable = table_cache=512
- set-variable = sort_buffer=2M
- set-variable = record_buffer=2M
- set-variable = thread_cache=8
- # Try number of CPU's*2 for thread_concurrency
- set-variable = thread_concurrency=8
- set-variable = myisam_sort_buffer_size=64M
- master-host=192.168.1.3
- master-user=testbak
- master-password=testbak
- master-port=3306
- server-id=2
- master-connect-retry=60
- replicate-do-db=hello
- log-slave-updates
- # Point the following paths to different dedicated disks
- #tmpdir = /tmp/
- #log-update = /path-to-dedicated-directory/hostname
- # Uncomment the following if you are using BDB tables
- #set-variable = bdb_cache_size=384M
- #set-variable = bdb_max_lock=100000
- # Uncomment the following if you are using InnoDB tables
- #innodb_data_home_dir = /usr/local/MySQL/var/
- #innodb_data_file_path = ibdata1:2000M;ibdata2:10M:autoextend
- #innodb_log_group_home_dir = /usr/local/MySQL/var/
- #innodb_log_arch_dir = /usr/local/MySQL/var/
- # You can set .._buffer_pool_size up to 50 - 80 %
- # of RAM but beware of setting memory usage too high
- #set-variable = innodb_buffer_pool_size=384M
- #set-variable = innodb_additional_mem_pool_size=20M
- # Set .._log_file_size to 25 % of buffer pool size
- #set-variable = innodb_log_file_size=100M
- #set-variable = innodb_log_buffer_size=8M
- #innodb_flush_log_at_trx_commit=1
- #set-variable = innodb_lock_wait_timeout=50
- [MySQLdump]
- quick
- set-variable = max_allowed_packet=16M
- [MySQL]
- no-auto-rehash
- # Remove the next comment character if you are not familiar with SQL
- #safe-updates
- [isamchk]
- set-variable = key_buffer=256M
- set-variable = sort_buffer=256M
- set-variable = read_buffer=2M
- set-variable = write_buffer=2M
- [myisamchk]
- set-variable = key_buffer=256M
- set-variable = sort_buffer=256M
- set-variable = read_buffer=2M
- set-variable = write_buffer=2M
- [MySQLhotcopy]
- interactive-timeout
- ********************************************************************
配置完畢,重啟主數據庫,由於配置文件中加入了log-bin參數,因此開始有index產生,在/var/lib/MySQL目錄下有.index檔案紀錄數據庫的異常log。
配置Slave數據庫
將192.168.1.4 master 的備份MySQL.tar.gz復制到192.168.1.5 slave上
- #cd /var/lib/
- #tar xzvf MySQL.tar.gz
- #chown –R MySQL:MySQL MySQL
配置一般在MySQL命令行下進行。
- #MySQL -h192.168.1.5 –uroot –p
- MySQL>; change master to master_log_file='ephdb05-bin.003',master_log_pos=169;
啟動Slave數據庫:
- MySQL>; start slave;
- MySQL>; show slave status;
查看Slave數據同步操作的依據Master_Log_File,Read_Master_Log_Pos是否與當前Master的一致。這時在/var/lib/MySQL目錄會出現master.info,此檔案紀錄了Master MySQL server的信息。
數據庫優化
采用了blob的數據類型,長時間運行會造成數據碎片,需要進行整理。
在處理數據優化前,需要關閉MySQL服務。
/usr/local/MySQL/bin/MySQLadmin shutdown
修復和整理數據庫
/usr/local/MySQL/bin/myisamchk -r /usr/local/MySQL/var/hello/1_tbl
對第一個索引進行重索引
/usr/local/MySQL/bin/myisamchk -R 1 /usr/local/MySQL/var/hello/1_tbl
將索引按照倒序排序,加快檢索速度
/usr/local/MySQL/bin/myisamchk -S /usr/local/MySQL/var/hello/1_tbl
對數據庫關聯優化
/usr/local/MySQL/bin/myisamchk -a /usr/local/MySQL/var/hello/1_tbl
其他數據庫、表的操作類似)
四、總結
Ppache+PHP+MySQL越來越多被應用於網站建設,如何才能更安全,更有效的保護好數據是系統管理員的頭等大事,希望能有越來越多的好工具,好方法,好思路來協助我們做好這個工作,而且我堅信,以後的路是越走越寬的,套用老話結束這個文章------技術無極限!!
編輯推薦】