MySQL-master1:192.168.72.128
MySQL-master2:192.168.72.129
OS版本:CentOS 5.4
MySQL版本:5.5.9(主從復制的master和slave服務器中的mysql版本相同或者master版本高於slave版本)
一、MySQL master-master配置
1、修改MySQL配置文件
兩台MySQL均如要開啟binlog日志功能,開啟方法:在MySQL-master1 配置文件/etc/my.cnf
[MySQLd]段中加上
user = mysql
log-bin=mysql-bin
server-id = 1
binlog-do-db=test
binlog-ignore-db=mysql
replicate-do-db=test
replicate-ignore-db=mysql
log-slave-updates
slave-skip-errors=all
sync_binlog=1
auto_increment_increment=2
auto_increment_offset=1
在MySQL-master2 配置文件/etc/my.cnf
[MySQLd]段中加上
user = mysql
log-bin=mysql-bin
server-id= 2
binlog-do-db=test
binlog-ignore-db=mysql
replicate-do-db=test
replicate-ignore-db=mysql
log-slave-updates
slave-skip-errors=all
sync_binlog=1
auto_increment_increment=2
auto_increment_offset=2
將兩個配置文件保存,分別重啟mysql服務器
server_id值必須為2到232–1之間的一個正整數值。ID值唯一的標識了復制群集中的主從服務器,因此它們必須各不相同。
binlog-do-db=database 是要記錄日志的數據庫;
同步多個數據庫重復設置選項binlog-do-db=test 和replicate-do-db=test
例如
binlog-do-db=test1
replicate-do-db=test1
binlog-do-db=test2
replicate-do-db=test2
binlog-ignore-db 是不要記錄日志的數據庫名,多個數據庫中間用逗號(,)隔開;
mysql配置文件my.cnf中 log-slave-updates表示 如果一個MASTER 掛掉的話,另外一個馬上接管。
sync_binlog=1
auto_increment_increment=2
auto_increment_offset=1 指的是服務器頻繁的刷新日志。這個保證了在其中一台掛掉的話,日志刷新到另外一台。從而保證了數據的同步 。
auto_increment_offset = 1
auto_increment_increment = 2
這樣A的auto_increment字段產生的數值是:1, 3, 5, 7, …等奇數ID了
auto_increment_offset = 2
auto_increment_increment = 2
這樣B的auto_increment字段產生的數值是:2, 4, 6, 8, …等偶數ID了
你的auto_increment字段在不同的服務器之間絕對不會重復,所以Master-Master結構就沒有任何問題了。當然,你還可以使用3 台,4台,或者N台服務器,只要保證auto_increment_increment = N 再設置一下auto_increment_offset為適當的初始值就可以了,那樣,我們的MySQL可以同時有幾十台主服務器,而不會出現自增長ID 重復。
2、將192.168.72.128設為192.168.72.129的主服務器
在192.168.72.128上新建授權用戶
MySQL> grant replication slave on *.* to 'replication'@'%' identified by 'replication';
Query OK, 0 rows affected (0.00 sec)
MySQL>flush privileges;
Query OK, 0 rows affected (0.00 sec)
MySQL> show master status;
+------------------+----------+--------------+------------------+
| File | Position | Binlog_Do_DB | Binlog_Ignore_DB |
+------------------+----------+--------------+------------------+
| MySQL-bin.000003 | 374 | | |
+------------------+----------+--------------+------------------+
1 row in set (0.00 sec)
------------------------------------------------------------------------------
在192.168.72.129將192.168.72.128為自己的主服務器
MySQL> change master to master_host='192.168.72.128',master_user='replication',master_password='replication',master_log_file='MySQL-bin.000003',master_log_pos=374;
Query OK, 0 rows affected (0.05 sec)
MySQL> start slave;
Query OK, 0 rows affected (0.00 sec)
MySQL> show slave status/G
*************************** 1. row ***************************
Slave_IO_State: Waiting for master to send event
Master_Host: 192.168.72.128
Master_User: replication
Master_Port: 3306
Connect_Retry: 60
Master_Log_File: MySQL-bin.000003
Read_Master_Log_Pos: 374
Relay_Log_File: MySQL-master2-relay-bin.000002
Relay_Log_Pos: 235
Relay_Master_Log_File: MySQL-bin.000003
Slave_IO_Running: Yes
Slave_SQL_Running: Yes
Replicate_Do_DB:
Replicate_Ignore_DB:
Replicate_Do_Table:
Replicate_Ignore_Table:
Replicate_Wild_Do_Table:
Replicate_Wild_Ignore_Table:
Last_Errno: 0
Last_Error:
Skip_Counter: 0
Exec_Master_Log_Pos: 374
Relay_Log_Space: 235
Until_Condition: None
Until_Log_File:
Until_Log_Pos: 0
Master_SSL_Allowed: No
Master_SSL_CA_File:
Master_SSL_CA_Path:
Master_SSL_Cert:
Master_SSL_Cipher:
Master_SSL_Key:
Seconds_Behind_Master: 0
1 row in set (0.00 sec)
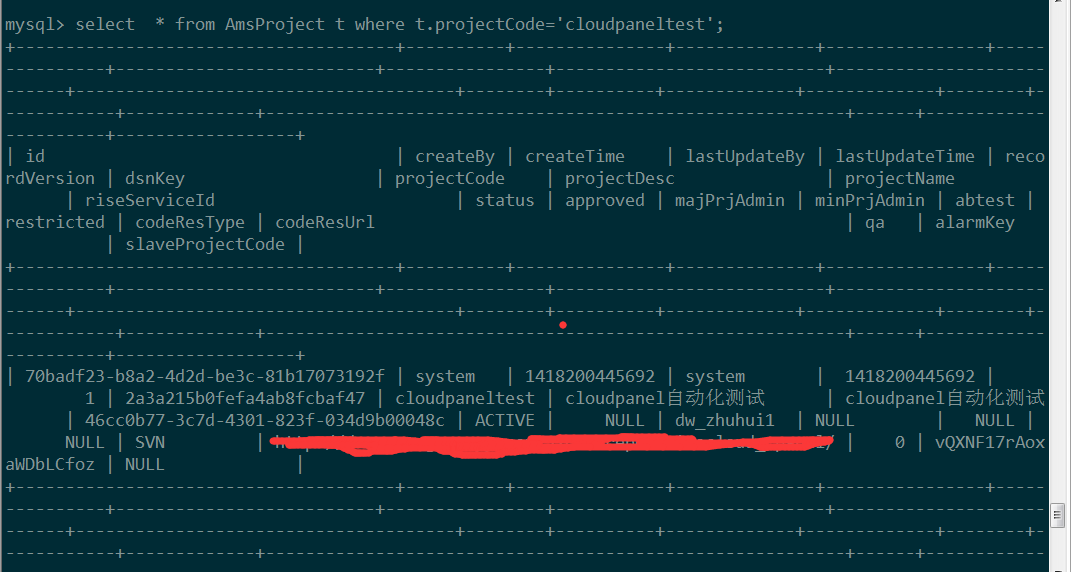
紅色標注部分為192.168.72.128主機中show master status命令結果中的file postion兩個值
3、將192.168.72.129設為192.168.72.128的主服務器
在192.168.72.129上新建授權用戶
MySQL> grant replication slave on *.* to 'replication'@'%' identified by 'replication';
Query OK, 0 rows affected (0.00 sec)
MySQL>flush privileges;
Query OK, 0 rows affected (0.00 sec)
MySQL> show master status;
+------------------+----------+--------------+------------------+
| File | Position | Binlog_Do_DB | Binlog_Ignore_DB |
+------------------+----------+--------------+------------------+
| MySQL-bin.000003 | 374 | | |
+------------------+----------+--------------+------------------+
1 row in set (0.00 sec)
----------------------------------------------------------------------------------
在192.168.72.128將192.168.72.129為自己的主服務器
MySQL> change master to master_host='192.168.72.129',master_user='replication',master_password='replication',master_log_file='MySQL-bin.000003',master_log_pos=374;
Query OK, 0 rows affected (0.05 sec)
MySQL> start slave;
Query OK, 0 rows affected (0.00 sec)
MySQL> show slave status/G
*************************** 1. row ***************************
Slave_IO_State: Waiting for master to send event
Master_Host: 192.168.72.129
Master_User: replication
Master_Port: 3306
Connect_Retry: 60
Master_Log_File: MySQL-bin.000003
Read_Master_Log_Pos: 374
Relay_Log_File: MySQL-master2-relay-bin.000002
Relay_Log_Pos: 235
Relay_Master_Log_File: MySQL-bin.000003
Slave_IO_Running: Yes
Slave_SQL_Running: Yes
Replicate_Do_DB:
Replicate_Ignore_DB:
Replicate_Do_Table:
Replicate_Ignore_Table:
Replicate_Wild_Do_Table:
Replicate_Wild_Ignore_Table:
Last_Errno: 0
Last_Error:
Skip_Counter: 0
Exec_Master_Log_Pos: 374
Relay_Log_Space: 235
Until_Condition: None
Until_Log_File:
Until_Log_Pos: 0
Master_SSL_Allowed: No
Master_SSL_CA_File:
Master_SSL_CA_Path:
Master_SSL_Cert:
Master_SSL_Cipher:
Master_SSL_Key:
Seconds_Behind_Master: 0
1 row in set (0.00 sec)
如果主數據庫有數據的話
數據庫鎖表操作,不讓數據再進行寫入動作。mysql> FLUSH TABLES WITH READ LOCK ;
用命令mysqldump
備份數據庫。
在master服務器執行
shell> mysqldump -uroot -p123456 --master-data --opt test1 > backup-file.sql
看主數據庫的狀態mysql> show master status;
記錄File 和Position 項的值
注:由於沒有鎖定主服務器,這裡記錄的主服務器二進制日志position值可能會大於做mysqldump時的值,這將導致從服務器丟失在此期間的更新。如果可以保證在此期間主服務器不會出現創建新表的更新,那麼丟失的影響不大;否則,將導致從服務器復制線程失敗,這時必須在做mysqldump時鎖定主服務器。
-----------------------------------------------
從服務器中my.cnf文件中加入選項
skip-slave-start
skip-slave-start 表示從mysql服務器啟動時不啟動同步線程,這就要在啟動從服務器之後,手工啟動同步線程,在mysql> 提示符下面運行“start slave”就可以
保存my.cnf後
執行
shell> mysqladmin -uroot -p123456 create test1
shell> mysql -uroot -p123456 test1 < backup-file.sql
啟動從服務器線程
mysql>start slave;
取消主數據庫鎖定mysql>UNLOCK TABLES;
4、其他命令
1、查看復制進度
需要在主庫上運行
mysql>show processlist \G;
2、主服務器上的相關命令:
show processlist;
show master status
show slave hosts
show {master|binary} logs
show binlog events
purge {master|binary} logs to 'log_name'
purge {master|binary} logs before 'date'
reset master(老版本flush master)
set sql_log_bin={0|1}
3、從服務器上的相關命令:
slave start
slave stop
slave stop IO_THREAD //此線程把master段的日志寫到本地
slave start IO_THREAD
slave stop SQL_THREAD //此線程把寫到本地的日志應用於數據庫
slave start SQL_THREAD
reset slave
set global sql_slave_skip_counter
load data from master
show slave status(SUPER,REPLICATION CLIENT)
CHANGE MASTER TO MASTER_HOST=, MASTER_PORT=,MASTER_USER=, MASTER_PASSWORD= //動態改變master信息
PURGE MASTER [before 'date'] 刪除master端已同步過的日志
=========================================================================
skip-slave-start
server-id = 1
log-bin=C:/Program Files/MySQL/MySQL Server 5.0/00/repbinlog
log-error=C:/Program Files/MySQL/MySQL Server 5.0/rep/rep.err
relay-log=C:/Program Files/MySQL/MySQL Server 5.0/rep/beltal_relay_log
sync_binlog=1
log-slave-updates
innodb_flush_log_at_trx_commit=1
binlog-do-db=sync
#slave
master-host = 192.168.1.144
master-user = replicate
master-password = replicate
master-port = 3306
master-connect-retry=60
replicate-do-db = sync
report-host=192.168.1.80
摘自 roockee的博客