Mysql的主從復制和級聯
記錄一下mysql的主主復制和級聯復制。
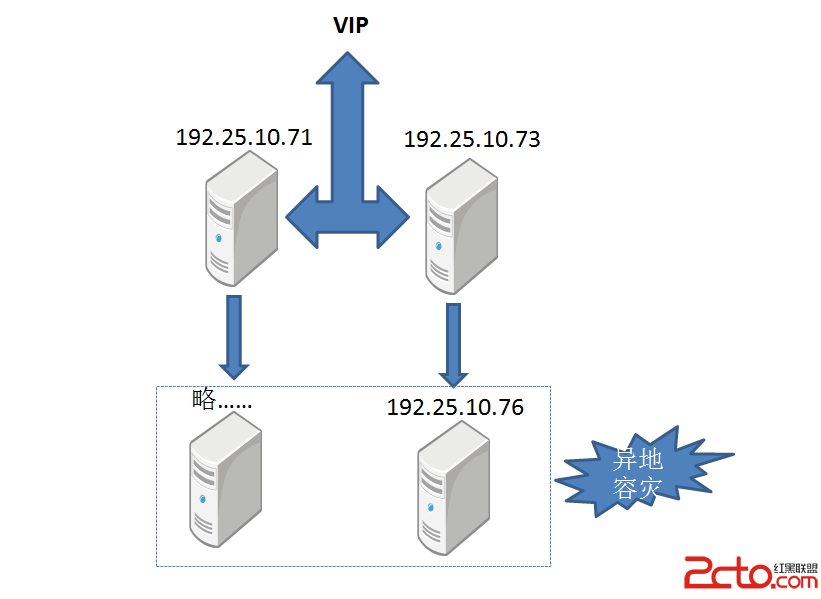
一、環境
主機:192.25.10.71
主機:192.25.10.73
從機:192.25.10.76
DB:Mysql 5.5.31
OS:CentOS 6.3
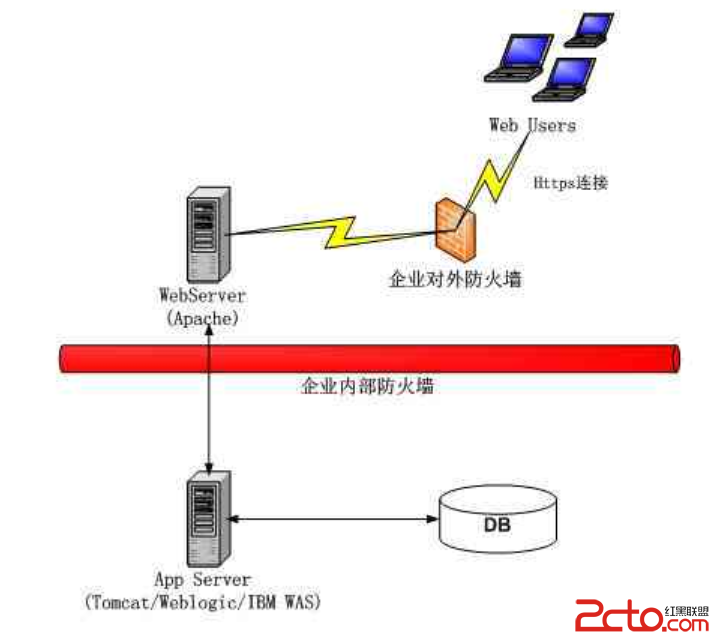
二、架構
 三、實施步驟
mysql的安裝略
1.master端創建測試DB
三、實施步驟
mysql的安裝略
1.master端創建測試DB
[root@proxy1 ~]# mysql
Welcome to the MySQL monitor.  Commands end with ; or \g.
Your MySQL connection id is 1959
Server version: 5.5.31-log Source distribution

Copyright (c) 2000, 2013, Oracle and/or its affiliates. All rights reserved.

Oracle is a registered trademark of Oracle Corporation and/or its
affiliates. Other names may be trademarks of their respective
owners.

Type 'help;' or '\h' for help. Type '\c' to clear the current input statement.

mysql> create database db_kenyon;
Query OK, 1 row affected (0.03 sec)

mysql> show databases;
+--------------------+
| Database           |
+--------------------+
| information_schema |
| db_kenyon          |
| mysql              |
| performance_schema |
| test               |
+--------------------+
5 rows in set (0.00 sec)

mysql> use db_kenyon;
Database changed
mysql> create table t_kenyon(id int);
Query OK, 0 rows affected (0.07 sec)

mysql> insert into t_kenyon values(1),(2),(3);
Query OK, 3 rows affected (0.01 sec)
Records: 3  Duplicates: 0  Warnings: 0

mysql> select * from t_kenyon;
+------+
| id   |
+------+
|    1 |
|    2 |
|    3 |
+------+
3 rows in set (0.00 sec)

mysql> show master status;
Empty set (0.00 sec)
[root@localhost ~]#
2.修改配置/etc/my.cnf
[mysqld]
log-bin=mysql-bin
server-id    =1
binlog-do-db=db_kenyon
innodb_data_home_dir = /usr/local/mysql/data/
innodb_log_group_home_dir = /usr/local/mysql/data/
innodb_buffer_pool_size = 256M
innodb_additional_mem_pool_size = 20M
innodb_log_file_size = 64M
innodb_log_buffer_size = 8M
innodb_flush_log_at_trx_commit = 1
innodb_lock_wait_timeout = 50
3.創建slave端連到master端的用戶,重啟master
[root@localhost ~]# /etc/init.d/mysqld restart
Shutting down MySQL.. SUCCESS!
Starting MySQL............ SUCCESS!
[root@localhost ~]# mysql
mysql>grant replication slave on *.* to repl@'192.25.10.73' identified by '123456';
mysql> flush privileges;
[root@localhost ~]#
4.備份master端數據,並拷貝至slave端
mysql> flush tables with read lock;
Query OK, 0 rows affected (0.00 sec)

mysql>  show master status;
+------------------+----------+---------------+--------------------------------------------------+-------------------+
| File             | Position | Binlog_Do_DB  | Binlog_Ignore_DB                                 | Executed_Gtid_Set |
+------------------+----------+---------------+--------------------------------------------------+-------------------+
| mysql-bin.000002 |      120 | db_kenyon |  |                   |
+------------------+----------+---------------+--------------------------------------------------+-------------------+
1 row in set (0.00 sec)
mysql>

另外一個session:
[root@localhost log]# cd /usr/local/mysql/data
[root@localhost data]# tar -zcvf backup.tar.gz db_kenyon
[root@localhost ]# scp backup.tar.gz root@192.25.10.73:/usr/local/mysql/data/

--回到之前的session,從機搭完以後解鎖,保證數據一致
mysql> unlock tables;
Query OK, 0 rows affected (0.00 sec)
5.修改slave端的數據
[mysqld]
server-id  = 2
master-host     =   192.25.10.71   #5.5以上廢棄
master-user     =   repl            #5.5以上廢棄
master-password =   123456           #5.5以上廢棄
master-port     =   3306                  #5.5以上廢棄
master-connect-retry=60           #重試時間60秒, #5.5以上廢棄
replicate-do-db=db_kenyon         #需要同步的庫
log-slave-updates=1               #啟用從庫日志,這樣可以設置鏈式復制
read-only = 1   #0表示可讀寫,1表示只讀,但是只針對普通用戶,超級用戶和同步用戶不受此限制
6.重啟slave,並指定主機檢查
mysql> change master to master_host='192.25.10.71',master_user='repl',master_password='123456',master_log_file='mysql-bin.000002',master_log_pos=120
mysql> show slave status\G
*************************** 1. row ***************************
               Slave_IO_State:
                  Master_Host: 192.25.10.71
                  Master_User: repl
                  Master_Port: 3306
                Connect_Retry: 60
              Master_Log_File: mysql-bin.000002
          Read_Master_Log_Pos: 120
               Relay_Log_File: localhost-relay-bin.000001
                Relay_Log_Pos: 4
        Relay_Master_Log_File: mysql-bin.000002
             Slave_IO_Running: No
            Slave_SQL_Running: No
              Replicate_Do_DB: db_kenyon
          Replicate_Ignore_DB:
           Replicate_Do_Table:
       Replicate_Ignore_Table:
      Replicate_Wild_Do_Table:
  Replicate_Wild_Ignore_Table:
                   Last_Errno: 0
                   Last_Error:
                 Skip_Counter: 0
          Exec_Master_Log_Pos: 120
              Relay_Log_Space: 120
              Until_Condition: None
               Until_Log_File:
                Until_Log_Pos: 0
           Master_SSL_Allowed: No
           Master_SSL_CA_File:
           Master_SSL_CA_Path:
              Master_SSL_Cert:
            Master_SSL_Cipher:
               Master_SSL_Key:
        Seconds_Behind_Master: NULL
Master_SSL_Verify_Server_Cert: No
                Last_IO_Errno: 0
                Last_IO_Error:
               Last_SQL_Errno: 0
               Last_SQL_Error:
  Replicate_Ignore_Server_Ids:
             Master_Server_Id: 0
                  Master_UUID:
             Master_Info_File: /usr/local/mysql/data/master.info
                    SQL_Delay: 0
          SQL_Remaining_Delay: NULL
      Slave_SQL_Running_State:
           Master_Retry_Count: 86400
                  Master_Bind:
      Last_IO_Error_Timestamp:
     Last_SQL_Error_Timestamp:
               Master_SSL_Crl:
           Master_SSL_Crlpath:
           Retrieved_Gtid_Set:
            Executed_Gtid_Set:
                Auto_Position: 0
1 row in set (0.00 sec)
調整網絡和mysql參數等,使兩個參數:Slave_IO_Running, Slave_SQL_Running的狀態為YES 7.級聯過程 其他配置如上,注意級聯參數log-slave-updates開啟,該參數在my.cnf裡值應為1,或者
mysql> show variables like 'log_slave_%';
+-------------------+-------+
| Variable_name     | Value |
+-------------------+-------+
| log_slave_updates | ON   |
+-------------------+-------+
1 row in set (0.00 sec)
8.主主的過程就是主從的基礎上再以從機為主機,反向操作一遍即可。簡單測試,在71上建表,73、76上都能看到該表即成功。 四、級聯的性能損耗測試 使用mysqlslap
[root@proxy1 bin]# ./mysqlslap   --concurrency=2  --iterations=5 --number-int-cols=10 --number-char-cols=10 -a --auto-generate-sql-guid-primary --number-of-queries=10000 --auto-generate-sql-load-type=write
Benchmark
        Average number of seconds to run all queries: 5.324 seconds
        Minimum number of seconds to run all queries: 4.106 seconds
        Maximum number of seconds to run all queries: 6.113 seconds
        Number of clients running queries: 2
        Average number of queries per client: 5000
每秒處理能力1878 改變concurrency,得到如下結果: 並發數 平均時間s(後者開啟級聯) 每秒處理 損耗 2 5.324 1878 0.6s 11% 2 5.912 1691 0.6s 11% 10 2.521 3966 0.3s 12% 10 2.828 3536 0.3s 12% 50 2.161 4627 0.2s 7% 50 2.331 4290 0.2s 7% 100 2.355 4246 0.3s 11% 100 2.618 3819 0.3s 11%