安裝准備
# oslevel –r //查看操作系統版本
//-08可以安裝10g,-09可以安裝11g

# prtconf |more //打印硬件配置信息
System Model: IBM,7028-6C4
Machine Serial Number: 10681AA
Processor Type: PowerPC_POWER4
Processor Implementation Mode:POWER 4 //P4的機器
Processor Version: PV_4
Number Of Processors: 2 //兩顆cpu
Processor Clock Speed: 1002 MHz //主頻1002Mhz
CPU Type: 64-bit
Kernel Type: 64-bit //內核位數
LPAR Info: 1 NULL
Memory Size: 2048 MB //內存2g
Good Memory Size: 2048 MB
Platform Firmware level: 3R080425
Firmware Version: IBM,RG080425_d79e22_r
Console Login: enable
Auto Restart: true
Full Core: false
Network Information
HostName: aix203
IPAddress: 10.10.10.203
SubNetmask: 255.255.255.0
Gateway:
NameServer:
DomainName:
Paging Space Information
TotalPaging Space: 4096MB
PercentUsed: 1%
Volume Groups Information
==============================================================================
rootvg:
PV_NAME PV STATE TOTAL PPs FREE PPs FREE DISTRIBUTION
hdisk0 active 542 4 00..00..00..00..04
==============================================================================
datavg:
PV_NAME PV STATE TOTAL PPs FREE PPs FREE DISTRIBUTION
hdisk3 active 159 139 32..22..21..32..32
hdisk4 active 159 159 32..32..31..32..32
==============================================================================
INSTALLED RESOURCE LIST
The following resources are installed on the machine.
+/- = Added or deleted from Resource List.
* = Diagnosticsupport not available.
ModelArchitecture: chrp
ModelImplementation: Multiple Processor, PCI bus
+ sys0 System Object
+ sysplanar0 System Planar
* pci1 U0.1-P1 PCIBus
* pci6 U0.1-P2 PCIBus
+ ent1 U0.1-P2-I4/E1 10/100 MbpsEthernet PCI Adapter II (14
10ff01)
* pci7 U0.1-P2 PCIBus
+ ent2 U0.1-P1/E1 10/100Mbps Ethernet PCI Adapter II (14
10ff01)
* pci8 U0.1-P2 PCIBus
+ fcs0 U0.1-P2-I3/Q1 FC Adapter
* fcnet0 U0.1-P2-I3/Q1 FibreChannel Network Protocol Device
* fscsi0 U0.1-P2-I3/Q1 FC SCSI I/OController Protocol Device
* hdisk1 U0.1-P2-I3/Q1-W50020F230000BB37-L0 Other FC SCSI Disk Drive
* hdisk3 U0.1-P2-I3/Q1-W50020F230000BB37-LD000000000000 Other FC SCSI Disk Drive
* hdisk4 U0.1-P2-I3/Q1-W50020F230000BB37-LE000000000000 Other FC SCSI Disk Drive
* pci0 U0.1-P1 PCIBus
* isa0 U0.1-P1 ISABus
+ fda0 U0.1-P1/D1 StandardI/O Diskette Adapter
* siokma0 U0.1-P1/K1 Keyboard/Mouse Adapter
+ sioka0 U0.1-P1/K1 KeyboardAdapter
+ sioma0 U0.1-P1/K1 MouseAdapter
+ ppa0 U0.1-P1/R1 CHRPIEEE1284 (ECP) Parallel Port Adapt
er
+ sa0 U0.1-P1/S1 StandardI/O Serial Port
+ tty0 U0.1-P1/S1-L0 AsynchronousTerminal
+ sa1 U0.1-P1/S2 StandardI/O Serial Port
+ sa2 U0.1-P1/S3 StandardI/O Serial Port
* ide0 U0.1-P1/Q6 ATA/IDE Controller Device
+ cd0 U0.1-P1/Q6-A0 IDE CD-ROMDrive I (650 MB)
* pci2 U0.1-P2 PCIBus
* pci3 U0.1-P2 PCI Bus
+ ent0 U0.1-P1/E2 10/100Mbps Ethernet PCI Adapter II (14
10ff01)
* pci4 U0.1-P2 PCIBus
+ scsi0 U0.1-P2/Z1 Wide/Ultra-3 SCSII/O Controller
+ hdisk0 U0.1-P2/Z1-A8 Other SCSIDisk Drive
+ ses0 U0.1-P2/Z1-AF SCSIEnclosure Services Device
+ scsi1 U0.1-P2/Z2 Wide/Ultra-3 SCSI I/O Controller
* pci5 U0.1-P2 PCIBus
+ L2cache0 L2 Cache
+ mem0 Memory
+ proc0 U0.1-P1-C1 Processor
+ proc1 U0.1-P1-C1 Processor
# bootinfo -K //查看內核的版本

【補充】:32位內核升級到64位
——————————————————————————————————————————————————————————————————————
# ls /unix
//內核使用的文件是叫unix的文件
//當系統啟動內核時系統會到磁盤上找到這個unix文件
# ls |grep unix

# ls -l /unix

32位內核升級到64位:
# ln -sf /usr/lib/boot/unix_64 /unix
//unix_64是一個用來讀取64位內核的文件
//將unix文件鏈接到unix_64文件上,即當系統啟動時,系統會通過讀取unix文件而讀取到unix_64這個文件
# ln -sf /usr/lib/boot/unix_64 /usr/lib/boot/unix
//做第二個鏈接,此文件本身就是一個鏈接文件
//“ln -s”:做一個軟鏈接,f代表強制
# bosboot -ad /dev/ipldevice //修改啟動信息
# shutdown -Fr //重啟系統
64位內核降級到32位:
# ln -sf /usr/lib/boot/unix_mp /unix
//unix_32是一個用來讀取32位內核的文件
# ln -sf /usr/lib/boot/unix_mp /usr/lib/boot/unix
# bosboot -ad /dev/ipldevice //修改啟動信息
# shutdown -Fr //重啟系統
補充完畢——————————————————————————————————————————————————————————————————
# df -m//查看文件系統
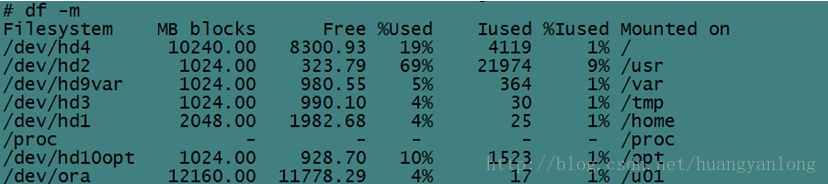
注意項目:
/u01
單獨創建一個文件系統放到u01下,不要放在根下,避免把根空間塞滿處理起來較麻煩。即單獨建立一個邏輯卷,把其掛載到u01下,在u01下存放oracle的所有文件。
在/u01單獨作為文件系統的情況下,根也就不用分配太大的空間了。
/tmp
安裝oracle之前,至少要有400M的臨時空間,若tmp不夠手工對其進行一下擴容。
%Used
不要超過80%,若發現某個空間超過80%了,一定要去擴容。
/home
設置給其2g,通常會使用ftp在home下上傳一些文件,稍微給大一些,較方便。
# lsps -a //查看交換分區信息建議給4g
//因為這裡機器內存為2g,交換分區設成是其兩倍
//交換分區擴容時不要使用陣列上的磁盤(陣列若是多機使用有被刪除的可能性),使用根卷下的磁盤

//對於根卷,不要給其添加新的物理卷(即不要將陣列上的盤添加到根卷上),因為陣列磁盤添加到根卷後,若將陣列上的擴充磁盤直接刪除將會引起系統很多問題
————————————————————————————————————————————————————————————————————
方式一:# lsps -a
方式二:# lsps -s

補充完畢
————————————————————————————————————————————————————————————————————
# lslpp -l |grep bos.adt

# lslpp -l |grep -i xlc.rte

# lslpp -l |grep -i xlc

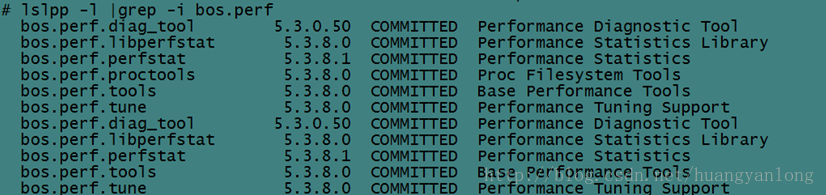
# lslpp -l |grep -i bos.perf
3.2 補丁包的安裝
# instfix -ik IY58143

# instfix -ik IY59386

# instfix -ik IY60930

# instfix -ik IY66513

# instfix -ik IY70159

# instfix -ik IY68989

(4)修改系統內核參數
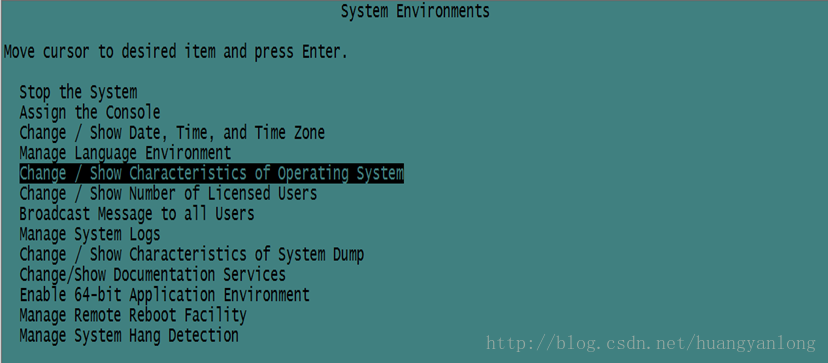
# smit system
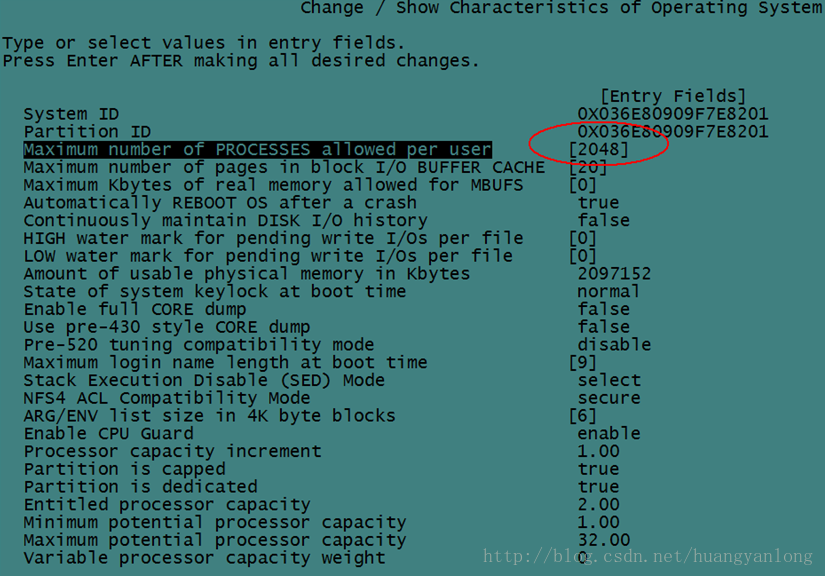
Maximum number of PROCESSES allowed peruser 允許訪問用戶訪問的進程個數
2048
# smit chaio
//啟動異步IO要保證操作系統支持異步IO,如果操作系統不支持異步IO,要在oracle用戶下去模擬一些異步的進程
//chaio代表change IO
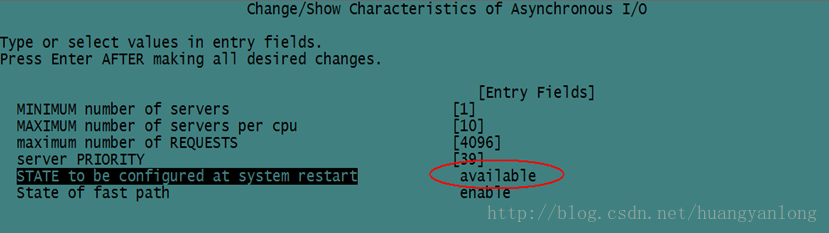
STATE to be configured atsystem restart 系統下次啟動設備狀態
默認defined
修改成available//設備可用狀態
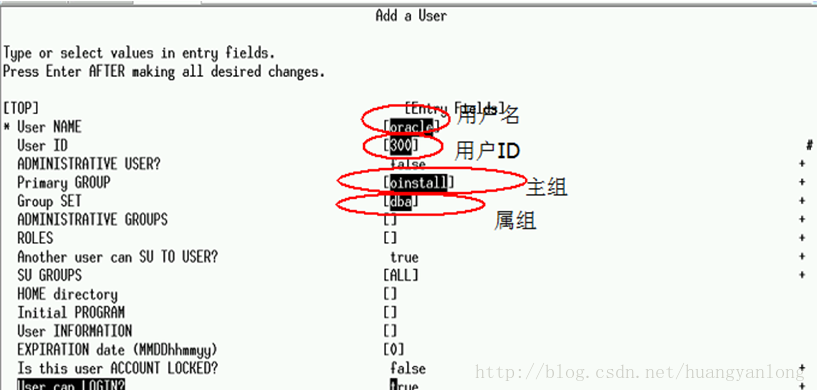
使用smit user(或#smit mkuser)命令創建用戶
users: oracle
oracle 501 /home/oracle
參考信息如下圖:
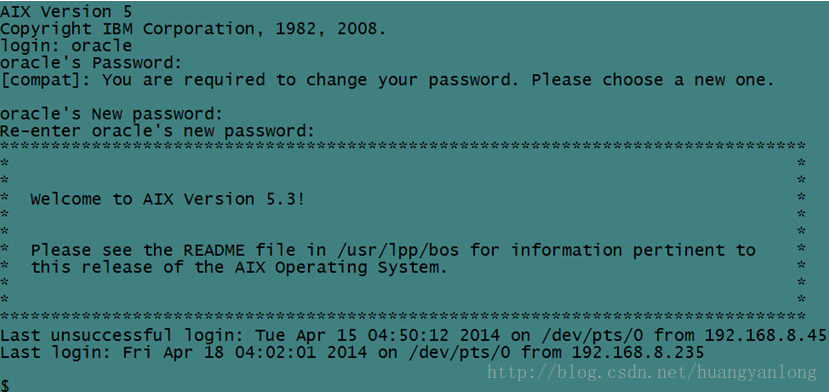
# id oracle

# passwd oracle//用戶設置密碼

login: oracle
//要使用oracle用戶登陸一次,因為第一次登陸會重設密碼,之後用戶才會生效
使用smit group(或#smit mkgroup)命令創建組
oinstall 501 false oracle root files
dba 502 false oracle root files
#smit chuser//修改oracle參數設置
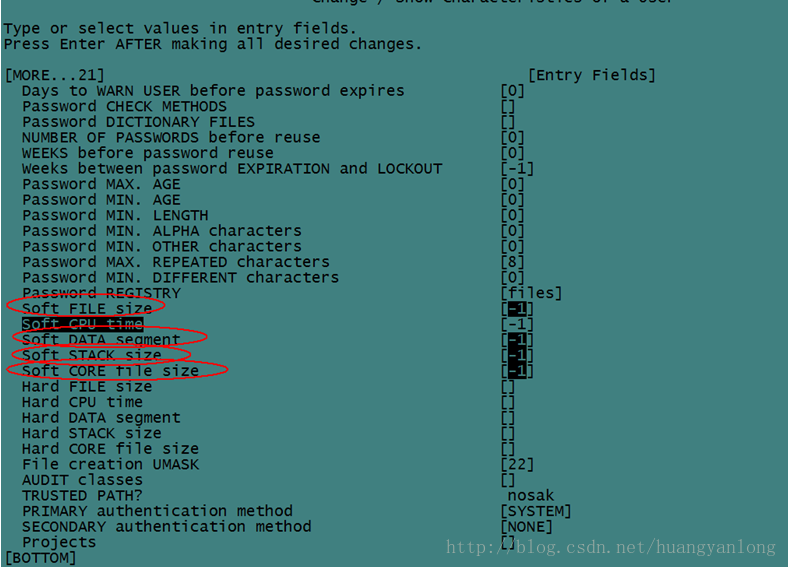
修改選項
Soft FILE size 可以讀取或寫入文件的大小
-1 不做限制
Soft DATA segment 堆棧的大小
-1 不做限制
Soft STACK size
-1 不做限制
Soft CORE file size
-1 不做限制
# cat/etc/security/limits//修改完參數後,會添加到limits文件中,查看到如下
*
* Sizes are in multiples of 512 byte blocks, CPU timeis in seconds
*
* fsize -soft file size in blocks
* core - softcore file size in blocks
* cpu -soft per process CPU time limit in seconds
* data -soft data segment size in blocks
* stack -soft stack segment size in blocks
* rss -soft real memory usage in blocks
* nofiles -soft file descriptor limit
* fsize_hard - hard file size in blocks
* core_hard -hard core file size in blocks
* cpu_hard -hard per process CPU time limit in seconds
* data_hard -hard data segment size in blocks
* stack_hard - hard stack segment size in blocks
* rss_hard -hard real memory usage in blocks
* nofiles_hard - hard file descriptor limit
*
* The following table contains the default hard valuesif the
* hard values are not explicitly defined:
*
* Attribute Value
* ========== ============
* fsize_hard set to fsize
* cpu_hard set to cpu
* core_hard -1
* data_hard -1
* stack_hard 8388608
* rss_hard -1
* nofiles_hard -1
*
* NOTE: A valueof -1 implies "unlimited"
*
default:
fsize = 2097151
core =2097151
cpu = -1
data =262144
rss =65536
stack =65536
nofiles =2000
root:
daemon:
bin:
sys:
adm:
uucp:
guest:
nobody:
lpd:
oracle:
fsize = -1
data = -1
stack = -1
core = -1
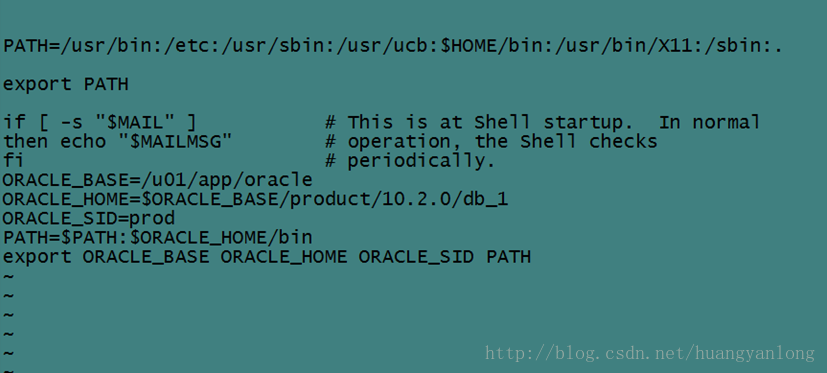
# su - oracle
$ vi .profile
添加:
ORACLE_BASE=/u01/app/oracle
ORACLE_HOME=$ORACLE_BASE/product/10.2.0/db_1
ORACLE_SID=prod
PATH=$PATH:$ORACLE_HOME/bin
export ORACLE_BASE ORACLE_HOME ORACLE_SIDPATH
修改後配置文件如下圖:
(9)添加/u01下oracle目錄
$ ls /u01 //查看u01下內容,發現為空

$ su -

# chown -Roracle:oinstall /u01
# su - oracle
$ mkdir -p/u01/app/oracle
$ ls -l /u01

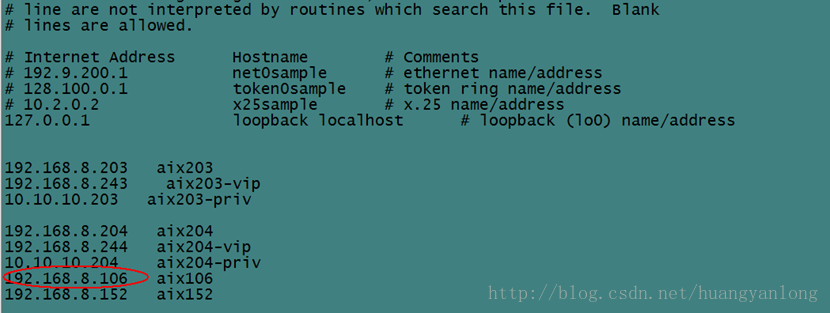
# vi /etc/hosts
添加aix106
注意:此環境中,使用aix106作為遠程服務器使用,其上共享了軟件的安裝文件。以下操作,目的是將oracle文件拷貝到本地。
# mount aix106:/ware/soft
# ls /soft

# mkdir /soft2
# cp -r/soft/database /soft2//把aix106上的database拷貝到本地,對其有讀寫權限
1、
保證177端口號是激活的
$ netstat -an |grep177

補充:
若沒激活,以下方法激活:

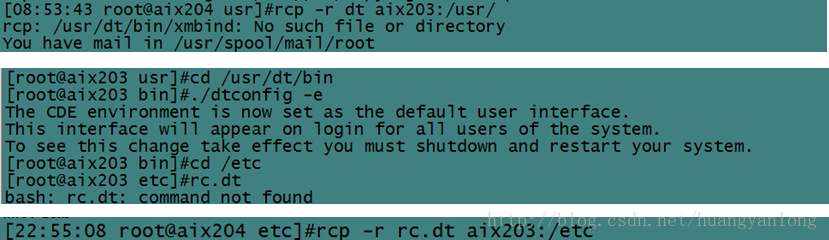
#du -sm dt

由於aix203上缺少dt、rc.dt文件,通過aix204向其拷貝文件,如下所示:
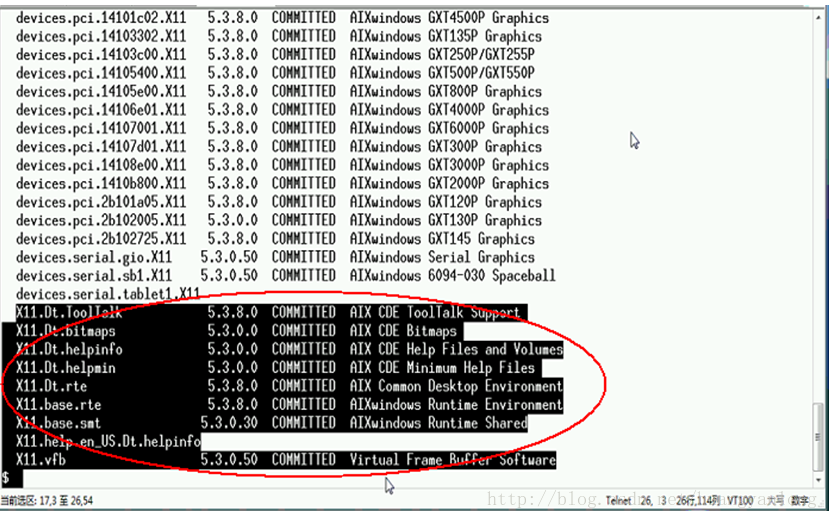
2、確認軟件包已經安裝(disk2上)
$ lslpp -l |grep -i x11
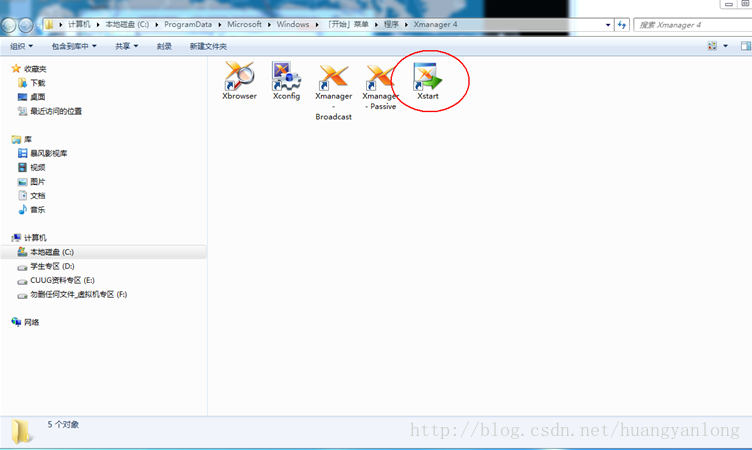
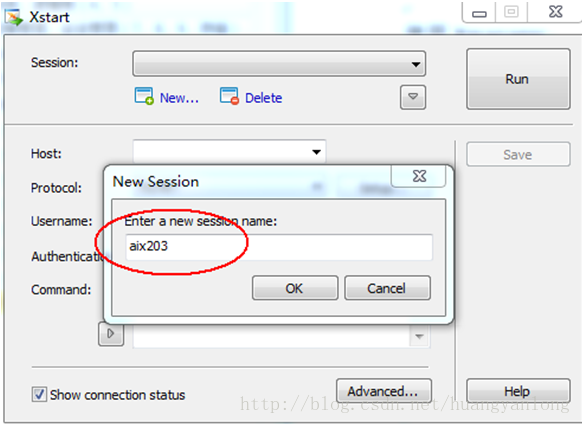
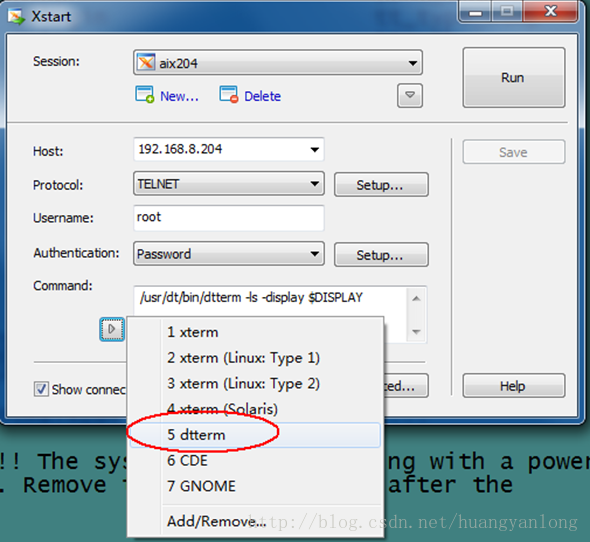
使用Xmanager
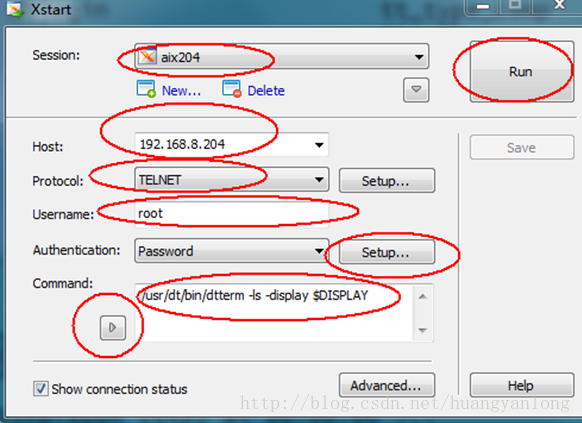

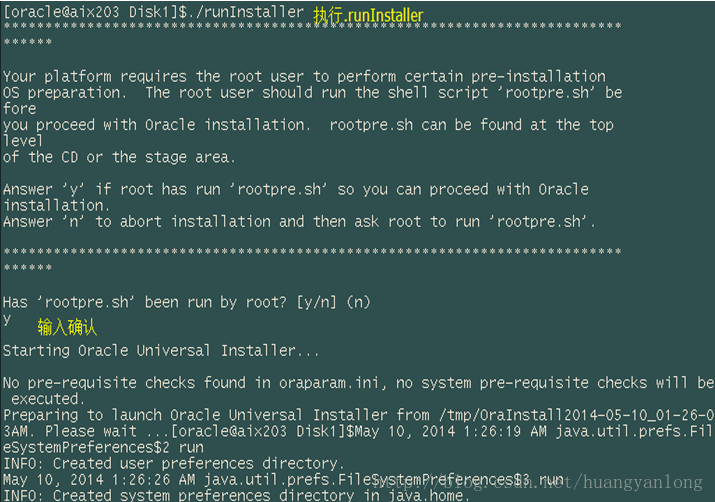
$./runInstaller
//執行後,輸入y確認,之後報錯,根據錯誤提示可知沒有設置DISPLAY所致
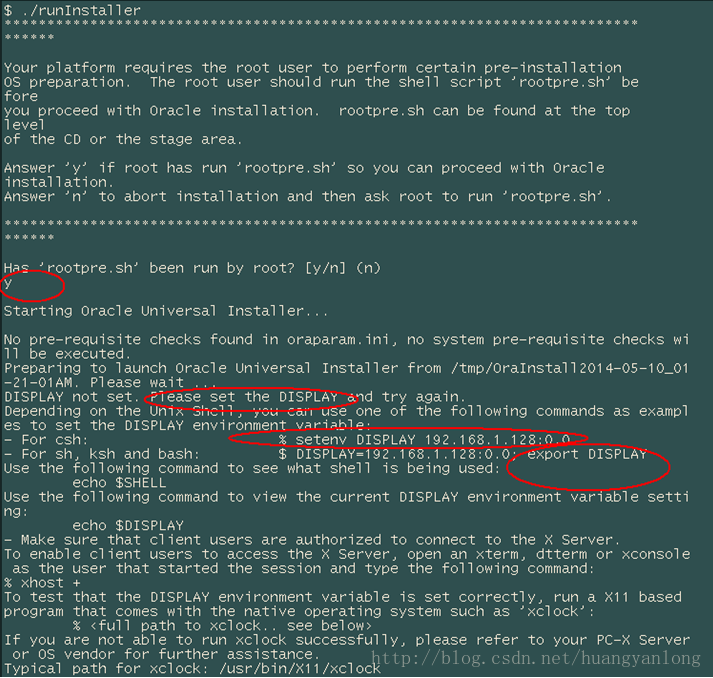

$exportDISPLAY=192.168.8.73:0
完成以上步驟後,可以進入到下面的圖形化界面了。

以下開始按提示圖形 安裝oracle軟件即可,此處省略。
至此,如何在AIX安裝oracle的流程已介紹完成。實際安裝時,根據現場的不同環境做出相應的調整即可,思路是一樣的。
***********************************************聲明************************************************
原創作品,出自 “深藍的blog” 博客,歡迎轉載,轉載時請務必注明出處(http://blog.csdn.net/huangyanlong)。
表述有錯誤之處,請您留言,不勝感激。
提醒:點擊目錄,更有助於您的查看。
*****************************************************************************************************