在上一篇我們都是采用發送信息到隊列然後隊列把信息在發送到消費者,其實實際情況並非如此,rabbitMQ其實真正的思想是生產者不發送任何信息到隊列,甚至不知道信息將發送到哪個隊列。相反生產者只能發送信息到交換機,交換機接收到生產者的信息,然後按照規則把它推送到對列中,交換機是如何做處理他接收到的信息,並怎麼樣發送到特定的隊列,那麼這一篇主要是講解交換機的規則。
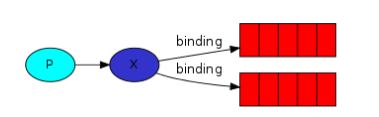
在上一篇說到的隊列都指定了名稱,但是現在我們不需要這麼做,我們需要所有的日志信息,而不只是其中的一個。如果要做這樣的隊列,我們需要2件事,一個就是獲取一個新的空的隊列,這樣我就需要創建一個隨機名稱的隊列,最好讓服務器幫我們做出選擇,第一個就是我們斷開用戶的隊列,應該自動進行刪除。ok下面是一副工作圖。
信息發送端代碼
public class EmitLog {
private static final String EXCHANGE_NAME = "logs";
public static void main(String[] args) throws IOException, TimeoutException {
ConnectionFactory factory=new ConnectionFactory();
factory.setHost("localhost");
Connection connection=factory.newConnection();
Channel channel=connection.createChannel();
channel.exchangeDeclare(EXCHANGE_NAME,"fanout");//fanout表示分發,所有的消費者得到同樣的隊列信息
//分發信息
for (int i=0;i<5;i++){
String message="Hello World"+i;
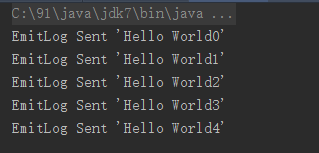
channel.basicPublish(EXCHANGE_NAME,"",null,message.getBytes());
System.out.println("EmitLog Sent '" + message + "'");
}
channel.close();
connection.close();
}
消費者代碼
public class ReceiveLogs1 {
private static final String EXCHANGE_NAME = "logs";
public static void main(String[] args) throws IOException, TimeoutException {
ConnectionFactory factory = new ConnectionFactory();
factory.setHost("localhost");
Connection connection = factory.newConnection();
Channel channel = connection.createChannel();
channel.exchangeDeclare(EXCHANGE_NAME, "fanout");
//產生一個隨機的隊列名稱
String queueName = channel.queueDeclare().getQueue();
channel.queueBind(queueName, EXCHANGE_NAME, "");//對隊列進行綁定
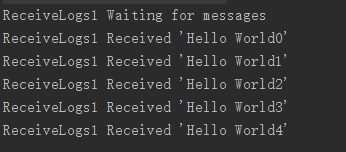
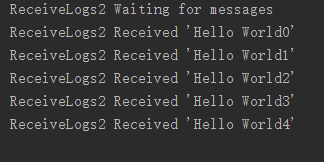
System.out.println("ReceiveLogs1 Waiting for messages");
Consumer consumer = new DefaultConsumer(channel) {
@Override
public void handleDelivery(String consumerTag, Envelope envelope, AMQP.BasicProperties properties, byte[] body) throws IOException {
String message = new String(body, "UTF-8");
System.out.println("ReceiveLogs1 Received '" + message + "'");
}
};
channel.basicConsume(queueName, true, consumer);//隊列會自動刪除
}
}
上面就完成了一個發布/訂閱模式的消息隊列 看看結果
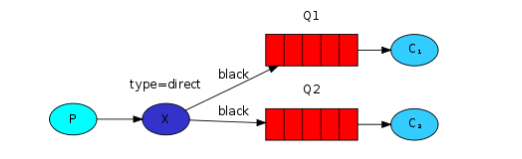
上面我用采用了廣播的模式進行消息的發送,現在我們采用路由的方式對不同的消息進行過濾
發送端代碼
public class RoutingSendDirect {
    private static final String EXCHANGE_NAME = "direct_logs";
    // 路由關鍵字
    private static final String[] routingKeys = new String[]{"info" ,"warning", "error"};
    public static void main(String[] args) throws IOException, TimeoutException {
        ConnectionFactory factory = new ConnectionFactory();
        factory.setHost("localhost");
        Connection connection = factory.newConnection();
        Channel channel = connection.createChannel();
        //聲明交換機
        channel.exchangeDeclare(EXCHANGE_NAME,"direct");//注意是direct
        //發送信息
        for (String routingKey:routingKeys){
            String message = "RoutingSendDirect Send the message level:" + routingKey;
            channel.basicPublish(EXCHANGE_NAME,routingKey,null,message.getBytes());
            System.out.println("RoutingSendDirect Send"+routingKey +"':'" + message);
        }
        channel.close();
        connection.close();
    }
}
ReceiveLogsDirect1 消費者代碼
public class ReceiveLogsDirect1 {
    // 交換器名稱
    private static final String EXCHANGE_NAME = "direct_logs";
    // 路由關鍵字
    private static final String[] routingKeys = new String[]{"info" ,"warning"};

    public static void main(String[] args) throws IOException, TimeoutException {
        ConnectionFactory factory = new ConnectionFactory();
        factory.setHost("localhost");
        Connection connection = factory.newConnection();
        Channel channel = connection.createChannel();
        //聲明交換器
        channel.exchangeDeclare(EXCHANGE_NAME, "direct");
        //獲取匿名隊列名稱
        String queueName=channel.queueDeclare().getQueue();

        //根據路由關鍵字進行綁定
        for (String routingKey:routingKeys){
            channel.queueBind(queueName,EXCHANGE_NAME,routingKey);
            System.out.println("ReceiveLogsDirect1 exchange:"+EXCHANGE_NAME+"," +
                    " queue:"+queueName+", BindRoutingKey:" + routingKey);
        }
        System.out.println("ReceiveLogsDirect1  Waiting for messages");
        Consumer consumer = new DefaultConsumer(channel) {
            @Override
            public void handleDelivery(String consumerTag, Envelope envelope, AMQP.BasicProperties properties, byte[] body) throws IOException {
                String message = new String(body, "UTF-8");
                System.out.println("ReceiveLogsDirect1 Received '" + envelope.getRoutingKey() + "':'" + message + "'");
            }
        };
        channel.basicConsume(queueName, true, consumer);
    }
ReceiveLogsDirect2消費者代碼
public class ReceiveLogsDirect2 {
    // 交換器名稱
    private static final String EXCHANGE_NAME = "direct_logs";
    // 路由關鍵字
    private static final String[] routingKeys = new String[]{"error"};

    public static void main(String[] argv) throws Exception {
        ConnectionFactory factory = new ConnectionFactory();
        factory.setHost("localhost");
        Connection connection = factory.newConnection();
        Channel channel = connection.createChannel();
        //聲明交換器
        channel.exchangeDeclare(EXCHANGE_NAME, "direct");
        //獲取匿名隊列名稱
        String queueName = channel.queueDeclare().getQueue();
        //根據路由關鍵字進行多重綁定
        for (String severity : routingKeys) {
            channel.queueBind(queueName, EXCHANGE_NAME, severity);
            System.out.println("ReceiveLogsDirect2 exchange:"+EXCHANGE_NAME+", queue:"+queueName+", BindRoutingKey:" + severity);
        }
        System.out.println("ReceiveLogsDirect2 Waiting for messages");

        Consumer consumer = new DefaultConsumer(channel) {
            @Override
            public void handleDelivery(String consumerTag, Envelope envelope, AMQP.BasicProperties properties, byte[] body) throws UnsupportedEncodingException {
                String message = new String(body, "UTF-8");
                System.out.println("ReceiveLogsDirect2 Received '" + envelope.getRoutingKey() + "':'" + message + "'");
            }
        };
        channel.basicConsume(queueName, true, consumer);
    }
}
上面代碼可以看出這裡是通過路由來找個這個對列的。我們看下結果


這種應該屬於模糊匹配
* :可以替代一個詞
#:可以替代0或者更多的詞
現在我們繼續看看代碼來理解
發送端
public class TopicSend {
private static final String EXCHANGE_NAME = "topic_logs";
public static void main(String[] args) throws IOException, TimeoutException {
Connection connection = null;
Channel channel = null;
try{
ConnectionFactory factory=new ConnectionFactory();
factory.setHost("localhost");
connection=factory.newConnection();
channel=connection.createChannel();
//聲明一個匹配模式的交換機
channel.exchangeDeclare(EXCHANGE_NAME,"topic");
//待發送的消息
String[] routingKeys=new String[]{
"quick.orange.rabbit",
"lazy.orange.elephant",
"quick.orange.fox",
"lazy.brown.fox",
"quick.brown.fox",
"quick.orange.male.rabbit",
"lazy.orange.male.rabbit"
};
//發送消息
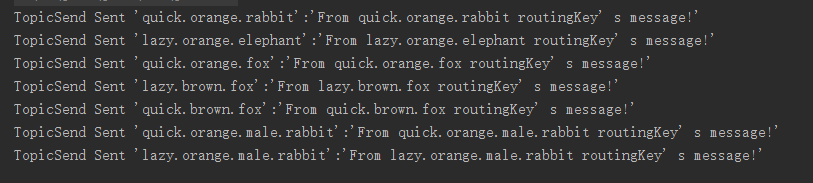
for(String severity :routingKeys){
String message = "From "+severity+" routingKey' s message!";
channel.basicPublish(EXCHANGE_NAME, severity, null, message.getBytes());
System.out.println("TopicSend Sent '" + severity + "':'" + message + "'");
}
}catch (Exception e){
e.printStackTrace();
if (connection!=null){
channel.close();
connection.close();
}
}finally {
if (connection!=null){
channel.close();
connection.close();
}
}
}
}
消費者1:
public class ReceiveLogsTopic1 {
    private static final String EXCHANGE_NAME = "topic_logs";

    public static void main(String[] args) throws IOException, TimeoutException {
        ConnectionFactory factory = new ConnectionFactory();
        factory.setHost("localhost");
        Connection connection = factory.newConnection();
        Channel channel = connection.createChannel();

        //聲明一個匹配模式的交換機
        channel.exchangeDeclare(EXCHANGE_NAME, "topic");
        String queueName = channel.queueDeclare().getQueue();
        //路由關鍵字
        String[] routingKeys = new String[]{"*.orange.*"};
        //綁定路由
        for (String routingKey : routingKeys) {
            channel.queueBind(queueName, EXCHANGE_NAME, routingKey);
            System.out.println("ReceiveLogsTopic1 exchange:" + EXCHANGE_NAME + ", queue:" + queueName + ", BindRoutingKey:" + routingKey);
        }
        System.out.println("ReceiveLogsTopic1 Waiting for messages");

        Consumer consumer = new DefaultConsumer(channel) {
            @Override
            public void handleDelivery(String consumerTag, Envelope envelope, AMQP.BasicProperties properties, byte[] body) throws IOException {
                String message = new String(body, "UTF-8");
                System.out.println("ReceiveLogsTopic1 Received '" + envelope.getRoutingKey() + "':'" + message + "'");
            }
        };
        channel.basicConsume(queueName, true, consumer);
    }
}
消費者2:
ublic class ReceiveLogsTopic2 {
    private static final String EXCHANGE_NAME = "topic_logs";

    public static void main(String[] argv) throws IOException, TimeoutException {
        ConnectionFactory factory = new ConnectionFactory();
        factory.setHost("localhost");
        Connection connection = factory.newConnection();
        Channel channel = connection.createChannel();
//      聲明一個匹配模式的交換器
        channel.exchangeDeclare(EXCHANGE_NAME, "topic");
        String queueName = channel.queueDeclare().getQueue();
        // 路由關鍵字
        String[] routingKeys = new String[]{"*.*.rabbit", "lazy.#"};
//      綁定路由關鍵字
        for (String bindingKey : routingKeys) {
            channel.queueBind(queueName, EXCHANGE_NAME, bindingKey);
            System.out.println("ReceiveLogsTopic2 exchange:"+EXCHANGE_NAME+", queue:"+queueName+", BindRoutingKey:" + bindingKey);
        }

        System.out.println("ReceiveLogsTopic2 Waiting for messages");

        Consumer consumer = new DefaultConsumer(channel) {
            @Override
            public void handleDelivery(String consumerTag, Envelope envelope, AMQP.BasicProperties properties, byte[] body) throws UnsupportedEncodingException  {
                String message = new String(body, "UTF-8");
                System.out.println("ReceiveLogsTopic2 Received '" + envelope.getRoutingKey() + "':'" + message + "'");
            }
        };
        channel.basicConsume(queueName, true, consumer);
    }
}
運行後結果