NRPE是Nagios的一個功能擴展,它可在遠程Linux/Unix主機上執行插件程序。通過在遠程服務器上安裝NRPE插件及Nagios插件程序來向Nagios監控平台提供該服務器的本地情況,如CPU負載,內存使用,磁盤使用等。這裡將Nagios監控端稱為Nagios服務器端,而將遠程被監控的主機稱為Nagios客戶端。
Nagios監控遠程主機的方法有多種,其方式包括SNMP,NRPE,SSH,NCSA等。這裡介紹其通過NRPE監控遠程Linux主機的方式。
NRPE(Nagios Remote Plugin Executor)是用於在遠端服務器上運行監測命令的守護進程,它用於讓Nagios監控端基於安裝的方式觸發遠端主機上的檢測命令,並將檢測結果返回給監控端。而其執行的開銷遠低於基於SSH的檢測方式,而且檢測過程不需要遠程主機上的系統賬號信息,其安全性也高於SSH的檢測方式。
NRPE有兩部分組成
check_nrpe插件:位於監控主機上
nrpe daemon:運行在遠程主機上,通常是被監控端agent
注意:nrpe daemon需要Nagios-plugins插件的支持,否則daemon不能做任何監控
當Nagios需要監控某個遠程Linux主機的服務或者資源情況時:
首先:Nagios會運行check_nrpe這個插件,告訴它要檢查什麼;
其次:check_nrpe插件會連接到遠程的NRPE daemon,所用的方式是SSL;
然後:NRPE daemon 會運行相應的Nagios插件來執行檢查;
最後:NRPE daemon 將檢查的結果返回給check_nrpe 插件,插件將其遞交給nagios做處理。
<版權所有,文章允許轉載,但必須以鏈接方式注明源地址,否則追究法律責任!>
原博客地址: http://blog.csdn.net/mchdba/article/details/46666229
原作者:黃杉 (mchdba)
去mysql客戶端安裝nrpe客戶端服務
[root@localhost ~]# useradd -s/sbin/nologin nagios
[root@localhost ~]# yum -yinstall gcc gcc-c++ make openssl openssl-devel
tar -xvf nrpe-2.15.tar.gz
cd nrpe-2.15
./configure--with-nrpe-user=nagios --with-nrpe-group=nagios --with-nagios-user=nagios--with-nagios-group=nagios --enable-command-args --enable-ssl
make all
make install-plugin
make install-daemon
make install-daemon-config
grep -v '^#' /usr/local/nagios/etc/nrpe.cfg |sed '/^$/d'
[root@localhost ~]# grep -v '^#' /usr/local/nagios/etc/nrpe.cfg|sed '/^$/d'
log_facility=daemon
pid_file=/var/run/nrpe.pid
server_port=5666
nrpe_user=nagios
nrpe_group=nagios
allowed_hosts=127.0.0.1,192.168.121.211
dont_blame_nrpe=0
allow_bash_command_substitution=0
debug=0
command_timeout=60
connection_timeout=300
command[check_users]=/usr/local/nagios/libexec/check_users-w 8 -c 12
command[check_load]=/usr/local/nagios/libexec/check_load -w15,10,5 -c 30,25,20
command[check_sda1]=/usr/local/nagios/libexec/check_disk -w20% -c 10% -p /dev/sda3
command[check_zombie_procs]=/usr/local/nagios/libexec/check_procs-w 5 -c 10 -s Z
command[check_total_procs]=/usr/local/nagios/libexec/check_procs-w 750 -c 800
command[check-host-alive]=/usr/local/nagios/libexec/check_ping-H 10.254.3.72 -w 3000.0,80% -c 5000.0,100% -p 5
command[check_mysql_status]=/usr/local/nagios/libexec/check_mysql-unagios -P3306 -s /usr/local/mysql/mysql.sock -Hlocalhost--password='nagiosq@0625' -d test -w 60 -c 100
[root@localhost ~]#
/usr/local/nagios/bin/nrpe -c /usr/local/nagios/etc/nrpe
[root@localhost bin]# cat /etc/init.d/nrped
#chkconfig: 2345 80 90
#description:auto_run
NRPE=/usr/local/nagios/bin/nrpe
NRPECONF=/usr/local/nagios/etc/nrpe.cfg
case "$1" in
start)
echo -n "Starting NRPE daemon..."
$NRPE -c $NRPECONF -d
echo " done."
;;
stop)
echo -n "Stopping NRPE daemon..."
pkill -u nagios nrpe
echo " done."
;;
restart)
$0 stop
sleep 2
$0 start
;;
*)
echo "Usage: $0 start|stop|restart"
;;
esac
exit 0
[root@localhost bin]#
chmod +x /etc/init.d/nrped
chkconfig --add nrped
chkconfig nrped on
[root@localhost bin]# ps -eaf|grep nrpe
nagios 30440 1 0 23:48 ? 00:00:00 /usr/local/nagios/bin/nrpe -c/usr/local/nagios/etc/nrpe.cfg -d
root 30442 3292 0 23:48 pts/0 00:00:00 grep nrpe
[root@localhost bin]#
[root@localhost bin]# netstat -tnlp |grepnrpe
tcp 0 0 0.0.0.0:5666 0.0.0.0:* LISTEN 30440/nrpe
tcp 0 0 :::5666 :::* LISTEN 30440/nrpe
[root@localhost bin]#
tar xf nrpe-2.15.tar.gz
cd nrpe-2.15
./configure --with-nrpe-user=nagios --with-nrpe-group=nagios --with-nagios-user=nagios --with-nagios-group=nagios --enable-command-args --enable-ssl
make all
make install-plugin
#安裝完成後,會在Nagios安裝目錄的libexec下生成check_nrpe的插件,如下所示:
[root@test_db2 nagios]# ll /usr/local/nagios/libexec/check_nrpe
-rwxrwxr-x 1 nagios nagios 76777 Jun 2523:53 /usr/local/nagios/libexec/check_nrpe
[root@test_db2 nagios]#
檢測報錯:
[root@test_db2 libexec]# ./check_nrpe -H192.168.121.210
CHECK_NRPE: Error - Could not complete SSLhandshake.
[root@test_db2 libexec]#
去客戶端在allowed_hosts中添加監控端IP地址
[root@localhost ~]# vim/usr/local/nagios/etc/nrpe.cfg
allowed_hosts=127.0.0.1,192.168.121.211
在mysql服務器上,報錯:
[root@localhost ~]#/usr/local/nagios/libexec/check_mysql -unagios -P3306 -S -s/usr/local/mysql/mysql.sock -Hlocalhost --password='nagiosq@0512' -d test -w 60-c 100
/usr/local/nagios/libexec/check_mysql:error while loading shared libraries: libmysqlclient.so.18: cannot open sharedobject file: No such file or directory
[root@localhost ~]#
[root@localhost ~]# find / -namelibmysqlclient.so.18
/usr/local/mysql/lib/libmysqlclient.so.18
/root/mysql/mysql-5.6.12/libmysql/libmysqlclient.so.18
/root/mysql-5.6.12/libmysql/libmysqlclient.so.18
[root@localhost ~]# ln -s/usr/local/mysql/lib/libmysqlclient.so.18 /usr/lib64/libmysqlclient.so.18
[root@localhost ~]#
添加mysql賬號:
mysql> GRANT PROCESS, SUPER, REPLICATIONCLIENT ON *.* TO 'nagios'@'localhost' IDENTIFIED BY 'nagiosq@0625';
Query OK, 0 rows affected (0.05 sec)
mysql>
客戶端自己檢測:
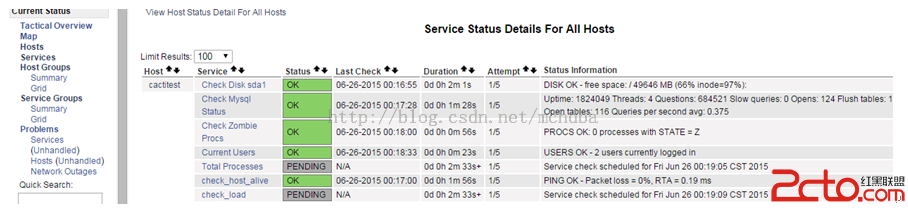
[root@localhost ~]#/usr/local/nagios/libexec/check_mysql -unagios -P3306 -s /usr/local/mysql/mysql.sock -Hlocalhost--password='nagiosq@0625' -d test -w 60 -c 100
Uptime: 1823238 Threads: 6 Questions: 684495 Slow queries:0 Opens: 124 Flush tables: 1 Open tables: 116 Queries per second avg:0.375|Connections=3116c;;; Open_files=19;;; Open_tables=116;;; Qcache_free_memory=61538880;;;Qcache_hits=176271c;;; Qcache_inserts=41370c;;; Qcache_lowmem_prunes=0c;;;Qcache_not_cached=331835c;;; Qcache_queries_in_cache=3373;;; Queries=684496c;;;Questions=681384c;;; Table_locks_waited=0c;;; Threads_connected=5;;;Threads_running=2;;; Uptime=1823238c;;;
[root@localhost ~]#
將servers.cfg添加進nagios.cfg裡面,將command.cfg裡面的check_host_alive以及check_mysql_status補充好,然後重啟nagios
# add by timman on 20150512
define command{
command_name check_mysql_status
command_line $USER1$/check_mysql_status-w $ARG1$ -c $ARG2$
}
# 'check_nrpe' command definition,add bytimman on 20140508
define command{
command_name check_nrpe
command_line $USER1$/check_nrpe-H $HOSTADDRESS$ -c $ARG1$
}
define command{
command_name check_host_alive
command_line $USER1$/check_ping-H $HOSTADDRESS$ -w 3000.0,80% -c 5000.0,100% -p 5
}
[root@test_db2 etc]# more servers.cfg
# servicedefinition
define service{
host_name cactitest
service_description check_load
check_command check_nrpe!check_load
max_check_attempts 5
normal_check_interval 3
retry_check_interval 2
check_period 24x7
notification_interval 10
notification_period 24x7
notification_options w,u,c,r
contact_groups dba
}
define service{
host_name cactitest
service_description check_host_alive
check_command check_host_alive
max_check_attempts 5
normal_check_interval 3
retry_check_interval 2
check_period 24x7
notification_interval 10
notification_period 24x7
notification_options w,u,c,r
contact_groups dba
}
define service{
host_name cactitest
service_description Check Disksda1
check_command check_nrpe!check_sda1
max_check_attempts 5
normal_check_interval 3
retry_check_interval 2
check_period 24x7
notification_interval 10
notification_period 24x7
notification_options w,u,c,r
contact_groups dba
}
define service{
host_name cactitest
service_description TotalProcesses
check_command check_nrpe!check_total_procs
max_check_attempts 5
normal_check_interval 3
retry_check_interval 2
check_period 24x7
notification_interval 10
notification_period 24x7
notification_options w,u,c,r
contact_groups dba
}
define service{
host_name cactitest
service_description CurrentUsers
check_command check_nrpe!check_users
max_check_attempts 5
normal_check_interval 3
retry_check_interval 2
check_period 24x7
notification_interval 10
notification_period 24x7
notification_options w,u,c,r
contact_groups dba
}
define service{
host_name cactitest
service_description CheckZombie Procs
check_command check_nrpe!check_zombie_procs
max_check_attempts 5
normal_check_interval 3
retry_check_interval 2
check_period 24x7
notification_interval 10
notification_period 24x7
notification_options w,u,c,r
contact_groups dba
}
define service{
host_name cactitest
service_description CheckMysql Status
check_command check_nrpe!check_mysql_status
max_check_attempts 5
normal_check_interval 3
retry_check_interval 2
check_period 24x7
notification_interval 10
notification_period 24x7
notification_options w,u,c,r
contact_groups dba
}
在nagios.cfg裡面配置
cfg_file=/usr/local/nagios/etc/servers.cfg
同時添加新的主機或者服務配置cfg文件,都需要在nagios.cfg裡面配置一下,然後重啟nagios才能生效,如下所示:
[root@test_db2 nagios]# grep -v '^#'/usr/local/nagios/etc/nagios.cfg |sed '/^$/d' |grep cfg_file
cfg_file=/usr/local/nagios/etc/objects/commands.cfg
cfg_file=/usr/local/nagios/etc/objects/contacts.cfg
cfg_file=/usr/local/nagios/etc/contactgroups.cfg
cfg_file=/usr/local/nagios/etc/objects/timeperiods.cfg
cfg_file=/usr/local/nagios/etc/objects/templates.cfg
cfg_file=/usr/local/nagios/etc/hosts.cfg
cfg_file=/usr/local/nagios/etc/servers.cfg
cfg_file=/usr/local/nagios/etc/hostgroups.cfg
cfg_file=/usr/local/nagios/etc/objects/localhost.cfg
[root@test_db2 nagios]#