CSemaphore-信號量
示例1:
1、新建MFC對話框應用程序MFCtreeCtrl。
2、可視化編輯界面控件
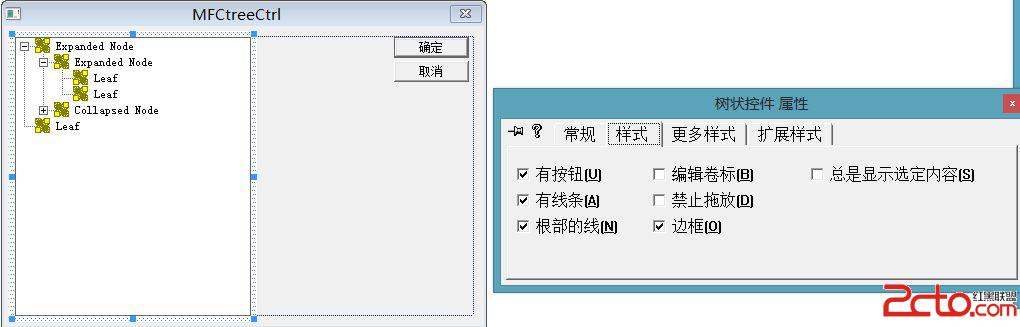

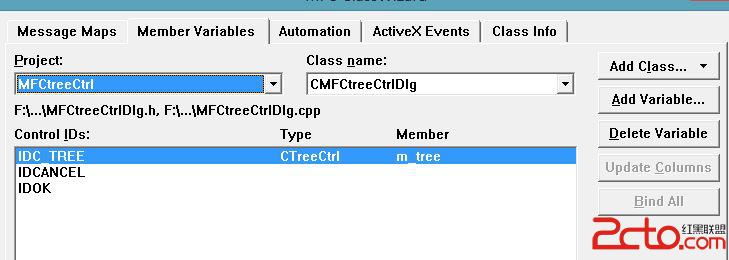
3、ctrl+w 綁定控件對應的成員變量和消息事件
4、***Dlg.h 中 添加成員變量和函數
CImageList m_ilNormal;//圖標列表
void initTreeCtrl();
5、***Dlg.cpp中的主要實現代碼(部分是自動生成的)
// MFCtreeCtrlDlg.cpp : implementation file
//

#include "stdafx.h"
#include "MFCtreeCtrl.h"
#include "MFCtreeCtrlDlg.h"
#include "resource.h"
#ifdef _DEBUG
#define new DEBUG_NEW
#undef THIS_FILE
static char THIS_FILE[] = __FILE__;
#endif

/////////////////////////////////////////////////////////////////////////////
// CAboutDlg dialog used for App About

class CAboutDlg : public CDialog
{
public:
	CAboutDlg();

// Dialog Data
	//{{AFX_DATA(CAboutDlg)
	enum { IDD = IDD_ABOUTBOX };
	//}}AFX_DATA

	// ClassWizard generated virtual function overrides
	//{{AFX_VIRTUAL(CAboutDlg)
	protected:
	virtual void DoDataExchange(CDataExchange* pDX);    // DDX/DDV support
	//}}AFX_VIRTUAL

// Implementation
protected:
	//{{AFX_MSG(CAboutDlg)
	//}}AFX_MSG
	DECLARE_MESSAGE_MAP()
};

CAboutDlg::CAboutDlg() : CDialog(CAboutDlg::IDD)
{
	//{{AFX_DATA_INIT(CAboutDlg)
	//}}AFX_DATA_INIT
}

void CAboutDlg::DoDataExchange(CDataExchange* pDX)
{
	CDialog::DoDataExchange(pDX);
	//{{AFX_DATA_MAP(CAboutDlg)
	//}}AFX_DATA_MAP
}

BEGIN_MESSAGE_MAP(CAboutDlg, CDialog)
	//{{AFX_MSG_MAP(CAboutDlg)
		// No message handlers
	//}}AFX_MSG_MAP
END_MESSAGE_MAP()

/////////////////////////////////////////////////////////////////////////////
// CMFCtreeCtrlDlg dialog

CMFCtreeCtrlDlg::CMFCtreeCtrlDlg(CWnd* pParent /*=NULL*/)
	: CDialog(CMFCtreeCtrlDlg::IDD, pParent)
{
	//{{AFX_DATA_INIT(CMFCtreeCtrlDlg)
		// NOTE: the ClassWizard will add member initialization here
	//}}AFX_DATA_INIT
	// Note that LoadIcon does not require a subsequent DestroyIcon in Win32
	m_hIcon = AfxGetApp()->LoadIcon(IDR_MAINFRAME);
}

void CMFCtreeCtrlDlg::DoDataExchange(CDataExchange* pDX)
{
	CDialog::DoDataExchange(pDX);
	//{{AFX_DATA_MAP(CMFCtreeCtrlDlg)
	DDX_Control(pDX, IDC_TREE, m_tree);
	//}}AFX_DATA_MAP
}

BEGIN_MESSAGE_MAP(CMFCtreeCtrlDlg, CDialog)
	//{{AFX_MSG_MAP(CMFCtreeCtrlDlg)
	ON_WM_SYSCOMMAND()
	ON_WM_PAINT()
	ON_WM_QUERYDRAGICON()
	//}}AFX_MSG_MAP
END_MESSAGE_MAP()

/////////////////////////////////////////////////////////////////////////////
// CMFCtreeCtrlDlg message handlers

BOOL CMFCtreeCtrlDlg::OnInitDialog()
{
	CDialog::OnInitDialog();

	// Add "About..." menu item to system menu.

	// IDM_ABOUTBOX must be in the system command range.
	ASSERT((IDM_ABOUTBOX & 0xFFF0) == IDM_ABOUTBOX);
	ASSERT(IDM_ABOUTBOX < 0xF000);

	CMenu* pSysMenu = GetSystemMenu(FALSE);
	if (pSysMenu != NULL)
	{
		CString strAboutMenu;
		strAboutMenu.LoadString(IDS_ABOUTBOX);
		if (!strAboutMenu.IsEmpty())
		{
			pSysMenu->AppendMenu(MF_SEPARATOR);
			pSysMenu->AppendMenu(MF_STRING, IDM_ABOUTBOX, strAboutMenu);
		}
	}

	// Set the icon for this dialog.  The framework does this automatically
	//  when the application's main window is not a dialog
	SetIcon(m_hIcon, TRUE);			// Set big icon
	SetIcon(m_hIcon, FALSE);		// Set small icon

	// TODO: Add extra initialization here
	initTreeCtrl();
	return TRUE;  // return TRUE  unless you set the focus to a control
}

void CMFCtreeCtrlDlg::OnSysCommand(UINT nID, LPARAM lParam)
{
	if ((nID & 0xFFF0) == IDM_ABOUTBOX)
	{
		CAboutDlg dlgAbout;
		dlgAbout.DoModal();
	}
	else
	{
		CDialog::OnSysCommand(nID, lParam);
	}
}

// If you add a minimize button to your dialog, you will need the code below
//  to draw the icon.  For MFC applications using the document/view model,
//  this is automatically done for you by the framework.

void CMFCtreeCtrlDlg::OnPaint()
{
	if (IsIconic())
	{
		CPaintDC dc(this); // device context for painting

		SendMessage(WM_ICONERASEBKGND, (WPARAM) dc.GetSafeHdc(), 0);

		// Center icon in client rectangle
		int cxIcon = GetSystemMetrics(SM_CXICON);
		int cyIcon = GetSystemMetrics(SM_CYICON);
		CRect rect;
		GetClientRect(&rect);
		int x = (rect.Width() - cxIcon + 1) / 2;
		int y = (rect.Height() - cyIcon + 1) / 2;

		// Draw the icon
		dc.DrawIcon(x, y, m_hIcon);
	}
	else
	{
		CDialog::OnPaint();
	}
}

// The system calls this to obtain the cursor to display while the user drags
//  the minimized window.
HCURSOR CMFCtreeCtrlDlg::OnQueryDragIcon()
{
	return (HCURSOR) m_hIcon;
}

void CMFCtreeCtrlDlg::initTreeCtrl()
{
	m_ilNormal.Create(IDB_NORMAL,16,1,RGB(0,0,0));
	m_tree.SetImageList(&m_ilNormal,LVSIL_NORMAL);
	HTREEITEM hroot=m_tree.InsertItem("根文件夾",0,1);
	HTREEITEM h1=m_tree.InsertItem("子文件夾1",0,1,hroot);
	HTREEITEM h2=m_tree.InsertItem("子文件夾2",0,1,hroot);
	HTREEITEM h3=m_tree.InsertItem("子文件夾3",0,1,hroot);
	HTREEITEM h4=m_tree.InsertItem("子文件夾4",0,1,hroot);
	HTREEITEM h2_1=m_tree.InsertItem("子文件夾2_1",0,1,h2);
	HTREEITEM h2_1_1=m_tree.InsertItem("子文件夾2_1_1",0,1,h2_1);
	m_tree.SetItemHeight(25);//高度
	m_tree.Expand(hroot,TVE_EXPAND);//設置某個節點項的展開狀態
}
【其他示例稍後補充】