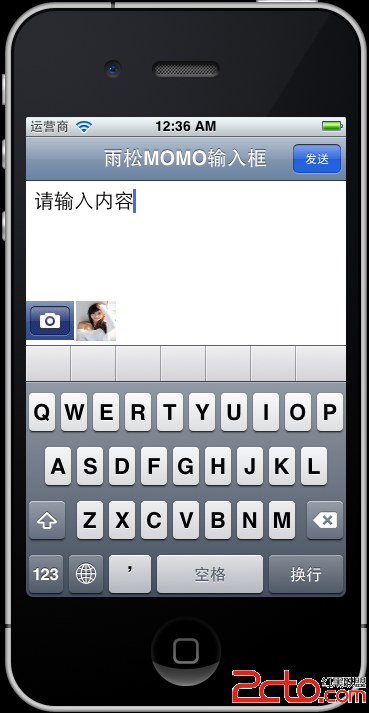
如下圖所示 在本地相冊中選擇一張圖片後,我們將他拷貝至沙盒當中,在客戶端中將它的縮略圖放在按鈕旁邊,這個結構其實和新浪微薄中選擇圖片後的效果一樣。最終點擊發送將按鈕將圖片2進制圖片上傳服務器。
 下面我們仔細學習具體的細節。創建一個空的IOS項目,接著在創建一個ViewController。
AppDelegate.h 應用的代理類 這個沒什麼好說的就是直接打開剛剛創建的新ViewController。
1
#import <UIKit/UIKit.h>
2
#import "TestViewController.h"
3
4
@interface AppDelegate : UIResponder <UIApplicationDelegate>
5
6
@property (strong, nonatomic) UIWindow *window;
7
@property (strong, nonatomic) UINavigationController *navController;
8
@property (strong, nonatomic) UIViewController *viewController;
9
@end
AppDelegate.m 在這裡就是打開我們創建的TestViewController
01
#import "AppDelegate.h"
02
03
@implementation AppDelegate
04
05
@synthesize window = _window;
06
@synthesize navController;
07
@synthesize viewController;
08
09
- (void)dealloc
10
{
11
[_window release];
12
[super dealloc];
13
}
14
15
- (BOOL)application:(UIApplication *)application didFinishLaunchingWithOptions:(NSDictionary *)launchOptions
16
{
17
self.window = [[[UIWindow alloc] initWithFrame:[[UIScreen mainScreen] bounds]] autorelease];
18
19
self.window.backgroundColor = [UIColor whiteColor];
20
self.viewController = [[TestViewController alloc]init];
21
self.navController = [[UINavigationController alloc] initWithRootViewController:self.viewController];
22
[self.window addSubview:navController.view];
23
24
[self.window makeKeyAndVisible];
25
return YES;
26
}
27
28
@end
TestViewController.h 注意這裡面引入了很多代理類。
01
#import <UIKit/UIKit.h>
02
03
@interface TestViewController : UIViewController<UITextViewDelegate,UIActionSheetDelegate,UINavigationControllerDelegate,UIImagePickerControllerDelegate>
04
{
05
//輸入框
06
UITextView *_textEditor;
07
08
//下拉菜單
09
UIActionSheet *myActionSheet;
10
11
//圖片2進制路徑
12
NSString* filePath;
13
}
14
@end
TestViewController.m 請大家仔細看這個類, 所有的東西都寫在了這裡哈。
001
#import "TestViewController.h"
002
003
@interface TestViewController ()
004
005
@end
006
007
@implementation TestViewController
008
009
- (void)viewDidLoad
010
{
011
[super viewDidLoad];
012
//導航欄標題
013
self.navigationItem.title = @"雨松MOMO輸入框";
014
015
//導航欄按鈕
016
self.navigationItem.rightBarButtonItem = [[[UIBarButtonItem alloc]
017
initWithTitle: @"發送"
018
style: UIBarButtonItemStyleDone
019
target: self
020
action: @selector(sendInfo)] autorelease];
021
022
//輸入框顯示區域
023
_textEditor = [[UITextView alloc] initWithFrame:CGRectMake(0, 0, 320, 100)];
024
//設置它的代理
025
_textEditor.delegate = self;
026
_textEditor.autoresizingMask = UIViewAutoresizingFlexibleWidth;
027
_textEditor.keyboardType = UIKeyboardTypeDefault;
028
_textEditor.font = [UIFont systemFontOfSize:20];
029
_textEditor.text = @"請輸入內容";
030
031
//默認軟鍵盤是在觸摸區域後才會打開
032
//這裡表示進入當前ViewController直接打開軟鍵盤
033
[_textEditor becomeFirstResponder];
034
035
//把輸入框加在視圖中
036
[self.view addSubview:_textEditor];
037
038
//下方的圖片按鈕 點擊後呼出菜單 打開攝像機 查找本地相冊
039
UIImage *image = [[UIImage alloc] initWithContentsOfFile:[[NSBundle mainBundle] pathForResource:@"camera" ofType:@"png"]];
040
041
UIButton *button = [UIButton buttonWithType:UIButtonTypeCustom];
042
button.frame = CGRectMake(0, 120, image.size.width, image.size.height);
043
044
[button setImage:image forState:UIControlStateNormal];
045
046
[button addTarget:self action:@selector(openMenu) forControlEvents:UIControlEventTouchUpInside];
047
048
//把它也加在視圖當中
049
[self.view addSubview:button];
050
051
}
052
053
-(void)openMenu
054
{
055
//在這裡呼出下方菜單按鈕項
056
myActionSheet = [[UIActionSheet alloc]
057
initWithTitle:nil
058
delegate:self
059
cancelButtonTitle:@"取消"
060
destructiveButtonTitle:nil
061
otherButtonTitles: @"打開照相機", @"從手機相冊獲取",nil];
062
063
[myActionSheet showInView:self.view];
064
[myActionSheet release];
065
066
}
067
068
- (void)actionSheet:(UIActionSheet *)actionSheet clickedButtonAtIndex:(NSInteger)buttonIndex
069
{
070
071
//呼出的菜單按鈕點擊後的響應
072
if (buttonIndex == myActionSheet.cancelButtonIndex)
073
{
074
NSLog(@"取消");
075
}
076
077
switch (buttonIndex)
078
{
079
case 0: //打開照相機拍照
080
[self takePhoto];
081
break;
082
083
case 1: //打開本地相冊
084
[self LocalPhoto];
085
break;
086
}
087
}
088
089
//開始拍照
090
-(void)takePhoto
091
{
092
UIImagePickerControllerSourceType sourceType = UIImagePickerControllerSourceTypeCamera;
093
if ([UIImagePickerController isSourceTypeAvailable: UIImagePickerControllerSourceTypeCamera])
094
{
095
UIImagePickerController *picker = [[UIImagePickerController alloc] init];
096
picker.delegate = self;
097
//設置拍照後的圖片可被編輯
098
picker.allowsEditing = YES;
099
picker.sourceType = sourceType;
100
[picker release];
101
[self presentModalViewController:picker animated:YES];
102
}else
103
{
104
NSLog(@"模擬其中無法打開照相機,請在真機中使用");
105
}
106
}
107
108
//打開本地相冊
109
-(void)LocalPhoto
110
{
111
UIImagePickerController *picker = [[UIImagePickerController alloc] init];
112
113
picker.sourceType = UIImagePickerControllerSourceTypePhotoLibrary;
114
picker.delegate = self;
115
//設置選擇後的圖片可被編輯
116
picker.allowsEditing = YES;
117
[self presentModalViewController:picker animated:YES];
118
[picker release];
119
}
120
121
//當選擇一張圖片後進入這裡
122
-(void)imagePickerController:(UIImagePickerController*)picker didFinishPickingMediaWithInfo:(NSDictionary *)info
123
124
{
125
126
NSString *type = [info objectForKey:UIImagePickerControllerMediaType];
127
128
//當選擇的類型是圖片
129
if ([type isEqualToString:@"public.image"])
130
{
131
//先把圖片轉成NSData
132
UIImage* image = [info objectForKey:@"UIImagePickerControllerOriginalImage"];
133
NSData *data;
134
if (UIImagePNGRepresentation(image) == nil)
135
{
136
data = UIImageJPEGRepresentation(image, 1.0);
137
}
138
else
139
{
140
data = UIImagePNGRepresentation(image);
141
}
142
143
//圖片保存的路徑
144
//這裡將圖片放在沙盒的documents文件夾中
145
NSString * DocumentsPath = [NSHomeDirectory() stringByAppendingPathComponent:@"Documents"];
146
147
//文件管理器
148
NSFileManager *fileManager = [NSFileManager defaultManager];
149
150
//把剛剛圖片轉換的data對象拷貝至沙盒中 並保存為image.png
151
[fileManager createDirectoryAtPath:DocumentsPath withIntermediateDirectories:YES attributes:nil error:nil];
152
[fileManager createFileAtPath:[DocumentsPath stringByAppendingString:@"/image.png"] contents:data attributes:nil];
153
154
//得到選擇後沙盒中圖片的完整路徑
155
filePath = [[NSString alloc]initWithFormat:@"%@%@",DocumentsPath, @"/image.png"];
156
157
//關閉相冊界面
158
[picker dismissModalViewControllerAnimated:YES];
159
160
//創建一個選擇後圖片的小圖標放在下方
161
//類似微薄選擇圖後的效果
162
UIImageView *smallimage = [[[UIImageView alloc] initWithFrame:
163
CGRectMake(50, 120, 40, 40)] autorelease];
164
165
smallimage.image = image;
166
//加在視圖中
167
[self.view addSubview:smallimage];
168
169
}
170
171
}
172
173
- (void)imagePickerControllerDidCancel:(UIImagePickerController *)picker
174
{
175
NSLog(@"您取消了選擇圖片");
176
[picker dismissModalViewControllerAnimated:YES];
177
}
178
179
-(void)sendInfo
180
{
181
NSLog(@"圖片的路徑是:%@", filePath);
182
183
NSLog(@"您輸入框中的內容是:%@", _textEditor.text);
184
}
185
186
- (void)viewDidUnload
187
{
188
[super viewDidUnload];
189
// Release any retained subviews of the main view.
190
}
191
192
- (BOOL)shouldAutorotateToInterfaceOrientation:(UIInterfaceOrientation)interfaceOrientation
193
{
194
return (interfaceOrientation == UIInterfaceOrientationPortrait);
195
}
196
197
@end
下面我們仔細學習具體的細節。創建一個空的IOS項目,接著在創建一個ViewController。
AppDelegate.h 應用的代理類 這個沒什麼好說的就是直接打開剛剛創建的新ViewController。
1
#import <UIKit/UIKit.h>
2
#import "TestViewController.h"
3
4
@interface AppDelegate : UIResponder <UIApplicationDelegate>
5
6
@property (strong, nonatomic) UIWindow *window;
7
@property (strong, nonatomic) UINavigationController *navController;
8
@property (strong, nonatomic) UIViewController *viewController;
9
@end
AppDelegate.m 在這裡就是打開我們創建的TestViewController
01
#import "AppDelegate.h"
02
03
@implementation AppDelegate
04
05
@synthesize window = _window;
06
@synthesize navController;
07
@synthesize viewController;
08
09
- (void)dealloc
10
{
11
[_window release];
12
[super dealloc];
13
}
14
15
- (BOOL)application:(UIApplication *)application didFinishLaunchingWithOptions:(NSDictionary *)launchOptions
16
{
17
self.window = [[[UIWindow alloc] initWithFrame:[[UIScreen mainScreen] bounds]] autorelease];
18
19
self.window.backgroundColor = [UIColor whiteColor];
20
self.viewController = [[TestViewController alloc]init];
21
self.navController = [[UINavigationController alloc] initWithRootViewController:self.viewController];
22
[self.window addSubview:navController.view];
23
24
[self.window makeKeyAndVisible];
25
return YES;
26
}
27
28
@end
TestViewController.h 注意這裡面引入了很多代理類。
01
#import <UIKit/UIKit.h>
02
03
@interface TestViewController : UIViewController<UITextViewDelegate,UIActionSheetDelegate,UINavigationControllerDelegate,UIImagePickerControllerDelegate>
04
{
05
//輸入框
06
UITextView *_textEditor;
07
08
//下拉菜單
09
UIActionSheet *myActionSheet;
10
11
//圖片2進制路徑
12
NSString* filePath;
13
}
14
@end
TestViewController.m 請大家仔細看這個類, 所有的東西都寫在了這裡哈。
001
#import "TestViewController.h"
002
003
@interface TestViewController ()
004
005
@end
006
007
@implementation TestViewController
008
009
- (void)viewDidLoad
010
{
011
[super viewDidLoad];
012
//導航欄標題
013
self.navigationItem.title = @"雨松MOMO輸入框";
014
015
//導航欄按鈕
016
self.navigationItem.rightBarButtonItem = [[[UIBarButtonItem alloc]
017
initWithTitle: @"發送"
018
style: UIBarButtonItemStyleDone
019
target: self
020
action: @selector(sendInfo)] autorelease];
021
022
//輸入框顯示區域
023
_textEditor = [[UITextView alloc] initWithFrame:CGRectMake(0, 0, 320, 100)];
024
//設置它的代理
025
_textEditor.delegate = self;
026
_textEditor.autoresizingMask = UIViewAutoresizingFlexibleWidth;
027
_textEditor.keyboardType = UIKeyboardTypeDefault;
028
_textEditor.font = [UIFont systemFontOfSize:20];
029
_textEditor.text = @"請輸入內容";
030
031
//默認軟鍵盤是在觸摸區域後才會打開
032
//這裡表示進入當前ViewController直接打開軟鍵盤
033
[_textEditor becomeFirstResponder];
034
035
//把輸入框加在視圖中
036
[self.view addSubview:_textEditor];
037
038
//下方的圖片按鈕 點擊後呼出菜單 打開攝像機 查找本地相冊
039
UIImage *image = [[UIImage alloc] initWithContentsOfFile:[[NSBundle mainBundle] pathForResource:@"camera" ofType:@"png"]];
040
041
UIButton *button = [UIButton buttonWithType:UIButtonTypeCustom];
042
button.frame = CGRectMake(0, 120, image.size.width, image.size.height);
043
044
[button setImage:image forState:UIControlStateNormal];
045
046
[button addTarget:self action:@selector(openMenu) forControlEvents:UIControlEventTouchUpInside];
047
048
//把它也加在視圖當中
049
[self.view addSubview:button];
050
051
}
052
053
-(void)openMenu
054
{
055
//在這裡呼出下方菜單按鈕項
056
myActionSheet = [[UIActionSheet alloc]
057
initWithTitle:nil
058
delegate:self
059
cancelButtonTitle:@"取消"
060
destructiveButtonTitle:nil
061
otherButtonTitles: @"打開照相機", @"從手機相冊獲取",nil];
062
063
[myActionSheet showInView:self.view];
064
[myActionSheet release];
065
066
}
067
068
- (void)actionSheet:(UIActionSheet *)actionSheet clickedButtonAtIndex:(NSInteger)buttonIndex
069
{
070
071
//呼出的菜單按鈕點擊後的響應
072
if (buttonIndex == myActionSheet.cancelButtonIndex)
073
{
074
NSLog(@"取消");
075
}
076
077
switch (buttonIndex)
078
{
079
case 0: //打開照相機拍照
080
[self takePhoto];
081
break;
082
083
case 1: //打開本地相冊
084
[self LocalPhoto];
085
break;
086
}
087
}
088
089
//開始拍照
090
-(void)takePhoto
091
{
092
UIImagePickerControllerSourceType sourceType = UIImagePickerControllerSourceTypeCamera;
093
if ([UIImagePickerController isSourceTypeAvailable: UIImagePickerControllerSourceTypeCamera])
094
{
095
UIImagePickerController *picker = [[UIImagePickerController alloc] init];
096
picker.delegate = self;
097
//設置拍照後的圖片可被編輯
098
picker.allowsEditing = YES;
099
picker.sourceType = sourceType;
100
[picker release];
101
[self presentModalViewController:picker animated:YES];
102
}else
103
{
104
NSLog(@"模擬其中無法打開照相機,請在真機中使用");
105
}
106
}
107
108
//打開本地相冊
109
-(void)LocalPhoto
110
{
111
UIImagePickerController *picker = [[UIImagePickerController alloc] init];
112
113
picker.sourceType = UIImagePickerControllerSourceTypePhotoLibrary;
114
picker.delegate = self;
115
//設置選擇後的圖片可被編輯
116
picker.allowsEditing = YES;
117
[self presentModalViewController:picker animated:YES];
118
[picker release];
119
}
120
121
//當選擇一張圖片後進入這裡
122
-(void)imagePickerController:(UIImagePickerController*)picker didFinishPickingMediaWithInfo:(NSDictionary *)info
123
124
{
125
126
NSString *type = [info objectForKey:UIImagePickerControllerMediaType];
127
128
//當選擇的類型是圖片
129
if ([type isEqualToString:@"public.image"])
130
{
131
//先把圖片轉成NSData
132
UIImage* image = [info objectForKey:@"UIImagePickerControllerOriginalImage"];
133
NSData *data;
134
if (UIImagePNGRepresentation(image) == nil)
135
{
136
data = UIImageJPEGRepresentation(image, 1.0);
137
}
138
else
139
{
140
data = UIImagePNGRepresentation(image);
141
}
142
143
//圖片保存的路徑
144
//這裡將圖片放在沙盒的documents文件夾中
145
NSString * DocumentsPath = [NSHomeDirectory() stringByAppendingPathComponent:@"Documents"];
146
147
//文件管理器
148
NSFileManager *fileManager = [NSFileManager defaultManager];
149
150
//把剛剛圖片轉換的data對象拷貝至沙盒中 並保存為image.png
151
[fileManager createDirectoryAtPath:DocumentsPath withIntermediateDirectories:YES attributes:nil error:nil];
152
[fileManager createFileAtPath:[DocumentsPath stringByAppendingString:@"/image.png"] contents:data attributes:nil];
153
154
//得到選擇後沙盒中圖片的完整路徑
155
filePath = [[NSString alloc]initWithFormat:@"%@%@",DocumentsPath, @"/image.png"];
156
157
//關閉相冊界面
158
[picker dismissModalViewControllerAnimated:YES];
159
160
//創建一個選擇後圖片的小圖標放在下方
161
//類似微薄選擇圖後的效果
162
UIImageView *smallimage = [[[UIImageView alloc] initWithFrame:
163
CGRectMake(50, 120, 40, 40)] autorelease];
164
165
smallimage.image = image;
166
//加在視圖中
167
[self.view addSubview:smallimage];
168
169
}
170
171
}
172
173
- (void)imagePickerControllerDidCancel:(UIImagePickerController *)picker
174
{
175
NSLog(@"您取消了選擇圖片");
176
[picker dismissModalViewControllerAnimated:YES];
177
}
178
179
-(void)sendInfo
180
{
181
NSLog(@"圖片的路徑是:%@", filePath);
182
183
NSLog(@"您輸入框中的內容是:%@", _textEditor.text);
184
}
185
186
- (void)viewDidUnload
187
{
188
[super viewDidUnload];
189
// Release any retained subviews of the main view.
190
}
191
192
- (BOOL)shouldAutorotateToInterfaceOrientation:(UIInterfaceOrientation)interfaceOrientation
193
{
194
return (interfaceOrientation == UIInterfaceOrientationPortrait);
195
}
196
197
@end