回顧
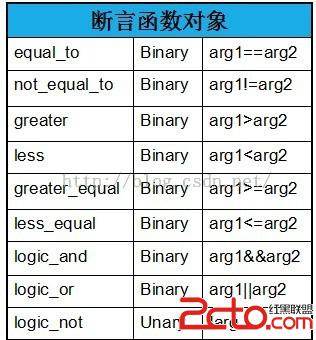
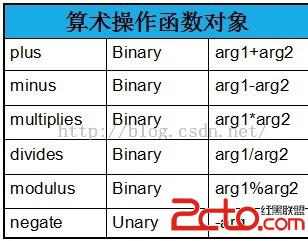
五、STL中內置的函數對象
一、適配器
1、三種類型的適配器:
(1)容器適配器:用來擴展7種基本容器,利用基本容器擴展形成了棧、隊列和優先級隊列
(2)迭代器適配器:(反向迭代器、插入迭代器、IO流迭代器)
(3)函數適配器:函數適配器能夠將仿函數和另一個仿函數(或某個值、或某個一般函數)結合起來。
【1】針對成員函數的函數適配器
【2】針對一般函數的函數適配器
二、函數適配器
1、示例
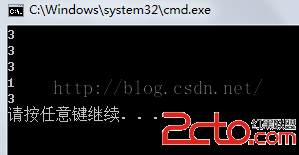
#include運行結果:#include #include #include using namespace std; bool is_odd(int n) { return n % 2 == 1; } int main(void) { int a[] = { 1, 2, 3, 4, 5 }; vector v(a, a + 5); cout << count_if(v.begin(), v.end(), is_odd) << endl; //計算奇數元素的個數 // 這裡的bind2nd將二元函數對象modulus轉換為一元函數對象。 //bind2nd(op, value) (param)相當於op(param, value) cout << count_if(v.begin(), v.end(), bind2nd(modulus (), 2)) << endl; //bind2nd函數對象或適配器 cout << count_if(v.begin(), v.end(), bind1st(modulus (), 2)) << endl; //bind2nd函數對象或適配器 //bind1st(op, value)(param)相當於op(value, param); cout << count_if(v.begin(), v.end(), bind1st(less (), 4)) << endl; //>4,函數適配器 cout << count_if(v.begin(), v.end(), bind2nd(less (), 4)) << endl; //<4,函數適配器 return 0; }
 2、源碼分析
這裡的bind2nd將二元函數對象modulus轉換為一元函數對象。是如何做到的呢?跟蹤源碼就知道了。
首先,bind2nd 是一個模板函數,如下:
// TEMPLATE FUNCTION bind2nd
template < class _Fn2,
         class _Ty > inline
binder2nd<_Fn2> bind2nd(const _Fn2 &_Func, const _Ty &_Right)
{
    // return a binder2nd functor adapter
    typename _Fn2::second_argument_type _Val(_Right);
    return (std::binder2nd<_Fn2>(_Func, _Val));
}
將匿名對象modulus
// TEMPLATE CLASS binder2nd templateclass binder2nd : public unary_function < typename _Fn2::first_argument_type, typename _Fn2::result_type > { // functor adapter _Func(left, stored) public: typedef unary_function < typename _Fn2::first_argument_type, typename _Fn2::result_type > _Base; typedef typename _Base::argument_type argument_type; typedef typename _Base::result_type result_type; binder2nd(const _Fn2 &_Func, const typename _Fn2::second_argument_type &_Right) : op(_Func), value(_Right) { // construct from functor and right operand } result_type operator()(const argument_type &_Left) const { // apply functor to operands return (op(_Left, value)); } result_type operator()(argument_type &_Left) const { // apply functor to operands return (op(_Left, value)); } protected: _Fn2 op; // the functor to apply typename _Fn2::second_argument_type value; // the right operand };
即構造時,binder2nd 的2個成員op 和 value 分別用modulus
for (; _First != _Last; ++_First)
if (_Pred(*_First))
++_Count;
*_First 就是遍歷得到的容器元素了,當滿足_Pred 條件時_Count++,此時可以看成是:std::binder2nd< modulus
// TEMPLATE STRUCT modulus template也就是如果左操作數是偶數則返回0,奇數% 2 == 1, 返回為真。最後總結,也就是count_if 計算容器中為奇數的元素個數,簡單地來說,可以理解成這樣:bind2nd(op,value)(param)相當於op(param,value); 其中param 是元素值,value是需要綁定的參數,所謂bind2nd 也即綁定第二個參數的意思,所以才說bind2nd將二元函數對象modulus轉換為一元函數對象,因為第二個參數就是2,當然這裡的第一個參數就是遍歷得到的容器元素值了。struct modulus : public binary_function<_Ty, _Ty, _Ty> { // functor for operator% _Ty operator()(const _Ty &_Left, const _Ty &_Right) const { // apply operator% to operands return (_Left % _Right); } };
與bind2nd 類似的還有 bind1st,顧名思義是綁定第一個參數的意思,如下的表達式:count_if(v.begin(),v.end(),bind1st(less
三、函數適配器應用實例
(一)、針對成員函數的函數適配器

1、示例
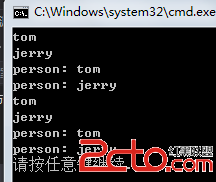
#include運行結果:#include #include #include #include using namespace std; class Person { public: Person(const string &name) : name_(name) {} void Print() const { cout << name_ << endl; } void PrintWithPrefix(string prefix) const { cout << prefix << name_ << endl; } private: string name_; }; void foo(const vector &v) { for_each(v.begin(), v.end(), mem_fun_ref(&Person::Print)); //mem_fun_ref先將不帶參數轉換成一元 for_each(v.begin(), v.end(), bind2nd(mem_fun_ref(&Person::PrintWithPrefix), "person: ")); //mem_fun_ref先將一元轉換成二元,bind2nd再將二元轉換成一元 } void foo2(const vector &v) { for_each(v.begin(), v.end(), mem_fun(&Person::Print)); for_each(v.begin(), v.end(), bind2nd(mem_fun(&Person::PrintWithPrefix), "person: ")); } int main(void) { vector v; //針對對象 v.push_back(Person("tom")); v.push_back(Person("jerry")); foo(v); vector v2; //針對指針 v2.push_back(new Person("tom")); v2.push_back(new Person("jerry")); foo2(v2); return 0; }
 2、源碼分析
在foo 函數中,第一行的mem_fun_ref 將不帶參數的成員函數轉換為一元函數對象,具體流程大家可以自己跟蹤代碼,實際上跟上面bind2nd 是類似的,需要稍微說一下的是傳遞函數指針的情況:
template < class _Result,
         class _Ty > inline
const_mem_fun_ref_t<_Result, _Ty>
mem_fun_ref(_Result (_Ty::*_Pm)() const)
{
    // return a const_mem_fun_ref_t functor adapter
    return (std::const_mem_fun_ref_t<_Result, _Ty>(_Pm));
}

// TEMPLATE CLASS const_mem_fun_ref_t
template < class _Result,
         class _Ty >
class const_mem_fun_ref_t
    : public unary_function<_Ty, _Result>
{
    // functor adapter (*left.*pfunc)(), const *pfunc
public:
    explicit const_mem_fun_ref_t(_Result (_Ty::*_Pm)() const)
        : _Pmemfun(_Pm)
    {
        // construct from pointer
    }

    _Result operator()(const _Ty &_Left) const
    {
        // call function
        return ((_Left.*_Pmemfun)());
    }

private:
    _Result (_Ty::*_Pmemfun)() const;   // the member function pointer
};
傳入的參數是一個函數指針,也就是void (Person::*_Pm) () const , 傳遞後 _Pm = &Print,在operator() 函數中return((_Left.*_Pmemfun)()); _Left 也就是遍歷到的Person 類對象,先找到類的函數,然後進行調用。
第二行中mem_fun_ref 接受兩個參數,明顯是重載的版本,它將一元函數轉換為二元函數對象,而bind2nd 再將其轉化為一元函數對象,即綁定了第二個參數為"person: ",跟蹤源碼可以看見這樣的函數調用:
_Result operator()(_Ty &_Left, _Arg _Right) const
{
    // call function with operand
    return ((_Left.*_Pmemfun)(_Right));
}
也就是將第二個參數當作參數傳遞給PrintWithPrefix,所以打印出來的帶有前綴person:而mem_fun 就類似了,只不過此次for_each 遍歷得到的是對象指針,所以進行函數調用時需要用-> 操作符,如下所示:
_Result operator()(const _Ty *_Pleft) const
{
    // call function
    return ((_Pleft->*_Pmemfun)());
}

_Result operator()(const _Ty *_Pleft, _Arg _Right) const
{
    // call function with operand
    return ((_Pleft->*_Pmemfun)(_Right));
}
(二)、針對一般函數的函數適配器:ptr_fun
1、示例1:
#include運行結果:#include #include #include #include using namespace std; int main(void) { char *a[] = {"", "BBB", "CCC"}; vector v(a, a + 2); vector ::iterator it; it = find_if(v.begin(), v.end(), bind2nd(ptr_fun(strcmp), "")); //查看不是空串的第一個串 if (it != v.end()) cout << *it << endl; return 0; }
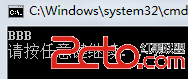
ptr_fun 將strcmp 二元函數轉換為二元函數對象,bind2nd 再將其轉化為一元函數對象,即綁定了第二個參數,因為strcmp 是在比較不相等的情況返回為真,故find_if 查找的是第一個不等於空串的串位置。
例程2:
#include運行結果:#include #include #include #include using namespace std; bool check(int elem) { return elem < 3; } int main(void) { int a[] = {1, 2, 3, 4, 5}; vector v(a, a + 5); vector ::iterator it; it = find_if(v.begin(), v.end(), not1(ptr_fun(check))); if (it != v.end()) cout << *it << endl; return 0; }
 ptr_fun 將check一元函數轉換為一元函數對象;not1做取反操作,原來是找<3,取反則為>=3;故find_if 查找的是第一個大於等於3的元素位置。
這些代碼的跟蹤就留給大家自己完成了,篇幅所限,不能將所有調用過程都顯現出來,學習STL還是得靠大家跟蹤源碼,才能有更深的體會。
參考:
C++ primer 第四版
Effective C++ 3rd
C++編程規范