C#開發WPF/Silverlight動畫及游戲系列教程(Game Course):(五)實現2D人物動畫②
第二種方法我稱之為圖片截取法,准備工作:這裡我以創建主角向右方向施法動畫為例。首先需要將10幀150*150的圖片通過Photoshop或其他方式合成為一張1500*150的大圖,如下圖:

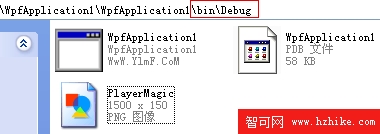
從圖上可以很清晰的看出主角的整個流暢的施法流程。然後將這張圖片保存到項目文件夾中的binDebug文件夾中,如下圖:
為什麼必須放在這呢?因為後面的代碼中BitmapFrame.Create()函數調用相對路徑圖片只認該文件夾,為什麼?問MS
OK,xaml代碼仍舊和前面章節的一樣,那麼接下來就是後台C#代碼了:
Image Spirit;
        int count = 1;
        public Window5() {
            InitializeComponent();
            Spirit = new Image();
            Spirit.Width = 150;
            Spirit.Height = 150;
            CarrIEr.Children.Add(Spirit);
            DispatcherTimer dispatcherTimer = new DispatcherTimer();
            dispatcherTimer.Tick += new EventHandler(dispatcherTimer_Tick);
            dispatcherTimer.Interval = TimeSpan.FromMilliseconds(150);
            dispatcherTimer.Start();
        }
        private void dispatcherTimer_Tick(object sender, EventArgs e) {
            Spirit.Source = cutImage(@"Player\PlayerMagic.png", count * 150, 0, 150, 150);
            count = count == 9 ? 0 : count + 1;
        }
        /// <summary>
        /// 截取圖片
        /// </summary>
        /// <param name="imgaddress">文件名(包括地址+擴展名)</param>
        /// <param name="x">左上角點X</param>
        /// <param name="y">左上角點Y</param>
        /// <param name="width">截取的圖片寬</param>
        /// <param name="height">截取的圖片高</param>
        /// <returns>截取後圖片數據源</returns>
        private BitmapSource cutImage(string imgaddress, int x, int y, int width, int height) {
            return new CroppedBitmap(
                BitmapFrame.Create(new Uri(imgaddress, UriKind.Relative)),
                new Int32Rect(x, y, width, height)
                 );
  }