導言:
在前面的教程,我們用GridView創建了一個批編輯界面。在用戶需要一次性編輯多條記錄的情況下,批編輯界面很有用。同理,當用戶需要同時刪除多條記錄時,該技術也很有用.
如果你使用過郵件系統的話,你應該對這種最常見的批刪除界面很熟悉:界面裡每一行都包含一個checkbox,此外,還有一個“Delete All Checked Items”按鈕(如圖1).本教程比較短,因為我們在前面的教程已經完成大體的框架,在前面的第50章《為GridView控件添加Checkbox》裡我們創建了一個包含一個checkboxes列的GridView控件;而在61章《在事務裡對數據庫修改進行封裝》裡,我們在BLL業務邏輯層裡創建了一個方法,該方法使用事務來刪除基於ProductID 的記錄.在本教程,我們將整合這些內容來創建一個處理批刪除的示例.
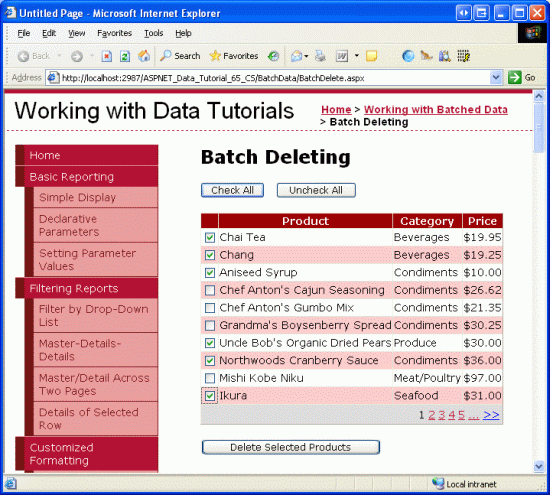
圖1:每一行都包含一個Checkbox
第一步:創建批刪除界面
由於我們在第52章已經創建了一個批刪除界面,因此我們可以簡單的將其拷貝到BatchDelete.aspx頁面。首先,打開BatchData文件夾裡的BatchDelete.aspx頁面,以及EnhancedGridView文件夾裡的CheckBoxField.aspx頁面。在CheckBoxField.aspx頁面,切換到Source模式,將<asp:Content>標簽裡的代碼進行復制.
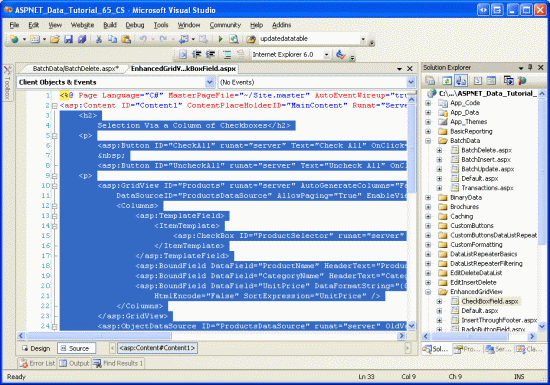
圖2:復制CheckBoxField.aspx頁面裡的聲明代碼
然後,切換到BatchDelete.aspx頁面的Source模式,將代碼粘貼到<asp:Content>標簽裡.同理,將CheckBoxField.aspx.cs裡面的後台代碼拷貝到BatchDelete.aspx.cs裡.(具體來說,就是將DeleteSelectedProducts按鈕的Click event事件、ToggleCheckState方法、CheckAll 和 UncheckAll按鈕的Click event事件)。完成拷貝後,BatchDelete.aspx頁面的後台代碼類應該包含下面的代碼:
using System;
using System.Data;
using System.Configuration;
using System.Collections;
using System.Web;
using System.Web.Security;
using System.Web.UI;
using System.Web.UI.WebControls;
using System.Web.UI.WebControls.WebParts;
using System.Web.UI.HtmlControls;

public partial class BatchData_BatchDelete : System.Web.UI.Page
{
 protected void DeleteSelectedProducts_Click(object sender, EventArgs e)
 {
 bool atLeastOneRowDeleted = false;

 // Iterate through the Products.Rows property
 foreach (GridViewRow row in Products.Rows)
 {
 // Access the CheckBox
 CheckBox cb = (CheckBox)row.FindControl("ProductSelector");
 if (cb != null && cb.Checked)
 {
 // Delete row! (Well, not really...)
 atLeastOneRowDeleted = true;

 // First, get the ProductID for the selected row
 int productID = Convert.ToInt32(Products.DataKeys[row.RowIndex].Value);

 // "Delete" the row
 DeleteResults.Text += string.Format
  ("This would have deleted ProductID {0}<br />", productID);

 //... To actually delete the product, use ...
 //ProductsBLL productAPI = new ProductsBLL();
 //productAPI.DeleteProduct(productID);
 //............................................
 }
 }

 // Show the Label if at least one row was deleted...
 DeleteResults.Visible = atLeastOneRowDeleted;
 }

 private void ToggleCheckState(bool checkState)
 {
 // Iterate through the Products.Rows property
 foreach (GridViewRow row in Products.Rows)
 {
 // Access the CheckBox
 CheckBox cb = (CheckBox)row.FindControl("ProductSelector");
 if (cb != null)
 cb.Checked = checkState;
 }
 }

 protected void CheckAll_Click(object sender, EventArgs e)
 {
 ToggleCheckState(true);
 }

 protected void UncheckAll_Click(object sender, EventArgs e)
 {
 ToggleCheckState(false);
 }
}
完成上述工作後,花幾分鐘在浏覽器裡測試該頁面.你應該首先看到一個GridView控件列出了前10個產品,每行列出了產品的name, category,price以及一個checkbox. 同時應該有3個按鈕“Check All”, “Uncheck All”和“Delete Selected Products”.點“Check All”按鈕將會選中所有的checkboxes;而“Uncheck All”按鈕將釋放所有的
checkboxes;點“Delete Selected Products”的話將顯示一個消息,列出選中的產品的ProductID值,不過並不會真的刪除產品.
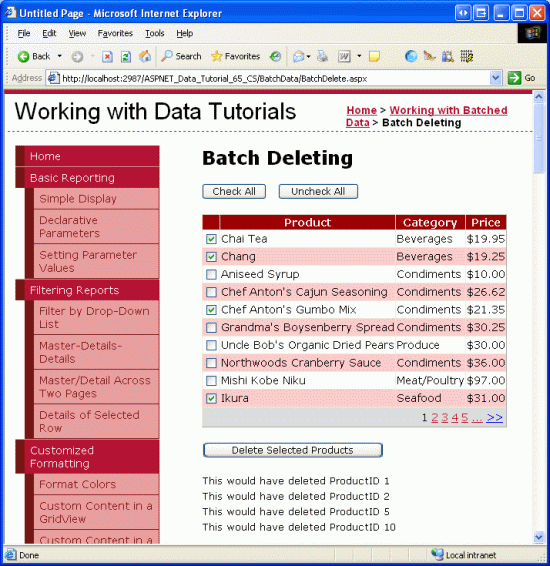
圖3:CheckBoxField.aspx頁面的界面搬到了BatchDeleting.aspx頁面
第二步:在事務裡刪除選中的產品
完成界面後,剩下的事情是更新代碼,以便當點擊“Delete Selected Products”按鈕時,使用ProductsBLL class類裡的DeleteProductsWithTransaction方法來刪除選中的產品.該方法是我們在第61章《在事務裡對數據庫修改進行封裝》裡添加的,它接受一系列的ProductID值,然後在一個事務裡將刪除對應的ProductID的記錄.
DeleteSelectedProducts按鈕的Click事件目前使用的foreach循環如下:
// Iterate through the Products.Rows property
foreach (GridViewRow row in Products.Rows)
{
 // Access the CheckBox
 CheckBox cb = (CheckBox)row.FindControl("ProductSelector");
 if (cb != null && cb.Checked)
 {
 // Delete row! (Well, not really...)
 atLeastOneRowDeleted = true;

 // First, get the ProductID for the selected row
 int productID = Convert.ToInt32(Products.DataKeys[row.RowIndex].Value);

 // "Delete" the row
 DeleteResults.Text += string.Format
 ("This would have deleted ProductID {0}<br />", productID);

 //... To actually delete the product, use ...
 //ProductsBLL productAPI = new ProductsBLL();
 //productAPI.DeleteProduct(productID);
 //............................................
 }
}
對每行而言,編程引用ProductSelector CheckBox控件,如果它被選中,從DataKeys collection集獲取該產品的ProductID值,然後更新DeleteResults控件的Text屬性以顯示要刪除該行.
上面的代碼並不會真的刪除任何的記錄,因為在ProductsBLL class類裡我們只是注釋出了如何使用Delete方法。 不過就算實際地運用了這些刪除邏輯,這些代碼雖然可以刪除產品但沒有運用原子操作.也就是說,如果按順序對頭幾個產品刪除成功,如果接下來的某個產品刪除失敗(比如可能是違背裡外鍵約束),那麼將拋出一個異常,但是前面的刪除操作並不會回滾.
為了保證使用原子操作,我們將轉為使用ProductsBLLclass類的DeleteProductsWithTransaction method方法.由於該方法接受一系列的ProductID值,
我們首先需要編譯這一系列的值,再將其作為參數傳遞出去.我們首先創建一個int類型的List<T>的實例,在foreach循環裡我們需要將產品的ProductID值添加給List<T>,結束循環後,List<T>將傳遞給ProductsBLL class類的DeleteProductsWithTransaction method方法,用下面的代碼對DeleteSelectedProducts按鈕的Click事件處理器進行更新:
protected void DeleteSelectedProducts_Click(object sender, EventArgs e)
{
 // Create a List to hold the ProductID values to delete
 System.Collections.Generic.List<int> productIDsToDelete =
 new System.Collections.Generic.List<int>();

 // Iterate through the Products.Rows property
 foreach (GridViewRow row in Products.Rows)
 {
 // Access the CheckBox
 CheckBox cb = (CheckBox)row.FindControl("ProductSelector");
 if (cb != null && cb.Checked)
 {
 // Save the ProductID value for deletion
 // First, get the ProductID for the selected row
 int productID = Convert.ToInt32(Products.DataKeys[row.RowIndex].Value);

 // Add it to the List...
 productIDsToDelete.Add(productID);

 // Add a confirmation message
 DeleteResults.Text += string.Format
 ("ProductID {0} has been deleted<br />", productID);
 }
 }

 // Call the DeleteProductsWithTransaction method and show the Label
 // if at least one row was deleted...
 if (productIDsToDelete.Count > 0)
 {
 ProductsBLL productAPI = new ProductsBLL();
 productAPI.DeleteProductsWithTransaction(productIDsToDelete);

 DeleteResults.Visible = true;

 // Rebind the data to the GridView
 Products.DataBind();
 }
}
上述代碼創建了一個int類型的List<T>(也就是productIDsToDelete),並用ProductID值對其進行填充,foreach循環結束後,如果至少選中了一個產品,將調用ProductsBLL 類的DeleteProductsWithTransaction method方法,並傳遞該List。名為DeleteResults的Label控件也將顯示出來;數據重新綁定到GridView(自然,剛刪除掉的記錄將不會顯示出來).
圖4裡,我們選擇幾個產品以刪除;圖5顯示的是點擊“Delete Selected Products”按鈕後的界面.注意,在Label控件裡顯示的已經刪除的產品的ProductID值,而這些產品已經刪除掉了,並沒有出現在GridView控件裡.
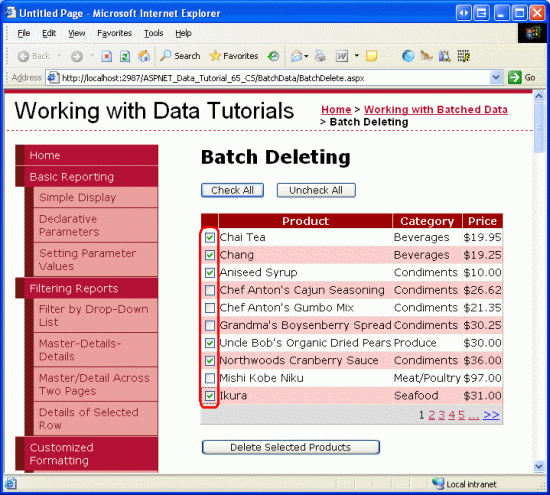
圖4:選中的產品將被刪除
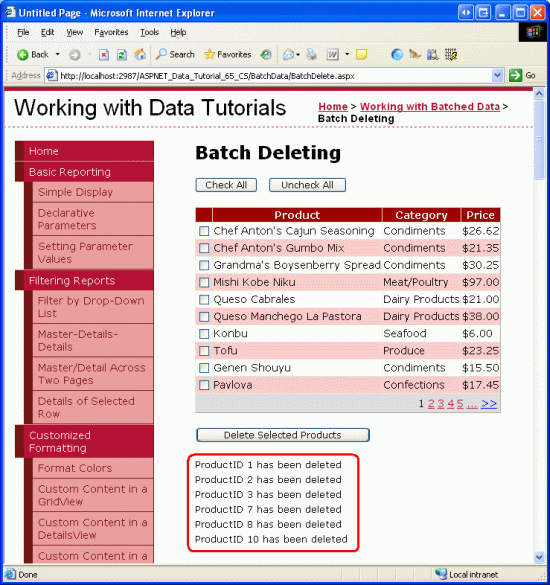
圖5:被刪除產品的ProductID值出現的GridView下面的Label控件裡
注意:為驗證DeleteProductsWithTransaction method方法的原子操作,你可以為某個產品在Order Details表裡手動添加一個條目,然後嘗試刪除該產品(當然與其它產品一起刪除).這將會違背外鍵約束,注意對其它產品的刪除操作是如何回滾的.
總結:
創建一個批刪除界面的話,我們需要創建一個包含checkboxes列的GridView控件,以及Button Web控件。當點擊該按鈕時,我們將刪除多個產品當作一個單一原子操作.在本文,我們創建的界面整合了以前的2個章節的內容.
在下一篇,我們考察如何創建一個批插入的界面
祝編程快樂!
作者簡介
本系列教程作者 Scott Mitchell,著有六本ASP/ASP.NET方面的書,是4GuysFromRolla.com的創始人,自1998年以來一直應用 微軟Web技術。大家可以點擊查看全部教程《[翻譯]Scott Mitchell 的ASP.NET 2.0數據教程》,希望對大家的學習ASP.NET有所幫助。