導言:
正如教程《概述插入、更新和刪除數據》裡探討過的一樣, GridView, DetailsView和FormView Web控件都有內置的修改數據的功能。當聲明綁定到數據源控件時,可以快速而方便地修改數據——甚至不用寫一行代碼。不幸的是,只有DetailsView和FormView控件提供了內置的插入、編輯、刪除功能,而 GridView控件只支持編輯、刪除功能。不過,稍許努力,我們就能使GridView控件包含一個插入界面。
為了給GridView添加插入功能,我們要決定如何添加新記錄:創建插入界面,編碼插入數據。在本教程,我們將為GridView的頁腳行(footer row )添加插入界面(見圖1)。其中每一列包含相應的用戶界面元件(比如在TextBox裡輸入產品名稱,在DropDownLis裡選擇供應商等等),同時我們需要一個"Add"按鈕,當點擊時,發生頁面回傳,將新記錄添加到表Products裡。
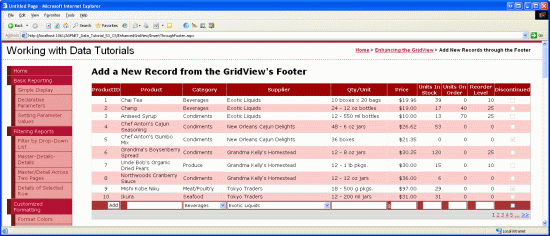
圖1:頁腳行提供了一個添加新記錄的界面
第一步:在GridView控件裡展示產品信息
首先添加一個展示產品的GridView控件。打開EnhancedGridView文件夾裡的InsertThroughFooter.aspx頁面,在上面添加一個GridView控件,設其ID為Products,然後,在其智能標簽裡綁定到一個名為ProductsDataSource的ObjectDataSource 。
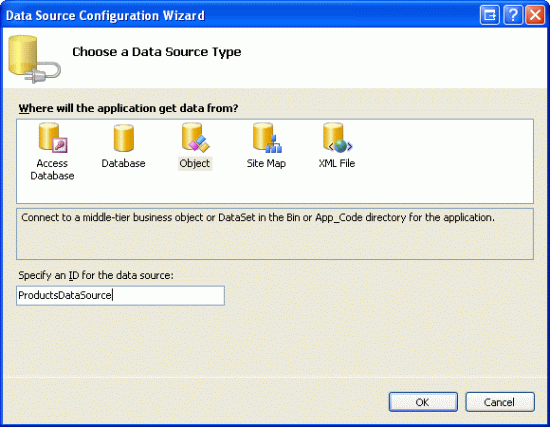
圖2:創建一個名為ProductsDataSource的新ObjectDataSource
設置該ObjectDataSource調用ProductsBLL類的GetProducts()方法獲取產品信息。在本教程裡,我們只關注於添加插入功能,與編輯和刪除無關。所以,確保在“插入”選項卡裡選AddProduct()方法。而在“編輯”和“刪除”裡選“(None)”。
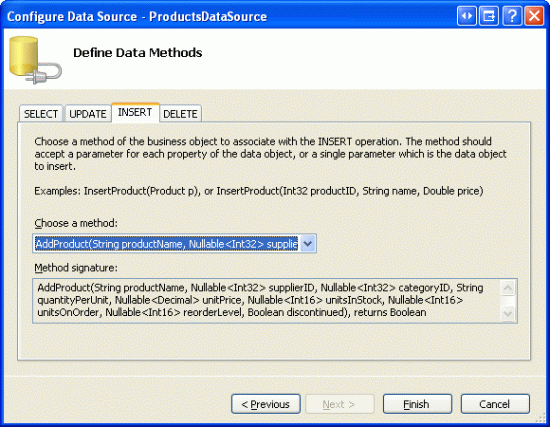
圖3:將 ObjectDataSource的Insert()方法設置為AddProduct()
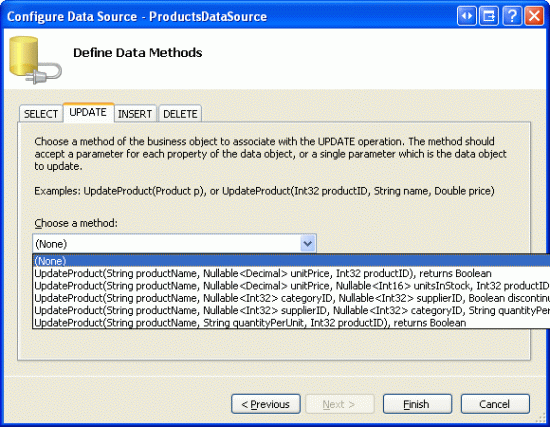
圖4:在UPDATE和DELETE選項裡選“(None)”
完成設置後,Visual Studio會自動添加相關列。現在,我們暫時不管這些列,在教程後續部分,我們將移除一些列,因為在添加新記錄時我們不需指定這些列的值。
因為數據庫中大概有80個產品,所以我們最好還是啟用分頁功能,以便使插入界面更直觀、更易操作。回到頁面,在GridView的智能標簽裡啟用分頁。
現在,GridView和ObjectDataSource的聲明代碼看起來和下面的差不多:
<asp:GridView ID="Products" runat="server" AutoGenerateColumns="False"
 DataKeyNames="ProductID" DataSourceID="ProductsDataSource"
 AllowPaging="True" EnableViewState="False">
 <Columns>
 <asp:BoundField DataField="ProductID" HeaderText="ProductID"
  InsertVisible="False" ReadOnly="True"
  SortExpression="ProductID" />
 <asp:BoundField DataField="ProductName" HeaderText="ProductName"
  SortExpression="ProductName" />
 <asp:BoundField DataField="SupplierID" HeaderText="SupplierID"
  SortExpression="SupplierID" />
 <asp:BoundField DataField="CategoryID" HeaderText="CategoryID"
  SortExpression="CategoryID" />
 <asp:BoundField DataField="QuantityPerUnit" HeaderText="QuantityPerUnit"
  SortExpression="QuantityPerUnit" />
 <asp:BoundField DataField="UnitPrice" HeaderText="UnitPrice"
  SortExpression="UnitPrice" />
 <asp:BoundField DataField="UnitsInStock" HeaderText="UnitsInStock"
  SortExpression="UnitsInStock" />
 <asp:BoundField DataField="UnitsOnOrder" HeaderText="UnitsOnOrder"
  SortExpression="UnitsOnOrder" />
 <asp:BoundField DataField="ReorderLevel" HeaderText="ReorderLevel"
  SortExpression="ReorderLevel" />
 <asp:CheckBoxField DataField="Discontinued" HeaderText="Discontinued"
  SortExpression="Discontinued" />
 <asp:BoundField DataField="CategoryName" HeaderText="CategoryName"
  ReadOnly="True" SortExpression="CategoryName" />
 <asp:BoundField DataField="SupplierName" HeaderText="SupplierName"
  ReadOnly="True" SortExpression="SupplierName" />
 </Columns>
</asp:GridView>

<asp:ObjectDataSource ID="ProductsDataSource" runat="server"
 InsertMethod="AddProduct" OldValuesParameterFormatString="original_{0}"
 SelectMethod="GetProducts" TypeName="ProductsBLL">
 <InsertParameters>
 <asp:Parameter Name="productName" Type="String" />
 <asp:Parameter Name="supplierID" Type="Int32" />
 <asp:Parameter Name="categoryID" Type="Int32" />
 <asp:Parameter Name="quantityPerUnit" Type="String" />
 <asp:Parameter Name="unitPrice" Type="Decimal" />
 <asp:Parameter Name="unitsInStock" Type="Int16" />
 <asp:Parameter Name="unitsOnOrder" Type="Int16" />
 <asp:Parameter Name="reorderLevel" Type="Int16" />
 <asp:Parameter Name="discontinued" Type="Boolean" />
 </InsertParameters>
</asp:ObjectDataSource>
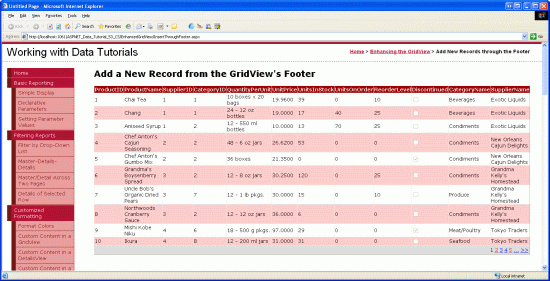
圖5:在一個啟用了分頁功能的GridView裡,顯示產品的所有數據項
第2步:添加一個頁腳行
GridView控件包含頁眉行、數據行和頁腳行。GridView控件ShowHeader和ShowFooter屬性決定了是否顯示頁眉行和頁腳行。如果要顯示頁腳行,我們需要將 ShowFooter屬性設置為true。如圖6所示:
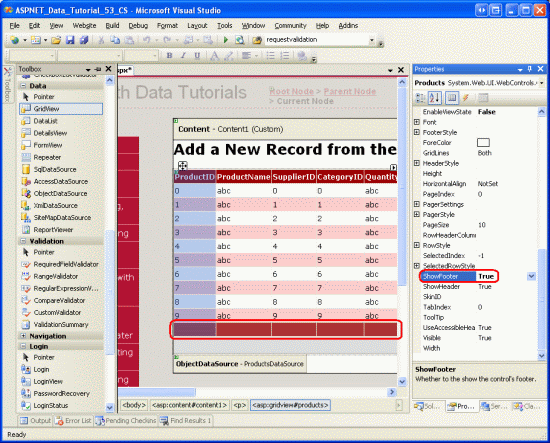
圖6:設ShowFooter屬性為True,添加頁腳行
我們注意到頁腳行的背景色是深紅色,這是由於我們在教程《使用ObjectDataSource展現數據》裡創建了一個名為DataWebControls的主題,並將其應用為所有的頁面底色。特別的,皮膚文件GridView.skin設置FooterStyle屬性使用FooterStyle CSS ,其代碼如下:
.FooterStyle
{
 background-color: #a33;
 color: White;
 text-align: right;
}
注意:在以前的教程我們提到過使用GridView的頁腳行。如果不清楚的話,請查閱教程第15章《在GridView的頁腳中顯示統計信息》
設置ShowFooter屬性為true後,在浏覽器裡觀看效果。當前的頁腳行並不包含任何的文字或Web控件。在第3步,我們將修改其包含相應的插入界面。
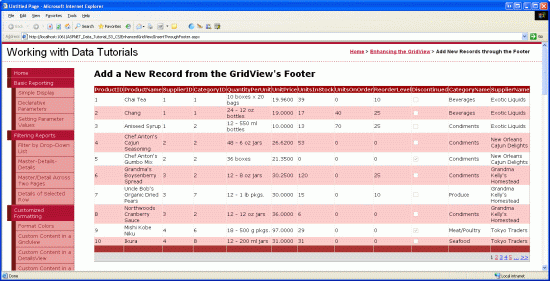
圖7:頁腳行顯示為空白
第3步:自定義頁腳行
回顧教程《在GridView控件中使用TemplateField》,在那篇教程我們探討了如何對GridView的某一列使用TemplateFields(而不是BoundFields或CheckBoxFields) ,從而實現自定義顯示樣式;而在教程《定制數據修改界面》裡我們看到如何在GridView裡使用TemplateFields定制編輯界面。一個TemplateField是由諸如ItemTemplate、EditItemTemplate等模板構成的。比如,ItemTemplate模板顯示的數據行為只讀狀態;而EditItemTemplate模板定制了一個編輯行界面。
除了ItemTemplate、EditItemTemplate等模板外,TemplateField也包含一個名為FooterTemplate的模板,它為容器指定頁腳行。所以我們可以在FooterTemplate模板裡添加插入界面要用到的Web控件。讓我們開始吧,首先,我們將GridView控件裡的所有列轉換成TemplateFields。在GridView控件的智能標簽裡點擊“編輯列”,在左邊選中每個域,再點擊“Convert this field into a TemplateField” 。
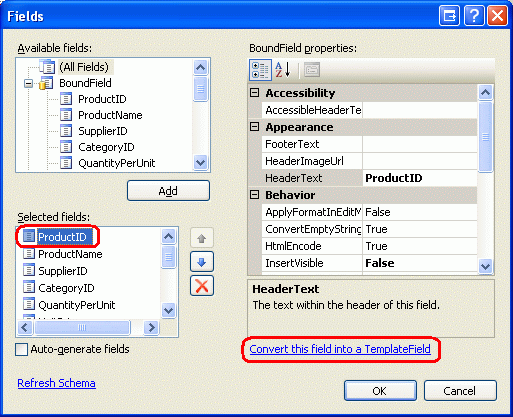
圖8:將每個域轉換為一個TemplateField
點擊“Convert this field into a TemplateField”的話,將當前類型的域轉換成相應的TemplateField。比如,每個BoundField將轉換成這樣的TemplateField,它的ItemTemplate包含一個Label控件來顯示相應的數據域;它的EditItemTemplate使用一個TextBox控件來顯示相應的數據域。例如,在這裡,名為ProductName的BoundField將被轉換為如下所示的TemplateField :
<asp:TemplateField HeaderText="ProductName" SortExpression="ProductName">
 <EditItemTemplate>
 <asp:TextBox ID="TextBox1" runat="server"
  Text='<%# Bind("ProductName") %>'></asp:TextBox>
 </EditItemTemplate>
 <ItemTemplate>
 <asp:Label ID="Label2" runat="server"
  Text='<%# Bind("ProductName") %>'></asp:Label>
 </ItemTemplate>
</asp:TemplateField>
同樣的,名為Discontinued的CheckBoxField轉換為TemplateField後,其ItemTemplate 和 EditItemTemplate 模板都將包含一個CheckBox Web控件(只是ItemTemplate模板裡的CheckBox不可用);而處於“只讀”狀態的ProductID BoundField轉換成TemplateField後,其ItemTemplate 和 EditItemTemplate 模板都包含一個Label控件。簡而言之,將GridView裡的某一列轉換為一個 TemplateField,是定制自定義模板的一種又快又容易的方法,且不會喪失該列應有的功能。
由於我們不需要GridView支持編輯功能,將每個TemplateField的EditItemTemplate模板刪除,只留下ItemTemplate模板。完成後, GridView的代碼看起來應和下面的差不多:
<asp:GridView ID="Products" runat="server" AutoGenerateColumns="False"
 DataKeyNames="ProductID" DataSourceID="ProductsDataSource"
 AllowPaging="True" EnableViewState="False" ShowFooter="True">
 <Columns>
 <asp:TemplateField HeaderText="ProductID" InsertVisible="False"
  SortExpression="ProductID">
  <ItemTemplate>
  <asp:Label ID="Label1" runat="server"
   Text='<%# Bind("ProductID") %>'></asp:Label>
  </ItemTemplate>
 </asp:TemplateField>
 <asp:TemplateField HeaderText="ProductName" SortExpression="ProductName">
  <ItemTemplate>
  <asp:Label ID="Label2" runat="server"
   Text='<%# Bind("ProductName") %>'></asp:Label>
  </ItemTemplate>
 </asp:TemplateField>
 <asp:TemplateField HeaderText="SupplierID" SortExpression="SupplierID">
  <ItemTemplate>
  <asp:Label ID="Label3" runat="server"
   Text='<%# Bind("SupplierID") %>'></asp:Label>
  </ItemTemplate>
 </asp:TemplateField>
 <asp:TemplateField HeaderText="CategoryID" SortExpression="CategoryID">
  <ItemTemplate>
  <asp:Label ID="Label4" runat="server"
   Text='<%# Bind("CategoryID") %>'></asp:Label>
  </ItemTemplate>
 </asp:TemplateField>
 <asp:TemplateField HeaderText="QuantityPerUnit"
  SortExpression="QuantityPerUnit">
  <ItemTemplate>
  <asp:Label ID="Label5" runat="server"
   Text='<%# Bind("QuantityPerUnit") %>'></asp:Label>
  </ItemTemplate>
 </asp:TemplateField>
 <asp:TemplateField HeaderText="UnitPrice" SortExpression="UnitPrice">
  <ItemTemplate>
  <asp:Label ID="Label6" runat="server"
   Text='<%# Bind("UnitPrice") %>'></asp:Label>
  </ItemTemplate>
 </asp:TemplateField>
 <asp:TemplateField HeaderText="UnitsInStock"
  SortExpression="UnitsInStock">
  <ItemTemplate>
  <asp:Label ID="Label7" runat="server"
   Text='<%# Bind("UnitsInStock") %>'></asp:Label>
  </ItemTemplate>
 </asp:TemplateField>
 <asp:TemplateField HeaderText="UnitsOnOrder"
  SortExpression="UnitsOnOrder">
  <ItemTemplate>
  <asp:Label ID="Label8" runat="server"
   Text='<%# Bind("UnitsOnOrder") %>'></asp:Label>
  </ItemTemplate>
 </asp:TemplateField>
 <asp:TemplateField HeaderText="ReorderLevel"
  SortExpression="ReorderLevel">
  <ItemTemplate>
  <asp:Label ID="Label9" runat="server"
   Text='<%# Bind("ReorderLevel") %>'></asp:Label>
  </ItemTemplate>
 </asp:TemplateField>
 <asp:TemplateField HeaderText="Discontinued"
  SortExpression="Discontinued">
  <ItemTemplate>
  <asp:CheckBox ID="CheckBox1" runat="server"
   Checked='<%# Bind("Discontinued") %>' Enabled="false" />
  </ItemTemplate>
 </asp:TemplateField>
 <asp:TemplateField HeaderText="CategoryName"
  SortExpression="CategoryName">
  <ItemTemplate>
  <asp:Label ID="Label10" runat="server"
   Text='<%# Bind("CategoryName") %>'></asp:Label>
  </ItemTemplate>
 </asp:TemplateField>
 <asp:TemplateField HeaderText="SupplierName"
  SortExpression="SupplierName">
  <ItemTemplate>
  <asp:Label ID="Label11" runat="server"
   Text='<%# Bind("SupplierName") %>'></asp:Label>
  </ItemTemplate>
 </asp:TemplateField>
 </Columns>
</asp:GridView>
現在, 每個GridView列都已經轉換成一個TemplateField,我們在其FooterTemplate裡添加適當的插入界面。然而,有些列沒有插入界面(比如ProductID),其它列的TemplateField模板將包含Web控件,供用戶輸入產品信息。
在GridView的智能標簽裡點擊“Edit Templates”,從下拉列表裡選擇某列的 FooterTemplate模板,從工具箱裡拖一個適當的控件到頁面上。
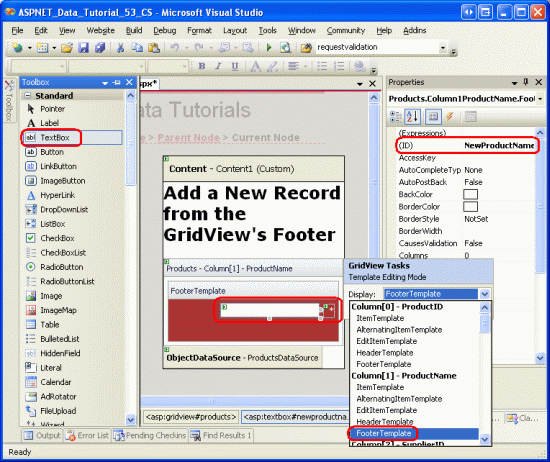
圖9:在每列的FooterTemplate裡添加適當的插入界面。
下面列出了GridView的所有列,並指定每列添加哪些插入界面:
ProductID – 無
ProductName –添加一個TextBox,ID為NewProductName;再添加一個
RequiredFieldValidator控件,防止用戶未輸入產品名。
SupplierID –無
CategoryID – 無
QuantityPerUnit – 添加一個TextBox,ID為NewQuantityPerUnit
UnitPrice – 添加一個TextBox,ID為NewUnitPrice,再添加一個CompareValidator控件,確保用戶輸入的是貨幣值,且>=0
UnitsInStock –添加一個TextBox,ID為NewUnitsInStock,再添加一個CompareValidator控件,確保用戶輸入的是整數值,且>=0
UnitsOnOrder – 添加一個TextBox,ID為NewUnitsOnOrder,再添加一個CompareValidator控件,確保用戶輸入的是整數值,且>=0
ReorderLevel –添加一個TextBox,ID為NewReorderLevel,再添加一個CompareValidator控件,確保用戶輸入的是整數值,且>=0
Discontinued–添加一個CheckBox,ID為NewDiscontinued
CategoryName ––添加一個DropDownList控件,ID為NewCategoryID。將其綁定到一個名為CategoriesDataSource的ObjectDataSource控件,設置它調用CategoriesBLL類的GetCategories() 方法。設置DropDownList控件顯示CategoryName,並將DropDownList控件的values設置為CategoryID
SupplierName –添加一個DropDownList控件,ID為NewSupplierID.將其綁定到一個名為SuppliersDataSource的ObjectDataSource控件,設置它調用SuppliersBLL類的GetSuppliers()方法.設置DropDownList控件顯示CompanyName ,並將DropDownList控件的values設置為SupplierID.
將每個validation控件的ForeColor屬性清空,以便用在FooterStyle CSS類定義的白色背景色取代默認的紅色;同時將ErrorMessage設置為詳細的錯誤提示;將Text屬性設置為星號。在每個FooterTemplates裡,只要包含有validation控件,將其Wrap屬性設置為false。最後,在GridView控件下面添加一個ValidationSummary 控件,設ShowMessageBox屬性為true;ShowSummary屬性為false。
當添加一個新產品時,我們需要給出CategoryID和SupplierID值。頁面上的2個DropDownList控件顯示的是CategoryName 和SupplierName,但傳遞的是我們需要的
CategoryID和SupplierID值。為什麼不直接顯示CategoryID和SupplierID值呢?因為最終用戶對CategoryName 和SupplierName更感興趣。既然現在可以在顯示CategoryName 和SupplierName的插入界面獲取對應的CategoryID和SupplierID值,我們將CategoryID 和SupplierID 2個TemplateFields從GridView移除。
同樣,當添加新產品時我們不需要ProductID,那麼我們也可以刪除ProductID TemplateField,不過,在這裡我們保留它。除了TextBoxes,DropDownLists、
CheckBoxes以及validation控件外,我們還需要在插入界面添加一個“Add”按鈕。當點擊該按鈕時,將新記錄添加到數據庫。在第4步,我們將在ProductID TemplateField的FooterTemplate模板添加一個“Add”按鈕。
按你喜歡的方式改進外觀。比如,將UnitPrice值格式化為貨幣形式;將UnitsInStock, UnitsOnOrder和ReorderLevel三列放在右邊;修改TemplateFields的HeaderText屬性等。
在FooterTemplates裡完成插入界面的修改後,移除SupplierID 和 CategoryID TemplateFields,最終,你的GridView控件的聲明代碼看起來應該和下面的差不多:
<asp:GridView ID="Products" runat="server" AutoGenerateColumns="False"
 DataKeyNames="ProductID" DataSourceID="ProductsDataSource"
 AllowPaging="True" EnableViewState="False" ShowFooter="True">
 <Columns>
 <asp:TemplateField HeaderText="ProductID" InsertVisible="False"
  SortExpression="ProductID">
  <ItemTemplate>
  <asp:Label ID="Label1" runat="server"
   Text='<%# Bind("ProductID") %>'></asp:Label>
  </ItemTemplate>
  <ItemStyle HorizontalAlign="Center" />
 </asp:TemplateField>
 <asp:TemplateField HeaderText="Product" SortExpression="ProductName">
  <ItemTemplate>
  <asp:Label ID="Label2" runat="server"
   Text='<%# Bind("ProductName") %>'></asp:Label>
  </ItemTemplate>
  <FooterTemplate>
  <asp:TextBox ID="NewProductName" runat="server"></asp:TextBox>
  <asp:RequiredFieldValidator ID="RequiredFieldValidator1"
   runat="server" ControlToValidate="NewProductName"
   Display="Dynamic" ForeColor=""
   ErrorMessage="You must enter a name for the new product.">
   * </asp:RequiredFieldValidator>
  </FooterTemplate>
  <FooterStyle Wrap="False" />
 </asp:TemplateField>
 <asp:TemplateField HeaderText="Category" SortExpression="CategoryName">
  <ItemTemplate>
  <asp:Label ID="Label10" runat="server"
   Text='<%# Bind("CategoryName") %>'></asp:Label>
  </ItemTemplate>
  <FooterTemplate>
  <asp:DropDownList ID="NewCategoryID" runat="server"
   DataSourceID="CategoriesDataSource"
   DataTextField="CategoryName" DataValueField="CategoryID">
  </asp:DropDownList>
  <asp:ObjectDataSource ID="CategoriesDataSource" runat="server"
   OldValuesParameterFormatString="original_{0}"
   SelectMethod="GetCategories" TypeName="CategoriesBLL">
  </asp:ObjectDataSource>
  </FooterTemplate>
 </asp:TemplateField>
 <asp:TemplateField HeaderText="Supplier" SortExpression="SupplierName">
  <ItemTemplate>
  <asp:Label ID="Label11" runat="server"
   Text='<%# Bind("SupplierName") %>'></asp:Label>
  </ItemTemplate>
  <FooterTemplate>
  <asp:DropDownList ID="NewSupplierID" runat="server"
   DataSourceID="SuppliersDataSource"
   DataTextField="CompanyName" DataValueField="SupplierID">
  </asp:DropDownList><asp:ObjectDataSource ID="SuppliersDataSource"
   runat="server" OldValuesParameterFormatString="original_{0}"
   SelectMethod="GetSuppliers" TypeName="SuppliersBLL">
  </asp:ObjectDataSource>
  </FooterTemplate>
 </asp:TemplateField>
 <asp:TemplateField HeaderText="Qty/Unit" SortExpression="QuantityPerUnit">
  <ItemTemplate>
  <asp:Label ID="Label5" runat="server"
   Text='<%# Bind("QuantityPerUnit") %>'></asp:Label>
  </ItemTemplate>
  <FooterTemplate>
  <asp:TextBox ID="NewQuantityPerUnit" runat="server"></asp:TextBox>
  </FooterTemplate>
 </asp:TemplateField>
 <asp:TemplateField HeaderText="Price" SortExpression="UnitPrice">
  <ItemTemplate>
  <asp:Label ID="Label6" runat="server"
   Text='<%# Bind("UnitPrice", "{0:c}") %>'></asp:Label>
  </ItemTemplate>
  <FooterTemplate>
  $<asp:TextBox ID="NewUnitPrice" runat="server" Columns="8" />
  <asp:CompareValidator ID="CompareValidator1" runat="server"
   ControlToValidate="NewUnitPrice"
   ErrorMessage="You must enter a valid currency value greater than
   or equal to 0.00. Do not include the currency symbol."
   ForeColor="" Operator="GreaterThanEqual" Type="Currency"
   ValueToCompare="0" Display="Dynamic">
   * </asp:CompareValidator>
  </FooterTemplate>
  <ItemStyle HorizontalAlign="Right" />
  <FooterStyle Wrap="False" />
 </asp:TemplateField>
 <asp:TemplateField HeaderText="Units In Stock"
  SortExpression="Units In Stock">
  <ItemTemplate>
  <asp:Label ID="Label7" runat="server"
   Text='<%# Bind("UnitsInStock") %>'></asp:Label>
  </ItemTemplate>
  <FooterTemplate>
  <asp:TextBox ID="NewUnitsInStock" runat="server" Columns="5" />
  <asp:CompareValidator ID="CompareValidator2" runat="server"
   ControlToValidate="NewUnitsInStock" Display="Dynamic"
   ErrorMessage="You must enter a valid numeric value for units
   in stock that's greater than or equal to zero."
   ForeColor="" Operator="GreaterThanEqual" Type="Integer"
   ValueToCompare="0">*</asp:CompareValidator>
  </FooterTemplate>
  <ItemStyle HorizontalAlign="Right" />
  <FooterStyle Wrap="False" />
 </asp:TemplateField>
 <asp:TemplateField HeaderText="Units On Order" SortExpression="UnitsOnOrder">
  <ItemTemplate>
  <asp:Label ID="Label8" runat="server"
   Text='<%# Bind("UnitsOnOrder") %>'></asp:Label>
  </ItemTemplate>
  <FooterTemplate>
  <asp:TextBox ID="NewUnitsOnOrder" runat="server" Columns="5" />
  <asp:CompareValidator ID="CompareValidator3" runat="server"
   ControlToValidate="NewUnitsOnOrder" Display="Dynamic"
   ErrorMessage="You must enter a valid numeric value for units on
   order that's greater than or equal to zero."
   ForeColor="" Operator="GreaterThanEqual" Type="Integer"
   ValueToCompare="0">*</asp:CompareValidator>
  </FooterTemplate>
  <ItemStyle HorizontalAlign="Right" />
  <FooterStyle Wrap="False" />
 </asp:TemplateField>
 <asp:TemplateField HeaderText="Reorder Level" SortExpression="ReorderLevel">
  <ItemTemplate>
  <asp:Label ID="Label9" runat="server"
   Text='<%# Bind("ReorderLevel") %>'></asp:Label>
  </ItemTemplate>
  <FooterTemplate>
  <asp:TextBox ID="NewReorderLevel" runat="server" Columns="5" />
  <asp:CompareValidator ID="CompareValidator4" runat="server"
   ControlToValidate="NewReorderLevel" Display="Dynamic"
   ErrorMessage="You must enter a valid numeric value for reorder
   level that's greater than or equal to zero."
   ForeColor="" Operator="GreaterThanEqual" Type="Integer"
   ValueToCompare="0">*</asp:CompareValidator>
  </FooterTemplate>
  <ItemStyle HorizontalAlign="Right" />
  <FooterStyle Wrap="False" />
 </asp:TemplateField>
 <asp:TemplateField HeaderText="Discontinued" SortExpression="Discontinued">
  <ItemTemplate>
  <asp:CheckBox ID="CheckBox1" runat="server"
   Checked='<%# Bind("Discontinued") %>' Enabled="false" />
  </ItemTemplate>
  <FooterTemplate>
  <asp:CheckBox ID="NewDiscontinued" runat="server" />
  </FooterTemplate>
  <ItemStyle HorizontalAlign="Center" />
  <FooterStyle HorizontalAlign="Center" />
 </asp:TemplateField>
 </Columns>
</asp:GridView>
在浏覽器裡查看該頁面時,GridView控件的頁腳行顯示為一個比較完善的插入界面(如圖10所示)。此時,插入界面並不包含一種方法將輸入的數據添加進數據庫。並將我們也沒有闡述那些鍵入的數據是如何轉換成一條記錄的。在第4步,我們將看到如何添加一個“Add ”按鈕,在頁面回傳後如何執行代碼。在第5步,我們看如何將鍵入的數據轉換成一條記錄添加到數據庫。
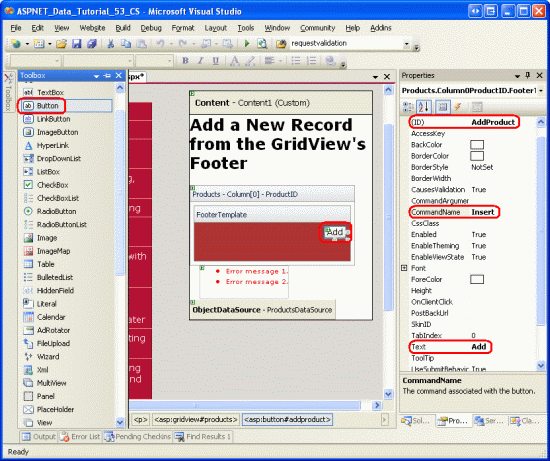
圖10:GridView的頁腳行提供了添加新記錄的界面
第4步:在插入界面添加Add按鈕
如前所述我們需要在界面添加一個Add按鈕,我們可以在某個FooterTemplate裡或另外增加一列來放置該按鈕來達到這個目的。在本教程,我們在ProductID TemplateField的FooterTemplate裡添加該按鈕。
點擊GridView的智能標簽中的“編輯模板”,選擇ProductID對應的 FooterTemplate ,添加一個Button Web控件(LinkButton 或是ImageButton,只要你喜歡), 設ID為AddProduct;CommandName屬性為Insert;Text屬性為“Add”,如圖11所示:

圖11:將Add Button放在ProductID TemplateField的FooterTemplate模板
添加按鈕後,在浏覽器查看該頁面。如果我們在界面輸入無效的數據,再點Add按鈕時,頁面回轉中斷,同時ValidationSummary控件詳細的列出了那些無效數據(如圖12)。當輸入適當的數據後,再點按鈕,將引發頁面回傳,但是沒有記錄添加到數據庫裡。我們需要編寫代碼實現插入數據的功能。
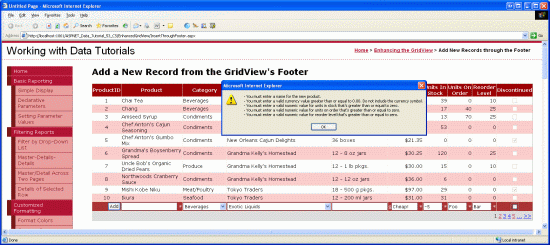
圖12:如果輸入的是無效數據,將會使頁面回轉中斷
注意:界面裡的validation控件未被設置為一組,當頁面中只有插入界面包含validation控件的話,運行沒問題。但是,如果在頁面中還有其它的validation控件的話(比如,如果還存在一個編輯界面,其中也包含validation控件),我們應該將插入界面裡的validation控件和Add按鈕的ValidationGroup屬性設置為同一個值,使其為一個特定的確認組。
第5步:向表Products添加一條新記錄
當使用GridView控件的內置的編輯功能時,GridView會自動的處理編輯產品所必要的工作。當點擊編輯按鈕時,它把在編輯頁面鍵入的數據拷貝到ObjectDataSource的UpdateParameters參數集包含的參數,再調用ObjectDataSource控件的Update()方法執行更新。由於GridView沒有提供內置的功能供插入數據,我們必須編寫代碼調用ObjectDataSource控件的Insert()方法,將在插入界面鍵入的數據復制到 ObjectDataSource控件的InsertParameters集合裡。
就像在教程28章《GridView裡的Button》裡探討的一樣,任何時候,只要點擊 GridView控件裡的Button, LinkButton或ImageButton,發生頁面回轉時引發GridView的RowCommand事件。不管這些Button, LinkButton、ImageButton控件是顯式添加的(比如,在頁腳行添加的Add按鈕),或者是GridView控件自動添加的(比如啟用分頁功能或排序功能時,頂部的出現的那些LinkButton)。
為相應用戶點擊Add按鈕,我們要為GridView的RowCommand事件創建一個事件處理器。由於任何時候點擊GridView控件的任何Button, LinkButton或ImageButton都會觸發該事件,我們必須指定當傳入事件處理器的CommandName屬性值與Add按鈕的一致時(即:“Insert”),並且鍵入的數據無誤時,才執行插入操作。代碼如下:
protected void Products_RowCommand(object sender, GridViewCommandEventArgs e)
{
 // Insert data if the CommandName == "Insert"
 // and the validation controls indicate valid data...
 if (e.CommandName == "Insert" && Page.IsValid)
 {
 // TODO: Insert new record...
 }
}
注意:你可能會很奇怪為什麼還要檢查Page.IsValid屬性呢?畢竟,如果在插入界面輸入了無效的數據時,頁面回傳會中斷。檢查Page.IsValid屬性是為了防止用戶未啟用JavaScript或巧妙的繞過客戶端驗證的情況。簡而言之,如果沒有進行客戶端進行有效性驗證的話,在處理數據以前必須在服務器端再進行一次有效性驗證。
在第1步,ObjectDataSource控件ProductsDataSource的Insert()方法映射的是ProductsBLL類的AddProduct方法。為了在表Products裡添加新記錄,我們只需要簡單的調用ObjectDataSource的Insert()方法:
protected void Products_RowCommand(object sender, GridViewCommandEventArgs e)
{
 // Insert data if the CommandName == "Insert"
 // and the validation controls indicate valid data...
 if (e.CommandName == "Insert" && Page.IsValid)
 {
 // Insert new record
 ProductsDataSource.Insert();
 }
}
現在可以調用Insert()方法,剩下的步驟是把在插入界面鍵入的值傳遞給ProductsBLL類的AddProduct方法中的參數。就像在教程17章《研究插入、更新和刪除的關聯事件》探討的一樣,可以通過ObjectDataSource控件的Inserting事件來實現。在Inserting事件裡,我們需要編程訪問頁腳行裡的控件,將其值賦給e.InputParameters集合。當用戶忽略了某個值時——比如使ReorderLevel文本框為空,我們應該指定該值為NULL。因為AddProducts方法允許那些nullable類型的列接收NULL值。代碼如下:
protected void ProductsDataSource_Inserting
 (object sender, ObjectDataSourceMethodEventArgs e)
{
 // Programmatically reference Web controls in the inserting interface...
 TextBox NewProductName =
 (TextBox)Products.FooterRow.FindControl("NewProductName");
 DropDownList NewCategoryID =
 (DropDownList)Products.FooterRow.FindControl("NewCategoryID");
 DropDownList NewSupplierID =
 (DropDownList)Products.FooterRow.FindControl("NewSupplierID");
 TextBox NewQuantityPerUnit =
 (TextBox)Products.FooterRow.FindControl("NewQuantityPerUnit");
 TextBox NewUnitPrice =
 (TextBox)Products.FooterRow.FindControl("NewUnitPrice");
 TextBox NewUnitsInStock =
 (TextBox)Products.FooterRow.FindControl("NewUnitsInStock");
 TextBox NewUnitsOnOrder =
 (TextBox)Products.FooterRow.FindControl("NewUnitsOnOrder");
 TextBox NewReorderLevel =
 (TextBox)Products.FooterRow.FindControl("NewReorderLevel");
 CheckBox NewDiscontinued =
 (CheckBox)Products.FooterRow.FindControl("NewDiscontinued");

 // Set the ObjectDataSource's InsertParameters values...
 e.InputParameters["productName"] = NewProductName.Text;

 e.InputParameters["supplierID"] =
 Convert.ToInt32(NewSupplierID.SelectedValue);
 e.InputParameters["categoryID"] =
 Convert.ToInt32(NewCategoryID.SelectedValue);

 string quantityPerUnit = null;
 if (!string.IsNullOrEmpty(NewQuantityPerUnit.Text))
 quantityPerUnit = NewQuantityPerUnit.Text;
 e.InputParameters["quantityPerUnit"] = quantityPerUnit;

 decimal? unitPrice = null;
 if (!string.IsNullOrEmpty(NewUnitPrice.Text))
 unitPrice = Convert.ToDecimal(NewUnitPrice.Text);
 e.InputParameters["unitPrice"] = unitPrice;

 short? unitsInStock = null;
 if (!string.IsNullOrEmpty(NewUnitsInStock.Text))
 unitsInStock = Convert.ToInt16(NewUnitsInStock.Text);
 e.InputParameters["unitsInStock"] = unitsInStock;

 short? unitsOnOrder = null;
 if (!string.IsNullOrEmpty(NewUnitsOnOrder.Text))
 unitsOnOrder = Convert.ToInt16(NewUnitsOnOrder.Text);
 e.InputParameters["unitsOnOrder"] = unitsOnOrder;

 short? reorderLevel = null;
 if (!string.IsNullOrEmpty(NewReorderLevel.Text))
 reorderLevel = Convert.ToInt16(NewReorderLevel.Text);
 e.InputParameters["reorderLevel"] = reorderLevel;

 e.InputParameters["discontinued"] = NewDiscontinued.Checked;
}
添加完Inserting事件處理器後,我們就可以通過GridView控件的頁腳行添加記錄了。開始吧,嘗試添加幾個產品。
優化並自定義Add操作
一般來說,點擊Add按鈕後,就將為數據庫添加一個新記錄。但是沒有任何直觀的提示反映成功地添加了記錄。的確,應該用一個Label Web控件或客戶端的消息框提示用戶已經成功地添加了產品,我把它作為一個練習留給讀者。
本文使用的GridView控件沒有對所顯示的產品進行任何排序,也未允許最終用戶對數據排序。因此,產品依它們在數據庫中的次序排序——依主鍵值順序。由於每條新添加的記錄的ProductID值比上一條的值大,所以,當添加新記錄時,它就自然地排到最後一位了。因此,當添加新記錄時,你希望自動地轉到GridView控件的最後一頁。怎麼才能辦到呢?在RowCommand事件處理器裡,調用ProductsDataSource.Insert()方法後,緊接著添加如下一行代碼,它說明當數據綁定到GridView後將轉到最後一頁:
// Indicate that the user needs to be sent to the last page
SendUserToLastPage = true;
其中SendUserToLastPage是頁面層(page-level)的布爾變量,其初始值為false。在GridView控件的DataBound事件處理器中,如果SendUserToLastPage為false(譯注:應該是true),PageIndex屬性將使用戶轉到最後一頁。
protected void Products_DataBound(object sender, EventArgs e)
{
 // Send user to last page of data, if needed
 if (SendUserToLastPage)
 Products.PageIndex = Products.PageCount - 1;
}
為什麼我們要在DataBound事件處理器(而不是在RowCommand事件處理器)裡設置PageIndex屬性呢?如果在RowCommand裡設置PageIndex屬性的話,它返回的是在添加新記錄之前的PageIndex值。在大多數情況下,這樣做是沒有問題的,但是,如果新添加的記錄剛好落到新的一頁(譯注:比如原本有80個產品,分為8頁顯示,此時末頁的PageIndex為7,當添加第81條記錄時,新添加的產品變成第9頁第1條記錄了,此時末頁的PageIndex為8,而不是添加產品前的7),而我們使用RowCommand裡設置的PageIndex值話,頁面將跳往倒數第2頁,而不是我們期望的末頁。而DataBound事件是在添加產品且重新綁定以後才發生,我們在DataBound事件處理器裡設置的PageIndex值才是真正的末頁的PageIndex值。
最後,本文用到的GridView看起來相當寬,因為添加產品信息要用到很多列。因此,最好將它設置為豎向排列。另外我們可以減少輸入列來縮小整體寬度,也許我們添加新產品時用不到UnitsOnOrder、UnitsInStock、ReorderLevel這幾項,那麼在GridView裡將其移除即可。
刪除UnitsOnOrder、UnitsInStock、ReorderLevel列後需要做調整,有2種方法:
1.仍然使用AddProduct方法,不過其需要傳入UnitsOnOrder、UnitsInStock、ReorderLevel列的值。我們可以在Inserting事件處理器中,對上述3列使用“硬編碼”值或默認值。
2.在ProductsBLL類裡對AddProduct方法重載,使其不需要傳入UnitsOnOrder、UnitsInStock、ReorderLevel列的值。然後,在ASP.NET page頁面設置ObjectDataSource使用重載的AddProduct方法。
以上2種方法都能奏效。在以前的教程裡我們使用的是後者,對ProductsBLL類的UpdateProduct方法多次重載。
總結:
DetailsView和FormView控件擁有內置的inserting插入數據功能,而GridView沒有。不過我們可以使用GridView控件的頁腳行來達到此目的。要顯示頁腳行只需要設置ShowFooter屬性為true。我們可以這樣對頁腳行進行用戶定制:將每一列轉換成TemplateField,並在其FooterTemplate模板定制插入界面。正如我們在本章看到的那樣,FooterTemplate 模板可以包含Buttons,TextBoxes, DropDownLists,CheckBoxes, data source controls,validation controls等控件,除此以外,為了便於用戶輸入,Add按鈕, LinkButton或ImageButton等也是必需的。
當點擊Add按鈕後,將調用ObjectDataSource控件的Insert()方法,進而使用其映射的插入數據方法(具體到本文,即為ProductsBLL類的AddProduct方法),在調用具體的插入數據方法前,我們需要將插入界面裡鍵入的數據傳遞ObjectDataSource控件的InsertParameters集合。要達到該目的,我們應該在ObjectDataSource控件的Inserting事件處理器裡,編程訪問插入界面的Web控件。
本教程探討了優化GridView外觀的技巧。接下來的一系列教程,我們看如何使用2進制數據——比如images, PDFs, Word documents等等,當然還有data Web控件。
祝編程快樂!
作者簡介
本系列教程作者 Scott Mitchell,著有六本ASP/ASP.NET方面的書,是4GuysFromRolla.com的創始人,自1998年以來一直應用 微軟Web技術。大家可以點擊查看全部教程《[翻譯]Scott Mitchell 的ASP.NET 2.0數據教程》,希望對大家的學習ASP.NET有所幫助。