本文介紹了ASP.NET如何通過WMI創建站點、添加虛擬目錄和添加主機頭。並且已在Windows Server 2003及IIS6的環境下測試通過。
這玩意兒花了老子3天時間才搞定,用了幾個小時寫代碼,而且當中還花了不少時間解決Win32: Access denied error的問題。當然我要指出的是,無論NETWORK SERVER帳戶還是IUSR_<servername>帳戶都不要設置過大的權限。對於WMI和IIS metabase的安全機理,我還是一無所知的。我只不過解決問題而已。
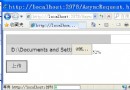
首先要從Internet信息服務(IIS)管理器中獲取網站標識符,點擊“網站”根節點,右側“標識符”顯示的就是網站的ID。默認網站的標識符通常是1。
獲取網站標識的功能,我們要用到一個namespace,代碼如下:
using System.Management;
下文所有’ServerName’都表示你的服務器名稱,或者如果你的代碼是本地運行的,也可以用一個點來表示。
創建一個站點,你會用到如下函數。這個函數返回新網站的ID,這樣你可以進一步對這個網站進行操作。
public static string CreateWebsite(string serverName, string appPoolName, string ip,string pathToRoot, string hostName, string domainName, int port)
{
    ConnectionOptions options = new ConnectionOptions();
    options.Authentication = AuthenticationLevel.Connect;
    options.EnablePrivileges = true;
    options.Impersonation = ImpersonationLevel.Impersonate;
    ManagementScope scope = new ManagementScope(string.Format(@\\{0}\root\MicrosoftIISv2,
                            serverName), options);
    scope.Connect();
    ManagementObject oW3SVC = new ManagementObject(scope,
    new ManagementPath(@"IIsWebService='W3SVC'"), null);

    ManagementBaseObject[] serverBindings = new ManagementBaseObject[1];
    serverBindings[0] = CreateServerBinding(scope,
                        string.Format("{0}.{1}", hostName, domainName), ip, port);
    ManagementBaseObject inputParameters = oW3SVC.GetMethodParameters("CreateNewSite");
    inputParameters["ServerComment"] = string.Format("{0}.{1}", hostName, domainName);
    inputParameters["ServerBindings"] = serverBindings;
    inputParameters["PathOfRootVirtualDir"] = pathToRoot;
    ManagementBaseObject outParameter =
      oW3SVC.InvokeMethod("CreateNewSite", inputParameters, null);

    string siteId = Convert.ToString(
     outParameter.Properties["ReturnValue"].Value).Replace(
     "IIsWebServer='W3SVC/", "").Replace("'", "");
    ManagementObject oWebVirtDir = new ManagementObject(scope,
    new ManagementPath(string.Format(
        @"IIsWebVirtualDirSetting.Name='W3SVC/{0}/root'", siteId)), null);
    oWebVirtDir.Properties["AppFriendlyName"].Value =
             string.Format("{0}.{1}", hostName, domainName);
    oWebVirtDir.Properties["AccessRead"].Value = true;
    oWebVirtDir.Properties["AuthFlags"].Value = 5; // Integrated Windows Auth.
    oWebVirtDir.Properties["AccessScript"].Value = true;
    oWebVirtDir.Properties["AuthAnonymous"].Value = true;
    oWebVirtDir.Properties["AppPoolId"].Value = appPoolName;
    oWebVirtDir.Put();

    ManagementObject site = new ManagementObject(scope,
      new ManagementPath(Convert.ToString(
      outParameter.Properties["ReturnValue"].Value)), null);
    site.InvokeMethod("Start", null);
    return siteId;
}
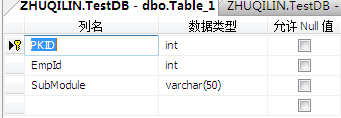
創建一個虛擬目錄:
public static void AddVirtualFolder(string serverName, string websiteId,string name, string path)
{
    ManagementScope scope = new ManagementScope(string.Format(@"\\{0}\root\MicrosoftIISV2", serverName));
    scope.Connect();

    string siteName = string.Format("W3SVC/{0}/Root/{1}", websiteId, name);

    ManagementClass mc = new ManagementClass(scope,new ManagementPath("IIsWebVirtualDirSetting"), null);
    ManagementObject oWebVirtDir = mc.CreateInstance();

    oWebVirtDir.Properties["Name"].Value = siteName;
    oWebVirtDir.Properties["Path"].Value = path;
    oWebVirtDir.Properties["AuthFlags"].Value = 5; // Integrated Windows Auth.
    oWebVirtDir.Properties["EnableDefaultDoc"].Value = true;
    // date, time, size, extension, longdate ;
    oWebVirtDir.Properties["DirBrowseFlags"].Value = 0x4000003E;
    oWebVirtDir.Properties["AccessFlags"].Value = 513; // read script
    oWebVirtDir.Put();

    ManagementObject mo = new ManagementObject(scope,
      new System.Management.ManagementPath("IIsWebVirtualDir='" +
      siteName + "'"), null);
    ManagementBaseObject inputParameters = mo.GetMethodParameters("AppCreate2");
    inputParameters["AppMode"] = 2;
    mo.InvokeMethod("AppCreate2", inputParameters, null);
    mo = new ManagementObject(scope, new System.Management.ManagementPath(
             "IIsWebVirtualDirSetting='" + siteName + "'"), null);
    mo.Properties["AppFriendlyName"].Value = name;
    mo.Put();
}
給網站添加一個主機頭:
public static void AddHostHeader(string serverName, string hostHeader, string ip, int port, string websiteID)
{
    ManagementScope scope = new ManagementScope(string.Format(
           @"\\{0}\root\MicrosoftIISV2", serverName));
    scope.Connect();

    string siteName = string.Format("'W3SVC/{0}'", websiteID);

    ManagementObject mo = new ManagementObject(scope,
      new System.Management.ManagementPath("IIsWebServerSetting=" + siteName), null);
    ManagementBaseObject[] websiteBindings =
      (ManagementBaseObject[])mo.Properties["ServerBindings"].Value;

    ManagementObject mco = CreateServerBinding(scope, hostHeader, ip, port);

    ManagementBaseObject[] newWebsiteBindings =
      new ManagementBaseObject[websiteBindings.Length+1];
    websiteBindings.CopyTo(newWebsiteBindings, 0);
    newWebsiteBindings[newWebsiteBindings.Length - 1] = mco;

    mo.Properties["ServerBindings"].Value = newWebsiteBindings;

    mo.Put();
}
最後別忘了這個函數,它可以為網站綁定一個網絡標識。
private static ManagementObject CreateServerBinding(ManagementScope scope,string hostName, string ip, int port)
{
    ManagementClass mc = new ManagementClass(scope,
           new ManagementPath("ServerBinding"), null);
    ManagementObject mco = mc.CreateInstance();

    mco.Properties["Hostname"].Value = hostName;
    mco.Properties["IP"].Value = ip;
    mco.Properties["Port"].Value = port;
    mco.Put();

    return mco;
}
安全。如果之用上面的那坨代碼還不行。我千方百計想讓其運行,但貌似忽視了2件事情。訪問WMI和IIS metabase。
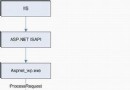
ASP.NET在Windows Server 2003和IIS6.0上運行默認使用的是NETWORK SERVICE帳戶。但是,我們還是要使用客戶端模擬。
所以在Web.config中添加下面一個配置:
<identity impersonate="true" />
使用了這個配置,IUSR_<servername>會使用客戶端模擬的方式去訪問IIS metabase。在後面的文章裡,我就用IUSR_來表示這個帳戶。不要忘記,在IUSR_後面加上你的服務器名稱才是這個帳戶的名字。
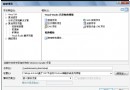
WMI權限設置
IIS metabase權限設置
有了足夠的權限就能運行了。
如果有高人能對這個方法談談自己的感想,並且能指出更好的配置IIS和WMI的方法,那就更贊了。記得之前,我都是自己搗鼓出來的,所以我不知道這個方法是不是最佳的方案。
如果你在運行代碼的時候碰到任何問題,我願意效勞。