Hangfire是一個開源且商業免費使用的工具函數庫。可以讓你非常容易地在ASP.NET應用(也可以不在ASP.NET應用)中執行多種類型的後台任務,而無需自行定制開發和管理基於Windows Service後台任務執行器。且任務信息可以被持久保存。內置提供集成化的控制台。 原文
Hangfire目前資料不多,官方文檔提供兩個教程 Sending Mail in Background with ASP.NET MVC 和 Highlighter Tutorial,根據第二個教程山寨了一把,把文中的Entity Framework 改成了 Dapper,Sql Server數據庫改成了LocalDB。結合自己的理解把原文翻譯一下(第一次翻譯,如有不妥盡情拍磚)
Simple sample :https://github.com/odinserj/Hangfire.Highlighter
Full sample:http://highlighter.hangfire.io, sources
考慮到你正在構建一個像GitHub Gists的代碼片段庫web應用程序,並且想實現語法高亮的特性。為了提供用戶體驗,甚至你想讓它在一個用戶禁用JavaScript的浏覽器中也能正常工作。
為了支持這種場景,並且縮短項目開發時間,你會選擇使用一個Web Service實現語法高亮,比如:http://pygments.appspot.com or http://www.hilite.me.
Note
Although this feature can be implemented without web services (using different syntax highlighter libraries for .NET), we are using them just to show some pitfalls regarding to their usage in web applications.
You can substitute this example with real-world scenario, like using external SMTP server, another services or even long-running CPU-intensive task. 這段不翻譯了,難。
Tip
This section contains steps to prepare the project. However, if you don’t want to do the boring stuff or if you have problems with project set-up, you can download the tutorial source code and go straight to The problem section.
這個教程使用VS2012 (安裝了Web Tools 2013 for Visual Studio 2012 補丁),你也可以使用VS2013。這個項目用到了.NET4.5,ASP.NET MVC5 和SQL Server 2008 Express 或更高版本。
注意:那個補丁就是為了在創建項目時有Asp.net MVC5 Empty Project 這個默認的項目模板,我下載了安裝報錯,找不到對應的包。SqlServer 2008 是為了存儲代碼片段和Hangfire的任務數據,他還用到了EF做為orm框架。
我這裡使用VS2013+LocalDB+Dapper實現類似功能。
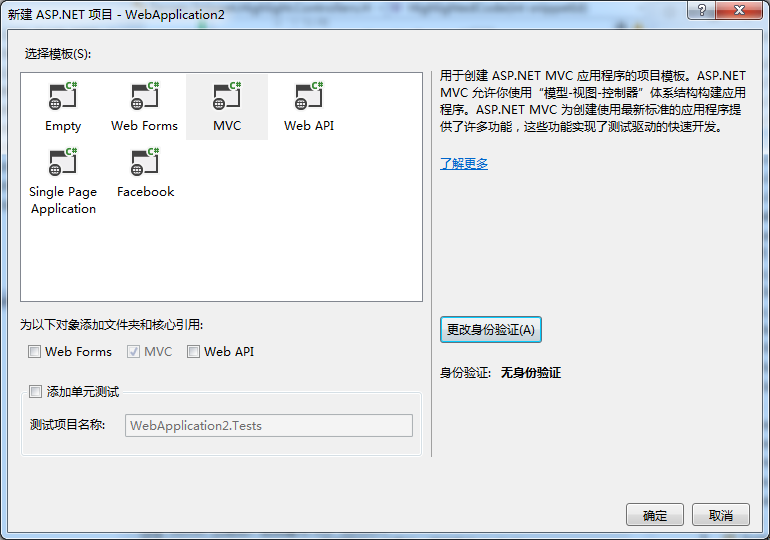
打開VS2013->Web->ASP.NET Web 應用程序->彈出框裡選擇 MVC 模板,身份驗證 我改成了 無身份驗證
創建完成之後默認就有個HomeController.cs 控制器。其中的Index Action 看起來是這樣的:
  public class HomeController : Controller
    {
        public ActionResult Index()
        {
            return View();
        }

        public ActionResult About()
        {
            ViewBag.Message = "Your application description page.";

            return View();
        }

        public ActionResult Contact()
        {
            ViewBag.Message = "Your contact page.";

            return View();
        }
    }
默認的Index視圖也存在了,可以直接F5運行,看看是不是顯示了默認頁面。
在Models文件夾下創建CodeSnippet.cs 文件

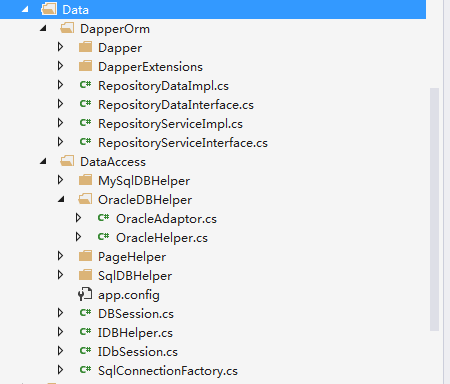
接下來官網文檔是安裝EntityFramework包,我這裡使用整理過的Dapper+DapperExtensions實現的簡易ORM(參照地址 ),文件放在Data文件夾下,如:
創建一個Services 文件夾,創建 HighLightRepository.cs 文件
這裡用到的連接字符串名字是 DefaultConnection。
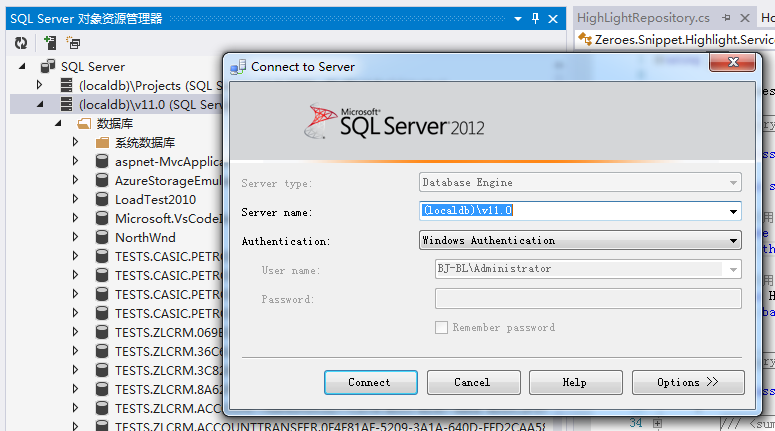
在vs2013中打開SQL Server 對象資源管理器,右鍵“添加 Sql Server”,Server name 後面輸入 (localdb)\v11.0.
右鍵添加數據庫ZereoesHangfire,數據庫位置 我這裡選擇了App_Data 文件夾。
新建數據庫表CodeSnippet,執行是點擊“更新”按鈕,彈出一個sql確認框,運行後就可以創建表了,默認用的是dbo架構。
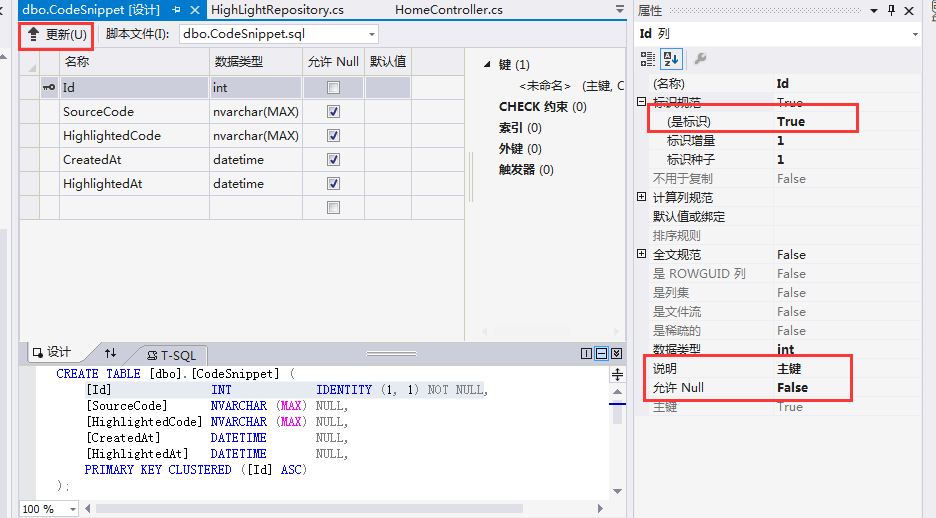
Our database is ready to use! 上面這部分沒有按照文檔中的操作。
現在是向我們的項目注入活力的時候了,請按照描述的樣子修改文件。
Install-Package MiniProfiler,我一般使用界面添加,不在控制台下操作。
安裝後,修改Global.asax.cs文件,添加如下代碼:
        protected void Application_BeginRequest()
        {
            StackExchange.Profiling.MiniProfiler.Start();
        }
        protected void Application_EndRequest()
        {
            StackExchange.Profiling.MiniProfiler.Stop();
        }
修改_Layout.cshtml
<head>
  <!-- ... -->
  @StackExchange.Profiling.MiniProfiler.RenderIncludes()
</head>
修改web.config
  <!--下面是手動添加的-->
  <system.webServer>
    <handlers>
      <add name="MiniProfiler" path="mini-profiler-resources/*" verb="*" type="System.Web.Routing.UrlRoutingModule" resourceType="Unspecified" preCondition="integratedMode" />
    </handlers>
  </system.webServer>
這是我們應用的和興功能。我們將使用 http://hilite.me 提供的HTTP API 來完成高亮工作。開始消費這個API之情,先安裝 Microsoft.Net.Http 包。
Install-Package Microsoft.Net.Http
這個類庫提供簡單的異步API用於發送HTTP請求和接收HTTP響應。所以,讓我們用它來創建一個HTTP請求到hilite.me 服務。
// ~/Controllers/HomeController.cs

/* ... */

public class HomeController
{
    /* ... */

    private static async Task<string> HighlightSourceAsync(string source)
    {
        using (var client = new HttpClient())
        {
            var response = await client.PostAsync(
                @"http://hilite.me/api",
                new FormUrlEncodedContent(new Dictionary<string, string>
                {
                    { "lexer", "c#" },
                    { "style", "vs" },
                    { "code", source }
                }));

            response.EnsureSuccessStatusCode();

            return await response.Content.ReadAsStringAsync();
        }
    }

    private static string HighlightSource(string source)
    {
        // Microsoft.Net.Http does not provide synchronous API,
        // so we are using wrapper to perform a sync call.
        return RunSync(() => HighlightSourceAsync(source));
    }

    private static TResult RunSync<TResult>(Func<Task<TResult>> func)
    {
        return Task.Run<Task<TResult>>(func).Unwrap().GetAwaiter().GetResult();
    }
}
然後,在HomeController.Create 方法中調用它
   [HttpPost]
        public ActionResult Create([Bind(Include = "SourceCode")] CodeSnippet snippet)
        {
            try
            {
                if (ModelState.IsValid)
                {
                    snippet.CreatedAt = DateTime.UtcNow;
                    // We'll add the highlighting a bit later.

                    //方案一:直接調用接口實現高亮
                    using (StackExchange.Profiling.MiniProfiler.StepStatic("Service call"))
                    {
                        snippet.HighlightedCode = HighlightSource(snippet.SourceCode);
                        snippet.HighlightedAt = DateTime.Now;
                    }

                    HighLightRepository.Instance.Insert(snippet);

                    return RedirectToAction("Details", new { id = snippet.Id });
                }

                return View(snippet);

            }
            catch (HttpRequestException)
            {
                ModelState.AddModelError("", "Highlighting service returned error. Try again later.");
            }
            return View(snippet);
        }
Note
We are using synchronous controller action method, although it is recommended to use asynchronous one to make network calls inside ASP.NET request handling logic. As written in the given article, asynchronous actions greatly increase application capacity, but does not help to increase performance. You can test it by yourself with a sample application – there are no differences in using sync or async actions with a single request.
This sample is aimed to show you the problems related to application performance. And sync actions are used only to keep the tutorial simple. 不翻譯,難。
Tip
You can use the hosted sample to see what’s going on.
現在,運行這個程序,嘗試創建一些代碼片段,從一個小的開始。你有沒有注意到一點延時,當你點擊 Create 按鈕後?
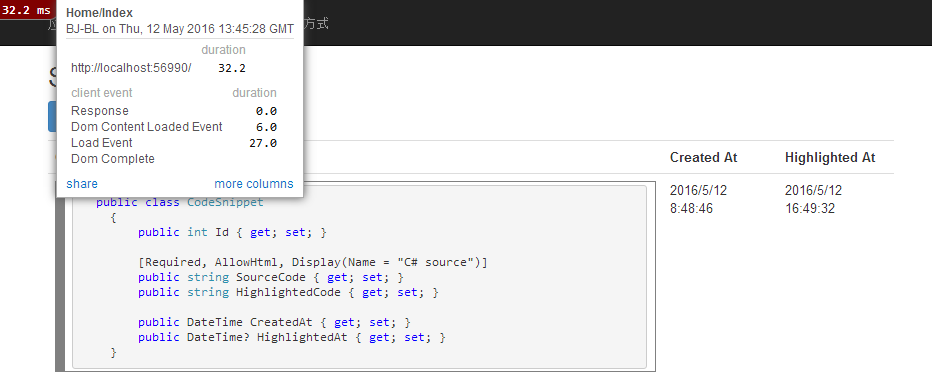
在我的開發機器上,它看起來用了0.5秒才重定向到詳情頁面。讓我們看看MiniProfiler是什麼導致這個延時:
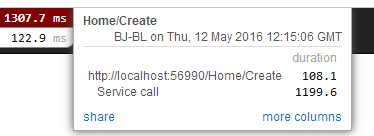
我這裡比他好點,用了1.3秒。
像我們看到的,調用web service是我們最大的問題。當我們嘗試創建一個稍微大點的代碼塊時會發生什麼?
.......省略兩個截圖.......
當我們擴大代碼片段時,滯後也在增大。此外,考慮到語法高亮Web Service()經歷著高負載,或者存在潛在的網絡風險。或者考慮到這是CPU密集型任務,你也不能優化。
 Moreover, consider that syntax highlighting web service (that is not under your control) experiences heavy load, or there are latency problems with network on their side. Or consider heavy CPU-intensive task instead of web service call that you can not optimize well.
Your users will be annoyed with un-responsive application and inadequate delays.
你的用戶將對無響應的應用、嚴重的延時感到憤怒。
面對這樣的問題你能做什麼? Async controller actions 沒有什麼幫助,像我前面earlier說的。你應該采用某種方法提取Web Service的調用和處理到HTTP請求之外,在後台運行。這裡是一些方法:
Ok, great. But there are several difficulties related to these techniques. The former requires us to set some check interval. Shorter interval can abuse our database, longer interval increases latency.
第一種是輪訓沒有高亮的片段,第二種是使用一個任務對立。
第一種輪訓間隔小了數據庫受不了,間隔打了用戶受不了。
後一種方法解決了這個問題,但是帶來了另外一個問題。隊列是否可以持久化?你需要多少工作者線程?怎麼協調他們?他們應當工作在哪,ASP.NET 應用內還是外,windows 服務?
最後一個問題是asp.net 應用處理長時間運行請求的痛點。
Warning
DO NOT run long-running processes inside of your ASP.NET application, unless they are prepared to die at any instruction and there is mechanism that can re-run them.
They will be simple aborted on application shutdown, and can be aborted even if the
IRegisteredObjectinterface is used due to time out.
很多問題吧?Relax,你可以使用 Hangfire.它基於持久化隊列解決應用程序重啟,使用“可靠的獲取”捕獲意外線程終止,包含協調邏輯運行有多個工作者線程。並且可以足夠簡單的使用它。
Note
YOU CAN process your long-running jobs with Hangfire inside ASP.NET application – aborted jobs will be restarted automatically.
Install-Package Hangfire
安裝完Hangfire,添加或更新OWIN Startup 類。在App_Start 文件夾下添加 Startup.cs 文件
[assembly: OwinStartup(typeof(Zeroes.Snippet.Highlight.App_Start.Startup))]
namespace Zeroes.Snippet.Highlight.App_Start
{
public class Startup
{
public void Configuration(IAppBuilder app)
{
// 有關如何配置應用程序的詳細信息,請訪問 http://go.microsoft.com/fwlink/?LinkID=316888
GlobalConfiguration.Configuration.UseSqlServerStorage("DefaultConnection");
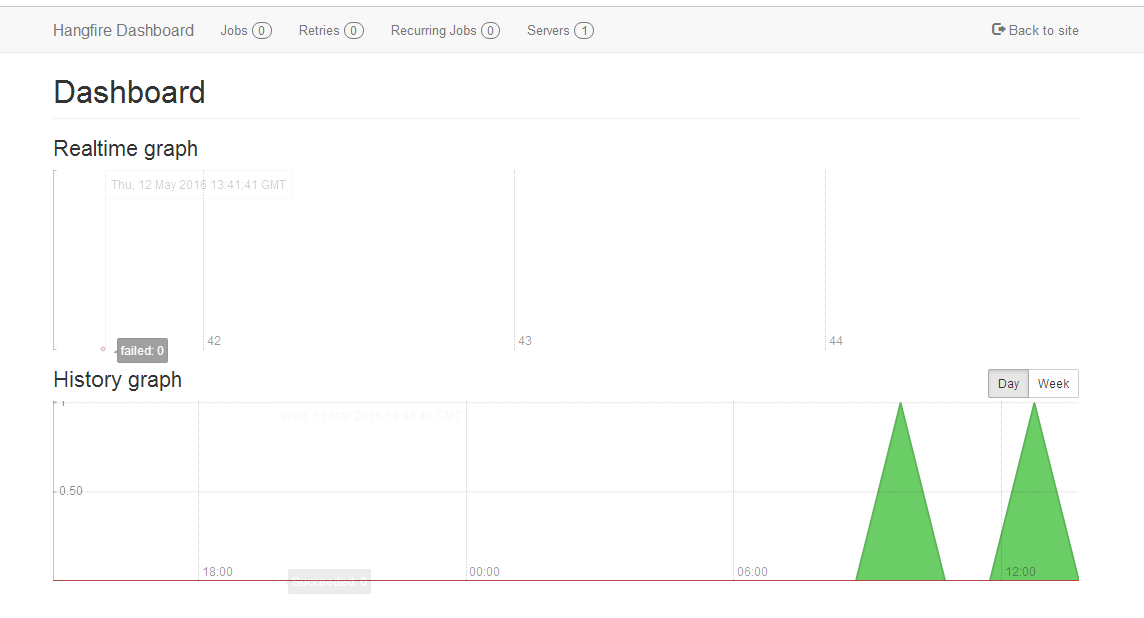
app.UseHangfireDashboard();
app.UseHangfireServer();
}
}
}
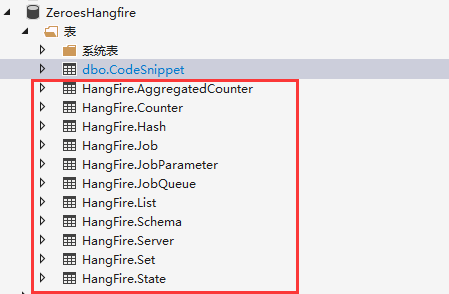
當應用程序第一次啟動時會自動創建所有的表。
首先,我們需要定義一個後台任務方法,當工作者線程捕獲到高亮任務時調用。我們將簡單的定義它為一個靜態方法,在 HomeController 中,使用 snippetId 參數。
// ~/Controllers/HomeController.cs

/* ... Action methods ... */

// Process a job
// Process a job
public static void HighlightSnippet(int snippetId)
{
var snippet = HighLightRepository.Instance.GetById<CodeSnippet>(snippetId);
if (snippet == null) return;
snippet.HighlightedCode = HighlightSource(snippet.SourceCode);
snippet.HighlightedAt = DateTime.UtcNow;
HighLightRepository.Instance.Update(snippet);
}
注意這是一個簡單的方法,不包含任何Hangfire相關的方法。他調用倉儲實例獲取一個代碼片段,調用Web Service。(這裡多線程抵用了HighLightRepository)
然後,我們需要一個地方調用這個方法加入隊列。所以,讓我們修改 Create 方法:
  [HttpPost]
        public ActionResult Create([Bind(Include = "SourceCode")] CodeSnippet snippet)
        {
            try
            {
                if (ModelState.IsValid)
                {
                    snippet.CreatedAt = DateTime.UtcNow;
                    //方案一:直接調用接口實現高亮
                    //using (StackExchange.Profiling.MiniProfiler.StepStatic("Service call"))
                    //{
                    //    snippet.HighlightedCode = HighlightSource(snippet.SourceCode);
                    //    snippet.HighlightedAt = DateTime.Now;
                    //}

                    HighLightRepository.Instance.Insert(snippet);
                    //方案二:加入任務隊列
                    using (StackExchange.Profiling.MiniProfiler.StepStatic("Job 隊列"))
                    {
                        // Enqueue a job
                        BackgroundJob.Enqueue(() => HighlightSnippet(snippet.Id));
                    }

                    return RedirectToAction("Details", new { id = snippet.Id });
                }

                return View(snippet);

            }
            catch (HttpRequestException)
            {
                ModelState.AddModelError("", "Highlighting service returned error. Try again later.");
            }
            return View(snippet);
        }
終於快完了。嘗試創建一些代碼片段看看時間線吧。(不要擔心你會看到空白頁,我一會就處理他)

Good,1.3秒到0.27秒了。但是還存在另外一個問題。你是否注意到有時你重定向的頁面內沒有任何源碼?發生這個是因為我們的視圖裡包含下面這行:
<div>@Html.Raw(Model.HighlightedCode)</div>
修改Details.cshtml
另外你需要拉取你的應用程序使用AJAX,直到它返回高亮代碼。
Or you can also use send a command to users via SignalR channel from your HighlightSnippet method. But that’s another story.
Note
Please, note that user still waits until its source code will be highlighted. But the application itself became more responsive and he is able to do another things while background job is processed.
In this tutorial you’ve seen that:
翻譯、貼代碼用了快3個小時,現在都快吐了。如果您覺著有點用處,就點個贊吧、贊吧、贊吧!
希望更多的人一起學習這個組件,下載地址(稍後補上,CSDN上傳太慢了)
補兩個界面: