如今不管任何應用都能夠看到列表的存在,而本章我們將學習如何使用Xamarin去實現它,以及如何使用適配器和自定義適配器(本文中的適配器的主要內容就是將原始的數據轉換成了能夠供列表控件顯示的項)。
在開始之前我們需要先了解下適配器,首先是提供給我們使用的適配器之間的關系:
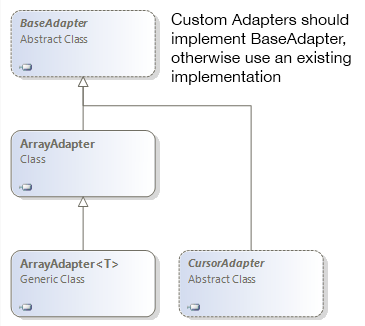
下面我們將上面的適配器進行簡單的介紹:
BaseAdapter:顧名思義,就是所以適配器的基類,但是我們不能將其實例化,因為它是一個虛類,一般我們都是繼承該類並實現其中的方法,形成形成自定義的列表(大多數情況下我們都會使用到它)。
ArrayAdapter和ArrayAdapter<T>:就是專門用於將列表數據的適配器,該適配器內部已經實現了BaseAdapter的方法,所以我們只需要指定對應的數據項以及列表項資源即可。
CursorAdapter:上面的適配器只是用於列表數據,而該適配器則可以用在將數據庫返回的結果集顯示到列表中去,當然在難度上也要比上面的適配器高。
下面我們將利用ListActivity和ArrayAdapater<T>去實現一個簡單的列表界面,下面為該示例的代碼(MainActivity.cs):
 1     public class MainActivity : ListActivity
 2     {
 3         protected string[] items;
 4
 5         protected override void OnCreate(Bundle bundle)
 6         {
 7             base.OnCreate(bundle);
 8             items = new string[]{
 9                 "First","Second","Third"
10             };
11             ListAdapter = new ArrayAdapter<string>(this, Android.Resource.Layout.SimpleListItem1, items);
12         }
13
14         protected override void OnListItemClick(ListView l, View v, int position, long id)
15         {
16             var t = items[position];
17             Toast.MakeText(this, t, ToastLength.Short).Show();
18         }
19 }
這裡有一個重要的關鍵詞就是ListActivity,如果存在一個界面整個界面都是列表,那麼我們就可以繼承這個特殊的活動,並且可以通過ListView屬性和ListAdapter去控制,同時還可以響應關於列表的事件。其中我們利用了ArrayAdapter給列表指定了一個適配器,而這個適配器的第一個參數是當前的上下文,第二個是列表中的項的界面,最後一個就是對應的數據了。
最後將顯示如下的界面:
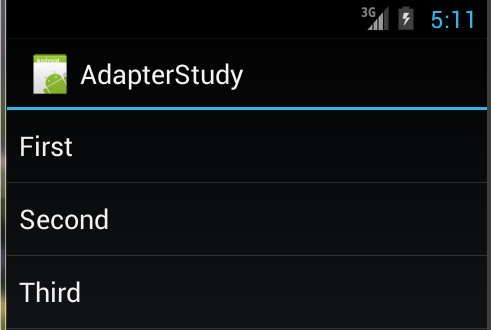
當我們點擊不同的項後,還能看到底部顯示了當前我們選擇的項。這個功能就是在我們重寫了OnListItemClick實現了,正如代碼中所示,我們根據position獲取指定的數據,然後通過Toast將其顯示出來。
簡單介紹過如何使用適配器後,我們將開始學習如何利用BaseAdapter自定義一個適配器,能夠促使我們理解適配器內部的工作原理,首先我們來看下筆者的寫的代碼:
 1         public class MyCustomeAdapter : BaseAdapter<string>
 2         {
 3             string[] items;
 4             Activity activity;
 5
 6             public MyCustomeAdapter(Activity context, string[] values)
 7                 : base()
 8             {
 9                 activity = context;
10                 items = values;
11             }
12
13             public override string this[int position]
14             {
15                 get { return items[position]; }
16             }
17
18             public override int Count
19             {
20                 get { return items.Length; }
21             }
22
23             public override long GetItemId(int position)
24             {
25                 return position;
26             }
27
28             public override View GetView(int position, View convertView, ViewGroup parent)
29             {
30                 View v = convertView;
31                 if (v == null)
32                     v = activity.LayoutInflater.Inflate(Android.Resource.Layout.SimpleListItem1, null);
33                 v.FindViewById<TextView>(Android.Resource.Id.Text1).Text = items[position];
34                 return v;
35             }
36         }
其中最主要的是GetView方法,ListView和ListActivity主要是通過調用該方法獲取對應項的視圖,然後將其添加為子控件,從而顯示,如果我們需要顯示例如淘寶等app那種復雜的列表就需要通過重寫該方法達到,細心的讀者可以發現筆者是先判斷convertView是否為null,如果為null才通過Inflate方法重新實例化一個視圖,關於這部分我們可以參考該文章。
關於其他的方法相信大家靠名稱就能夠明白了,這裡就不多做解釋,具體的使用方法如下所示:
1         protected override void OnCreate(Bundle bundle)
2         {
3             base.OnCreate(bundle);
4             string[] items = new string[]{
5                 "First","Second","Third"
6             };
7             ListAdapter = new MyCustomeAdapter(this, items);
8         }
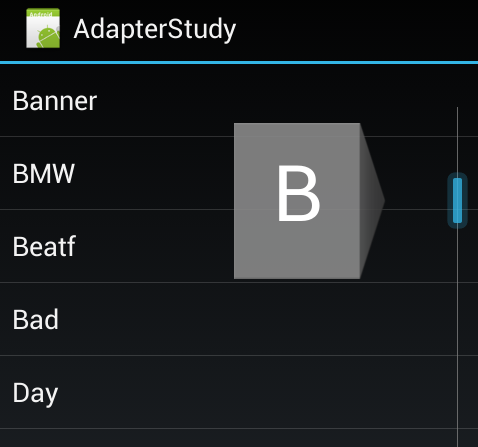
在手機的使用中,大家一定經常使用著電話簿,當我們點擊右邊的滾動條進行滑動的時候還會顯示a-z的字母並且列表的內容也會根據這些字母的變化發生變化,將快速定位到聯系人姓名為指定字母開頭的位置,本節我們將會學習如何實現該功能。
提供這個功能我們需要實現一個接口,這個接口就是ISectionIndexer,下面是關於該接口的代碼:
1     public interface ISectionIndexer : IJavaObject, IDisposable
2     {
3         int GetPositionForSection(int section);
4         int GetSectionForPosition(int position);
5         Object[] GetSections();
6     }
關於這些接口簡單的介紹下:
GetPositionForSection:根據關鍵字的索引獲取該關鍵字的起始數據索引。
GetSectionForPosition:根據數據索引獲取關鍵字索引。
GetSections:返回關鍵字數組。
筆者為了能夠節約時間,所以利用上節的示例代碼,在MyCustomeAdapter中實現了ISectionIndexer接口,下面是筆者的代碼:

關於該接口方法中的實現可以看代碼中的注釋,在使用的時候也要寫如下代碼:
 1         protected override void OnCreate(Bundle bundle)
 2         {
 3             base.OnCreate(bundle);
 4             string[] items = new string[]{
 5                 "Apple","As","Banner",
 6                 "BMW","Beatf","Bad",
 7                 "Day","Dazy","Eat","Else",
 8                 "Feel","Fly","Go","Hourse"
 9             };
10             ListAdapter = new MyCustomeAdapter(this, items);
11             ListView.FastScrollEnabled = true;
12             ListView.FastScrollAlwaysVisible = true;
13         }
按照官方的說法其實只要將FastScrollEnabled設置為true即可,但是筆者在虛擬機中測試的時候並不會顯示,所以筆者還要再將FastScrollAlwaysVisible一起設置為true才可以看到效果,下面為筆者的虛擬機上的截圖:
前面我們都是通過數組來填充列表的,但是實際情況下數據大多數都是來自於數據庫,而數據庫通過查詢後將會得到ICursor類型的返回值,當然我們也可以通過將ICursor轉換成數組或者鍵值對,但這些都是沒有必要的,因為有自帶的適配器(CursorAdapter)。
首先我們需要創建一個數據庫,下面是筆者的代碼,想學習數據庫的可以參考本人的以下隨筆:
《Xamarin.Android之SQLiteOpenHelper》
《Xamarin.Android之ContentProvider》
《Xamarin.Android之SQLite.NET ORM》
代碼如下所示:
 1     public class TestDatabase : SQLiteOpenHelper
 2     {
 3         public TestDatabase(Context context):base(context,"testdatabase.db",null,1)
 4         {}
 5
 6         public override void OnCreate(SQLiteDatabase db)
 7         {
 8             db.ExecSQL("CREATE TABLE TestTable ( _id INTEGER PRIMARY KEY AUTOINCREMENT NOT NULL,name TEXT NOT NULL)");
 9             db.ExecSQL("INSERT INTO TestTable (name) values('Vegetables')");
10             db.ExecSQL("INSERT INTO TestTable (name) values('Fruits')");
11             db.ExecSQL("INSERT INTO TestTable (name) values('Flower Buds')");
12             db.ExecSQL("INSERT INTO TestTable (name) values('Legumes')");
13             db.ExecSQL("INSERT INTO TestTable (name) values('Bulbs')");
14             db.ExecSQL("INSERT INTO TestTable (name) values('Tubers')");
15         }
16
17         public override void OnUpgrade(SQLiteDatabase db, int oldVersion, int newVersion)
18         {
19
20         }
21 }
數據庫創建部分比較簡單,主要的重點是下面的代碼。我們將實例化SimpleCursorAdapter並賦值給ListAdapter中去,代碼如下所示:
 1     [Activity(Label = "CursorAdapter", MainLauncher = true, Icon = "@drawable/icon")]
 2     public class MainActivity : ListActivity
 3     {
 4         TestDatabase vdb;
 5         ICursor cursor;
 6
 7         protected override void OnCreate(Bundle bundle)
 8         {
 9             base.OnCreate(bundle);
10             vdb = new TestDatabase(this);
11             //通過SQL查詢數據庫
12             cursor = vdb.ReadableDatabase.RawQuery("SELECT * FROM TestTable", null);
13             StartManagingCursor(cursor);
14             //創建適配器
15             ListAdapter = new SimpleCursorAdapter(this, Android.Resource.Layout.SimpleListItem1, cursor,
16                 new string[] { "name" },  //指定使用結果集中的哪個字段數據
17                 new int[] { Android.Resource.Id.Text1 }); //填充到哪個控件中
18         }
19
20         protected override void OnDestroy()
21         {
22             base.OnDestroy();
23             StopManagingCursor(cursor);
24             cursor.Close();
25         }
26 }
通過上面的代碼我們可以看到SimpleCursorAdapter相比之前的適配器,需要的參數更多。同時還需要對Cursor這個重要資源進行管理,對應的可以看到StartManagingCursor和StopManagingCursor,希望讀者在實際開發中一定要注意資源的釋放,以上的結果筆者就不截圖了。
為了某些效果我們不一定非要繼承BaseAdapter從而實現很多的方法,如果數據是來自於數據庫的我們還可以繼承自CursorAdapter,這樣我們能夠節省實現很多的方法,從而只需要關注重要部分,下面我們繼承CursorAdapter來查看需要實現哪些方法:
 1     public class CustomeCursorAdapter : Android.Widget.CursorAdapter
 2     {
 3
 4         public override void BindView(Android.Views.View view, Android.Content.Context context, Android.Database.ICursor cursor)
 5         {
 6             throw new NotImplementedException();
 7         }
 8
 9         public override Android.Views.View NewView(Android.Content.Context context, Android.Database.ICursor cursor, Android.Views.ViewGroup parent)
10         {
11             throw new NotImplementedException();
12         }
13 }
可以看到我們只需要實現兩個方法,相比BaseAdapter而言減少了很多,其中BindView就是將ICursor中的數據與View進行綁定,而NewView則是創建所需的界面。下面我們自定一個適配器實現和上一節一樣的效果:
 1     public class CustomeCursorAdapter : Android.Widget.CursorAdapter
 2     {
 3         Activity context;
 4
 5         public CustomeCursorAdapter(Activity context, ICursor cursor)
 6             : base(context, cursor)
 7         {
 8             this.context = context;
 9         }
10
11         public override void BindView(Android.Views.View view, Android.Content.Context context, Android.Database.ICursor cursor)
12         {
13             TextView tv = view.FindViewById<TextView>(Android.Resource.Id.Text1);
14             tv.Text = cursor.GetString(1);
15         }
16
17         public override Android.Views.View NewView(Android.Content.Context context, Android.Database.ICursor cursor, Android.Views.ViewGroup parent)
18         {
19             return this.context.LayoutInflater.Inflate(Android.Resource.Layout.SimpleListItem1, parent, false);
20         }
21 }
到此為止關於ListView和Adapter簡單的學習就結束了。
listview裡,會有一個顯示文字的textview,在adapter裡,獲取這個textview的ID,然後設置值顯示。
你沒有往你的Adapter裡添加數據。如果你要調用Adapter.notifyDatasetChanged()這個方法,你只能王Adapter裡面的List添加數據,而不能每次都給一個新的List對象,否則也無法刷新數據。