C#開發WPF/Silverlight動畫及游戲系列教程(Game Course):(十八) 完美精靈之八面玲珑(WPF Only)②
緊接著上一節,首先得解釋一下為什麼需要將這272張圖片合成為一張大圖。因為如果游戲中還有裝備、坐騎等其他設置,那麼我們就需要對圖片源進行時時的合成;同時對272張甚至更多的圖片進行合成效率高還是對2張大圖進行合成效率高這是顯而易見的。在本節例子中,主角由身體(衣服)及武器兩個部分組成;因此,我們還需要定義一個交錯數組來保存已經加載的角色裝備合成圖到內存中:
/// <summary>
/// 角色圖片緩存
/// 交錯數組示例PartImage[a,b][c,d]
/// a為衣服代號(在本例中也可以理解為身體代號,因為換衣服就相當於換角色身體)
/// b為武器代號
/// c為角色朝向代號
/// d代表當前動作幀所處於整合圖中的列數
/// 本例中1-5列為站立,6-13列為跑動,14-20列為攻擊,21-26列為施法,27-34列為死亡
/// 本例中PartImage = new BitmapSource[10, 20][,];即初步設定有10個角色,20種武器
/// </summary>
public static BitmapSource[,][,] PartImage = new BitmapSource[10, 20][,];
例如PartImage[0,6]即代表0號角色拿著6號武器8個方向所有動作幀圖片源
PartImage[4,0]則代表4號角色空著手8個方向所有動作幀圖片源
……依此類推
如果您的游戲中還有帽子及坐騎,則需要BitmapSource[,][,,,] PartImage這樣將第二組定義為4維數組。
……依此類推
當然,你也可以使用Hashtable(哈希表)、Dictionary(字典)等來代替PartImage[,][,]。但是在數字類型鍵與對象值對應保存的方式中,我更傾向於交錯數組,因為它更清晰、優雅且高效。
有了承接角色的載體,下面就是如何對上一節中合成的角色大圖與武器大圖(提取及合成方法同上一節相同)進行拼裝,最後分幀存儲進PartImage。嘿嘿,又現精華:
/// <summary>

///  拼裝角色+裝備後切割成系列幀圖片並保存進內存(裝備角色)

/// </summary>

/// <param name="Equipment">裝備代號數組</param>

/// <param name="rowNum">幀合成圖行數</param>

/// <param name="colNum">幀合成圖列數</param>

/// <param name="totalWidth">幀圖合成後總寬</param>

/// <param name="totalHeight">幀圖合成後總高</param>

/// <param name="singleWidth">單幀圖寬</param>

/// <param name="singleHeight">單幀圖高</param>

/// <returns>如果緩存中有則讀取緩存,否則返回合成的圖片源</returns>

public static BitmapSource[,] EquipPart(int[] Equipment, int rowNum, int colNum, int totalWidth, int totalHeight, int singleWidth, int singleHeight) {

 //Equipment[0]為衣服代號,Equipment[1]為武器代號,本例中裝備只由衣服+武器組成

 //假如內存中沒有該裝備的角色現成圖片源則進行讀取

 if (PartImage[Equipment[0], Equipment[1]] == null) {

  BitmapSource[,] bitmap = new BitmapSource[rowNum, colNum];

  //加載角色衣服(身體)大圖

  BitmapSource bitmapSource = new BitmapImage(new Uri(@"Images\Body" + Equipment[0].ToString() + ".gif", UriKind.Relative));

  //假如武器不是0,即如果角色手上有武器而非空手

  if (Equipment[1] != 0) {

   //加載武器大圖,並與衣服大圖組裝

   BitmapSource bitmapSource1 = new BitmapImage(new Uri(@"Images\Weapon" + Equipment[1].ToString() + ".gif", UriKind.Relative));

   DrawingVisual drawingVisual = new DrawingVisual();

   Rect rect = new Rect(0, 0, totalWidth, totalHeight);

   DrawingContext drawingContext = drawingVisual.RenderOpen();

   drawingContext.DrawImage(bitmapSource, rect);

   drawingContext.DrawImage(bitmapSource1, rect);

   drawingContext.Close();

   RenderTargetBitmap renderTargetBitmap = new RenderTargetBitmap(totalWidth, totalHeight, 0, 0, PixelFormats.Pbgra32);

   renderTargetBitmap.Render(drawingVisual);

   bitmapSource = renderTargetBitmap;

   //降低圖片質量以提高系統性能(由於本身圖片已經為低質量的gif類型,因此效果不大)

   //RenderOptions.SetBitmapScalingMode(bitmapSource, BitmapScalingMode.LowQuality);

  }

  for (int i = 0; i < rowNum; i++) {

   for (int j = 0; j < colNum; j++) {

    bitmap[i, j] = new CroppedBitmap(bitmapSource, new Int32Rect(j * singleWidth, i * singleHeight, singleWidth, singleHeight));

   }

  }

  //將裝備合成圖放進內存

  PartImage[Equipment[0], Equipment[1]] = bitmap;

  return bitmap;

 } else {

  //如果內存中已存在該裝備的角色圖片源則從內存中返回合成圖,極大提高性能

  return PartImage[Equipment[0], Equipment[1]];

 }

}
該方法我已經做了非常詳細的注釋,大致原理就是將上一節中合成的角色身體大圖(5100*1200那張)與一張同樣尺寸的武器大圖進行合成,組裝成一張5100*1200像素的帶武器的角色圖,最後再將這張圖進行所有序列單幀按150*150尺寸進行切割存儲進PartImage這個數組中:

有了EquipPart()方法後還暫時無法使用它,因為精靈控件還缺少一些能與之對接的屬性。因此我們首先還得為可愛的精靈控件添加如下屬性:
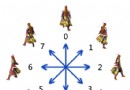
// 精靈當前調用的圖片源(二維數組):第一個表示角色方向,0朝上4朝下,

// 順時針依次為0,1,2,3,4,5,6,7;第二個表示該方向幀數

public BitmapSource[,] Source {get {…}set {…}}

// 精靈方向數量,默認為8個方向

public int DirectionNum {get {…}set {…}}

// 精靈當前動作狀態

public Actions Action {get {…}set {…}}

// 精靈之前動作狀態

public Actions OldAction {get {…}set {…}}

// 精靈各動作對應的幀列范圍(暫時只有5個動作)

public int[] EachActionFrameRange {get {…}set {…}}

// 精靈每方向總列數

public int DirectionFrameNum {get {…}set {…}}

// 精靈當前動作開始圖片列號

public int CurrentStartFrame {get {…}set {…}}

// 精靈當前動作結束圖片列號

public int CurrentEndFrame {get {…}set {…}}

// 每張精靈合成大圖總寬

public int TotalWidth {get {…}set {…}}

// 每張精靈合成大圖總高

public int TotalHeight {get {…}set {…}}

// 精靈單張圖片寬,默認150

public int SingleWidth {get {…}set {…}}

// 精靈單張圖片高,默認150

public int SingleHeight {get {…}set {…}}

/// <summary>

/// 精靈裝備代碼(目前只有前2者)

/// [0],衣服

/// [1],武器

/// [2],頭盔

/// [3],腰帶

/// [4],護手

/// [5],鞋子

/// [6],項鏈

/// [7],戒指1

/// [8],戒指2

/// ……

/// </summary>

public int[] Equipment {get {…}set {…}}
看到這些關鍵屬性後是否已經激動不己了?這就對啦,說明你已經進入狀態。這裡需要對幾個特別的屬性進行些說明:BitmapSource[,] Source是我們可以通過EquipPart()方法獲取的圖片源,在精靈生命線程中調用以顯示對應的精靈圖片; Actions Action和Actions OldAction是兩個精靈動作的枚舉屬性,該枚舉構造如下:
public enum Actions {

 /// <summary>

 /// 停止

 /// </summary>

 Stop = 0,

 /// <summary>

 /// 跑動

 /// </summary>

 Run = 1,

 /// <summary>

 /// 戰斗

 /// </summary>

 Attack = 2,

 /// <summary>

 /// 施法

 /// </summary>

 Magic = 3,

 /// <summary>

 /// 死亡

 /// </summary>

 Death = 9,

}
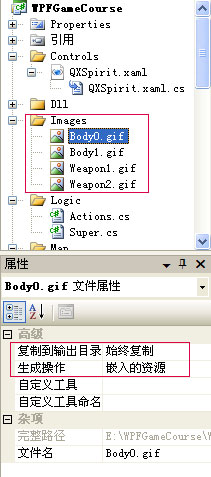
這兩個屬性將在游戲中對精靈起到非常關鍵的調控作用。屬性定義完後,我們還得將上一節中制作的角色身體(我制作了兩張分別為Body0.gif和Body1.gif)及武器(同樣也制作了兩把劍:Weapon1.gif和Weapon2.gif)大圖加載進項目中(加載方式請看第五節):
素材准備就緒,接著需要對這些屬性進行設置來初始化主角精靈:
QXSpirit Spirit = new QXSpirit();

private void InitSpirit() {

 Spirit.X = 300;

 Spirit.Y = 400;

 Spirit.Timer.Interval = TimeSpan.FromMilliseconds(150);

 //設置角色身體及裝備

 Spirit.Equipment[0] = 0;

 Spirit.Equipment[1] = 1;

 Spirit.EachActionFrameRange = new int[] { 5, 8, 7, 6, 8 }; //這5個數字在第十七節中講了多次

 Spirit.DirectionFrameNum = 34; //每個方向行上有34列(第十七節中有說明)

 Spirit.TotalWidth = 5100;

 Spirit.TotalHeight = 1200;

 //加載角色圖片源(具體參數意思可以到QXSpirit中了解)

 Spirit.Source = Super.EquipPart(Spirit.Equipment,

Spirit.DirectionNum, Spirit.DirectionFrameNum,

 Spirit.TotalWidth, Spirit.TotalHeight,

Spirit.SingleWidth, Spirit.SingleHeight

);

 Carrier.Children.Add(Spirit);

}
該方法很簡單,注釋描述得較清楚了,大家也可以將之與前面章節中的InitSpirit()進行比較來理解。接下來該讓精靈動一下了,我們可以將精靈的生命線程進行如下改進:
//幀推進器

int _FrameCounter = 1;

public int FrameCounter {

 get { return _FrameCounter; }

 set { _FrameCounter = value; }

}

//精靈線程間隔事件

private void Timer_Tick(object sender, EventArgs e) {

 //假如精靈動作發生改變,則調用ChangeAction()方法進行相關參數設置

 if (OldAction != Action) {

  ChangeAction();

 }

 //動態更改精靈圖片源以形成精靈連續動作

 Body.Source = Source[(int)Direction, FrameCounter];

 FrameCounter = FrameCounter == CurrentEndFrame ? CurrentStartFrame : FrameCounter + 1;

}
這裡我將前面章節中的count改成了FrameCounter(即幀推進器,意義差不多,但是在此處效果不同,它更加動態,大家需要承上啟下的分析後比較容易理解),然後在生命線程事件中首先判斷主角當前的動作狀態是否改變(例如主角默認是站立的,當在地圖上點擊了一下後動作即變成跑動狀態),如果改變則調用ChangeAction()方法,該方法完整代碼如下:
/// <summary>

/// 改變精靈動作狀態後激發的屬性及線程改變

/// </summary>

private void ChangeAction() {

 switch (Action) {

  case Actions.Stop:

   Timer.Interval = TimeSpan.FromMilliseconds(150); //動作圖片切換間隔

   CurrentStartFrame = 0; //該動作在合成大圖中的開始列

   CurrentEndFrame = EachActionFrameRange[0] - 1; //該動作在合成大圖中的結束列

   OldAction = Actions.Stop; //將當前動作記錄進OldAction裡

   break;

  case Actions.Run:

   Timer.Interval = TimeSpan.FromMilliseconds(150);

   CurrentStartFrame = EachActionFrameRange[0];

   CurrentEndFrame = EachActionFrameRange[0] + EachActionFrameRange[1] - 1;

   OldAction = Actions.Run;

   break;

  case Actions.Attack:

   Timer.Interval = TimeSpan.FromMilliseconds(120);

   CurrentStartFrame = EachActionFrameRange[0] + EachActionFrameRange[1];

   CurrentEndFrame = EachActionFrameRange[0] + EachActionFrameRange[1] + EachActionFrameRange[2] - 1;

   OldAction = Actions.Attack;

   break;

  case Actions.Magic:

   Timer.Interval = TimeSpan.FromMilliseconds(100);

    CurrentStartFrame = EachActionFrameRange[0] + EachActionFrameRange[1] + EachActionFrameRange[2];

   CurrentEndFrame = EachActionFrameRange[0] + EachActionFrameRange[1] + EachActionFrameRange[2] + EachActionFrameRange[3] - 1;

   OldAction = Actions.Magic;

   break;

  case Actions.Death:

   Timer.Interval = TimeSpan.FromMilliseconds(150);

   CurrentStartFrame = EachActionFrameRange[0] + EachActionFrameRange[1] + EachActionFrameRange[2] + EachActionFrameRange[3];

   CurrentEndFrame = EachActionFrameRange[0] + EachActionFrameRange[1] + EachActionFrameRange[2] + EachActionFrameRange[3] + EachActionFrameRange[4] - 1;

   OldAction = Actions.Death;

   break;

 }

 FrameCounter = CurrentStartFrame;

}
該方法根據精靈當前的動作狀態是5大動作中的哪個進而對精靈的切圖參數進行修改,從而達到改變窗口中顯示精靈相應動作動畫的效果。
Timer_Tick()事件中判斷完精靈動作狀態後,就需要動態的配置精靈的圖片源了:
Body.Source = Source[(int)Direction, FrameCounter];
Source的第一個參數為精靈當前的朝向,第二個參數為幀推進器。有的朋友就問了:前面增加的屬性中並沒有Direction這個屬性呀?是的,我就是為了突出該屬性的重要所以特別在此再申明,具體如下:
//精靈當前朝向:0朝上4朝下,順時針依次為0,1,2,3,4,5,6,7(關聯屬性)

public double Direction {

 get { return (double)GetValue(DirectionProperty); }

 set { SetValue(DirectionProperty, value); }

}

public static readonly DependencyProperty DirectionProperty = DependencyProperty.Register(

 "Direction",

 typeof(double),

 typeof(QXSpirit)

);
跟著我教程學習的朋友一看就知道它是一個關聯屬性(參考第十五節),為什麼需要將精靈的朝向單獨作為一個關聯屬性來定義?因為我將在主角的Storyboard移動動畫中對精靈的方向進行時時修改,以使得尋路移動動畫更加平滑(本例中的Storyboard仍然沿用DoubleAnimation類型逐幀動畫,而不是objectAnimation類型;因此為了與前面章節更好的兼容,Direction在此設置為double類型。)。
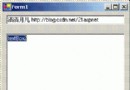
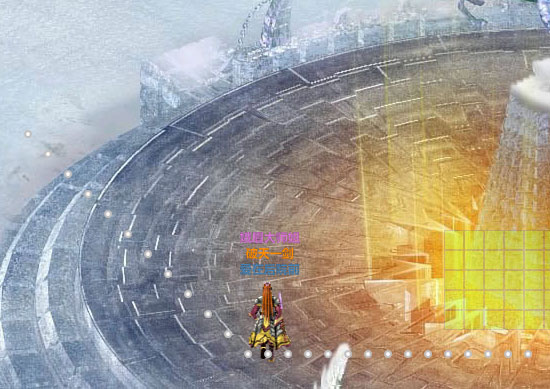
OK,至此已經寫了那麼多屬性和方法,休息休息看一下我們的成果吧:
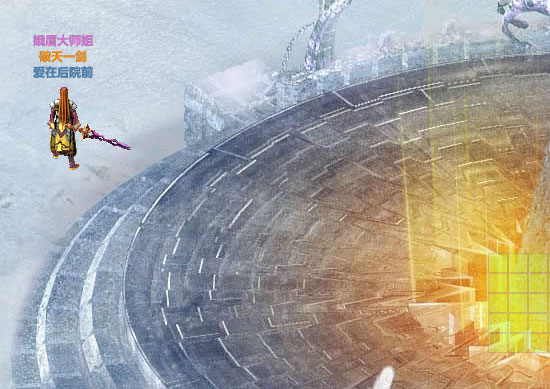
終於看到了久違的主角站立動作,是否有種感動得想要流涕的沖動?再看一張
雖然我們可以通過點擊地圖上的點進行移動,但是無論如何移動,主角的方向始終都是朝著0(即北)這個方向的。那麼如何利Direction這個關聯屬性讓主角在任何動作中均可以顯示正確的朝向?請聽下回分解。