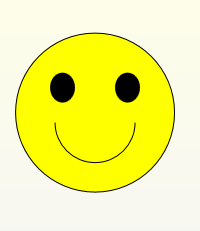
1.畫個笑臉給大家娛樂一下:
<Canvas Width="200" Height="180" VerticalAlignment="Center" Margin="772,577,466,390">
            <Ellipse Canvas.Left="10" Canvas.Top="10" Width="160" Height="160"
                     Fill="Yellow" Stroke="Black"/>
            <Ellipse Canvas.Left="45" Canvas.Top="50" Width="25" Height="30"
                     Fill="Black"/>
            <Ellipse Canvas.Left="110" Canvas.Top="50" Width="25" Height="30"
                     Fill="Black"/>
            <Path Data="M 50,100 A 30,30 0 0 0 130,100" Stroke="Black"/>
        </Canvas>
效果如下:
2.Xaml日期格式化
<Label Content="{Binding TaskDate,StringFormat='yyyy-MM-dd'}" Grid.Column="3"/>
3.讓按鈕有按鈕的感覺,汗,不是廢話嗎,就是讓按鈕有按下去的感覺
<ControlTemplate.Triggers>
                        <Trigger Property="Button.IsPressed" Value="True">
                            <Setter Property="RenderTransform">
                                <Setter.Value>
                                    <ScaleTransform ScaleX=".9" ScaleY=".9"/>
                                </Setter.Value>
                            </Setter>
                            <Setter Property="RenderTransformOrigin" Value=".5,.5"/>
                        </Trigger>
                    </ControlTemplate.Triggers>
4.Popup的使用方法
1.Popup控件永遠不會自動顯示,為了顯示Popup控件必須設置IsOpen屬性。
2.默認情況下,Popup.StaysOen屬性被設置為True,並且Popup控件會一直顯示,直到顯式地將IsOpen屬性設置為False。
如果將Popup.StaysOpen屬性設置為False,當用戶在其他地方單擊鼠標時,Popup控件就會消失。
如果Popup控件的IsOpen屬性設置為True時,通過Popup控件的PopupAnimation屬性可以設置Popup控件的顯示方式。
由於Popup控件不和任何控件相關聯,所以無論在哪定義Popup標簽都無所謂。
3.關聯控件可以這樣:
PlacementTarget="{Binding ElementName=button1}"   //綁定在哪個控件上,這裡是和button1這個控件綁定
Placement="Bottom"                   //在控件的那個位置顯示,這裡是在button1這個控件下方顯示
小例子:
<Popup PopupAnimation="Fade"
                       Placement="Center"
                       Name="_pupup">
                    <Button>Hello</Button>
                </Popup>
5.RenderTransform與LayoutTransform的區別
RenderTransform與LayoutTransform的之間的唯一區別是在什麼時候應用變換,
RenderTransform在呈現之前,而後者在布局之前應用。先看下RenderTransform:
<StackPanel Background="Gainsboro" Width="200" Height="80" Orientation="Horizontal" Margin="366,220,12,221">
            <Button Width="75" Content="15">
                <Button.RenderTransform>
                    <RotateTransform Angle="15"></RotateTransform>
                </Button.RenderTransform>
            </Button>
            <Button Width="75" Content="45">
                <Button.RenderTransform>
                    <RotateTransform Angle="45"></RotateTransform>
                </Button.RenderTransform>
            </Button>
            <Button Width="75" Content="65">
                <Button.RenderTransform>
                    <RotateTransform Angle="65"></RotateTransform>
                </Button.RenderTransform>
            </Button>
        </StackPanel>
效果:
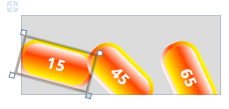
按鈕出現了重疊
LayoutTransform:
<StackPanel Background="Gainsboro" Width="250" Height="80" Orientation="Horizontal" Margin="71,220,257,221">
            <Button Width="75" Content="15">
                <Button.LayoutTransform>
                    <RotateTransform Angle="15"></RotateTransform>
                </Button.LayoutTransform>
            </Button>
            <Button Width="75" Content="45">
                <Button.LayoutTransform>
                    <RotateTransform Angle="45"></RotateTransform>
                </Button.LayoutTransform>
            </Button>
            <Button Width="75" Content="65">
                <Button.LayoutTransform>
                    <RotateTransform Angle="65"></RotateTransform>
                </Button.LayoutTransform>
            </Button>
        </StackPanel>
效果:
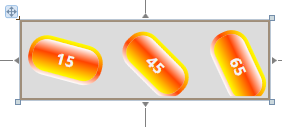
可以看出LayoutTransform不像RenderTransform出現了重疊,面板已經改變尺寸來完全適應所包含的按鈕。因為LayoutTransform
在布局之前應用,所以系統完全知道這樣的效果。