Windows Phone中,我們開發者可能會開發的一個功能點是將數據列表中某一項“Pin To Start(固 定到開始屏幕)”,大家都知道這種固定到開始屏幕的磁貼叫做輔助磁貼(也叫二級磁貼),用戶可以 通過該輔助磁貼啟動應用程序並導航到應用程序中某一個頁面或某一位置。
其實Windows 8 Store風格應用程序也引入了輔助磁貼的概念,用戶在使用Windows 8 Store應用的輔助磁貼和Windows Phone 輔助磁貼的體驗幾乎一樣,但是對於開發者來說實現方式完全不一樣了。
一、輔助磁貼概覽
由應用中某些元素的“固定(Pin)”操作生成
應用通過簡單的運行時調用啟動“固定” 操作
用戶通過系統 UI 確認“固定”操作
展示應用的個性化界面
與應用磁貼具備相同功能
點擊磁貼則啟動應用並導航到相應內容頁面
另外輔助磁貼常用場景包括:
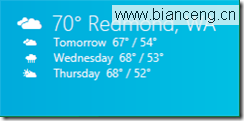
天氣應用中特定城市的天氣更新
日歷應用中有關近期活動的摘要
社交應用中重要聯系人的狀態和更新
RSS 閱讀器中的特定源
音樂播放列表
博客
更多關於輔助磁貼介紹可參考:輔助磁貼概述(Windows 應用商店應用) (Windows)
二、輔助磁貼構建
上面對輔助磁貼進行了簡單的介紹,那麼我們開發者該如何在應用程序內 添加構建輔助磁貼的功能呢?
1.添加Windows.UI.StartScreen 命名空間
2.添加樣式資源(該步驟可根據自己實際情況是否執行)
通常我們會使用應用程序中提供 StandardStyles.xaml 文件中的“固定”和“取消固定圖標”樣式資源。當然我們也可以自己定義相應 的樣式資源。
StandardStyles.xaml 文件提供的標准樣式資源如下:
1: <Page.Resources>
2: <Style x:Key="PinAppBarButtonStyle" TargetType="Button" BasedOn="{StaticResource AppBarButtonStyle}">
3: <Setter Property="AutomationProperties.AutomationId" Value="PinAppBarButton"/>
4: <Setter Property="AutomationProperties.Name" Value="Pin to Start"/>
5: <Setter Property="Content" Value=""/>
6: </Style>
7: <Style x:Key="UnpinAppBarButtonStyle" TargetType="Button" BasedOn="{StaticResource AppBarButtonStyle}">
8: <Setter Property="AutomationProperties.AutomationId" Value="UnpinAppBarButton"/>
9: <Setter Property="AutomationProperties.Name" Value="Unpin from Start"/>
10: <Setter Property="Content" Value=""/>
11: </Style>
12: </Page.Resources>
3.添加應用欄
通常我們會在應用欄中添加“固定到開始屏幕”按鈕,用戶通過該按鈕進行輔 助磁貼的創建。
 1:  <Page.BottomAppBar>
2:          <AppBar x:Name="SecondaryTileAppBar" Padding="10,0,10,0" >
3:            <Grid>
4:                  <Grid.ColumnDefinitions>
5:                 <ColumnDefinition Width="30*"/>
6:                  </Grid.ColumnDefinitions>
7:                  <StackPanel x:Name="RightPanel" Orientation="Horizontal" Grid.Column="1" HorizontalAlignment="Right">
8:                      <Button x:Name="PinButton" HorizontalAlignment="Left" Click="OnPinButtonClicked" />
9:                  </StackPanel>
10:              </Grid>
11:          </AppBar>
12:   </Page.BottomAppBar>
4.在頁面的.cs文件中添加標識輔助磁貼的唯一ID變量
1: public const string appbarTileId = "SecondaryTile.AppBar";
5.創建判斷是否存在相關輔助磁貼的方法,若存在顯示UnpinAppBarButtonStyle樣式資源,若不存 在顯示PinAppBarButtonStyle樣式資源。
1:  private void ToggleAppBarButton(bool showPinButton)
2:          {
3:              PinButton.Style = (showPinButton) ? (this.Resources["PinAppBarButtonStyle"] as Style) : (this.Resources["UnpinAppBarButtonStyle"] as Style);
4:          }
6.創建“固定到開始”按鈕點擊事件
1:  private async void OnPinButtonClicked(object sender, RoutedEventArgs e)
2:          {
3:              //當用戶選擇應用欄上的按鈕時,會顯示一個要求用戶進行確認的彈出窗口。
4:              //若要確保在顯示彈出窗口時不取消應用欄,必須設置應用欄的 IsSticky 屬性。
5:              this.BottomAppBar.IsSticky = true;
6:              if (SecondaryTile.Exists(appbarTileId))
7:              {
8:                  //取消相應的輔助磁貼
9:                  SecondaryTile secondaryTile = new SecondaryTile(appbarTileId);
10:                  bool isUnpinned = await secondaryTile.RequestDeleteForSelectionAsync(GetElementRect((FrameworkElement)sender), Windows.UI.Popups.Placement.Above);
11:
12:                  ToggleAppBarButton(isUnpinned);
13:              }
14:              else
15:              {
16:                  //輔助磁貼的一些屬性才能固定輔助磁貼.
17:                  //?磁貼的唯一 ID
18:                  //?短名稱
19:                  //?顯示名稱
20:                  //?磁貼選項
21:                  //?徽標圖像
22:                  //?激活輔助磁貼時將傳遞到父應用程序的參數字符串
23:                  Uri logo = new Uri("ms-appx:///Assets/1.jpg");
24:                  string tileActivationArguments = appbarTileId + " was pinned at " + DateTime.Now.ToLocalTime().ToString();
25:
26:                  SecondaryTile secondaryTile = new SecondaryTile(appbarTileId,
27:                                     "Secondary tile pinned via AppBar",
28:          "SDK Sample Secondary Tile pinned from AppBar",
29:                                      tileActivationArguments,
30:                                                                TileOptions.ShowNameOnLogo,
31:                                                                  logo);
32:                  //指定前景文本顏色和小徽標。
33:                  secondaryTile.ForegroundText = ForegroundText.Dark;
34:                  secondaryTile.SmallLogo = new Uri("ms-appx:///Assets/1.jpg");
35:                  //調用異步方法將輔助磁貼固定。
36:                  //實際上這種方法不是將磁貼直接固定到“開始”屏幕,而是會顯示一個要求用戶允許這樣做的確認提示框。
37:                  bool isPinned = await secondaryTile.RequestCreateForSelectionAsync(GetElementRect((FrameworkElement)sender), Windows.UI.Popups.Placement.Above);
38:
39:                  ToggleAppBarButton(!isPinned);
40:              }
41:              this.BottomAppBar.IsSticky = false;
42:          }
7.檢索之前定義的pin按鈕的邊界矩形,因為在固定輔助磁貼前,用戶必須確認,要求對此進行確認 的彈出窗口應當顯示在調用固定請求的按鈕旁邊。
1:  public Rect GetElementRect(FrameworkElement element)
2:          {
3:              GeneralTransform buttonTransform = element.TransformToVisual(null);
4:              Point point = buttonTransform.TransformPoint(new Point());
5:              return new Rect(point, new Size(element.ActualWidth, element.ActualHeight));
6:          }
到此為止我們可以通過以上步驟實現一個輔助磁貼的構建了。
三、示例的運行效果
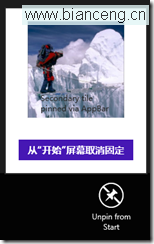
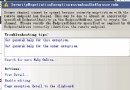
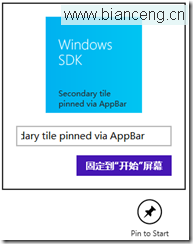
運行應用程序,彈出應用欄,點擊“Pin To Start”按鈕彈出窗口。
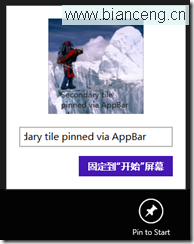
點擊“固定到‘開始’屏幕”按鈕之後,我們在開始屏幕上就可以看到相應創建的輔助磁貼 。

當我們在回到應用程序,就看到應用欄按鈕發生了變化。
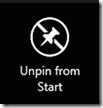
點擊“Unpin form Start”按鈕之後,彈出“從‘開始’屏幕取消固定”的窗口,我們點擊 按鈕之後就把相應的輔助磁貼取消了。