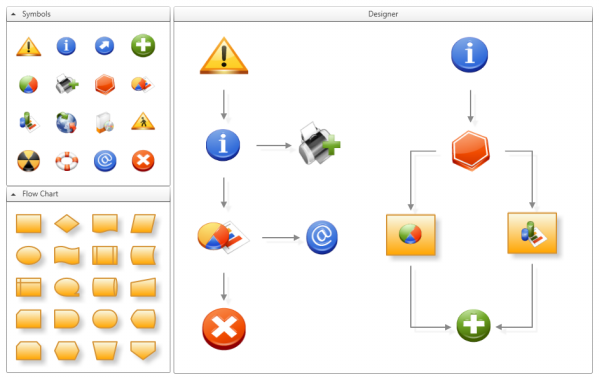
通過前面介紹的從WPF Diagram Designer Part 1學習控件模板、移動、改變大小和旋轉和從WPF Diagram Designer Part 2學習面板、縮略 圖、框線選擇和工具箱,我們學會了如何建立圖形設計器的基本移動、選擇、大小、旋轉、縮略圖、框選等基本功能。對於建模支持來說 ,流程圖是必不可少的一種圖形,那麼我們如何讓圖形設計器支持在設計對象之間畫上箭頭呢?本篇將介紹圖形設計器中的連接。
WPF Diagram Designer - Part 3
畫連接線存在多種實現方式,一種是在工具箱中提供一個連接元素,然後由設計人員選擇後在兩個組件中拖拽;還有一種就是由組件自 身提供連接點,用戶點擊這個連接點後拖拽到另一個組件的連接點之上,這篇文章采用的是第二種方案。由於在建模中可能會存在多種不 同的關系,所以在OpenExpressApp的MetaModelEngine中的圖形設計器將采用第一種方式,但是會提供第二種方式的快捷方式。
如何連接
通過以下連接說明,我們可以知道存在連接Connection和連接點Connector兩個概念,這兩個概念分別由兩個裝飾對象來支持顯示和操 作。
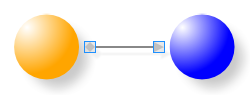
如果在連接點上釋放鼠標,則生成一個Connection對象,這個對象作為DesignerCanvas的子對象。
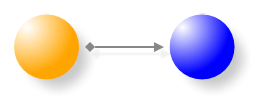
Connection與DesingerItem一樣,也實現了ISelectable選擇接口,當選擇連接時,Connection之上的ConnectionAdorner顯示兩個矩形 每個矩形是一個Thumb控件,可以拖動更改連接點
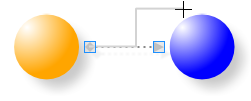
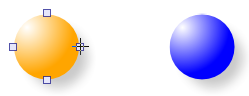 將鼠標移到一個元素上面,元素四周會出現四個Connector,這個是在ConnectorDecoratorTemplate中進行定義的,其中在 DesignerItem的模板也定義了一部分內容。
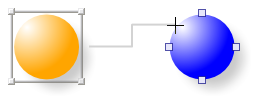 當在connector上點擊鼠標左鍵進行拖動時,connector將生成一個ConnectorAdorner,顯示當前鼠標位置與源連接點的連線, 當鼠標移動時,DesignerCanvas將在不斷檢查是否鼠標在潛在的目標連接點上

連接點 Connector
連接點是顯示在設計元素之上的可供連接線關聯的位置,它的Position屬性代表連接點中心相對於DesignCanvas位置,其實現代碼如下 :
代碼
public class Connector : Control, INotifyPropertyChanged

  {

    private Point position;

    public Point Position

    {

      get { return position; }

      set

      {

        if (position != value)

        {

          position = value;

          OnPropertyChanged("Position");

        }

      }

    }

     public Connector()

     {

       // fired when layout changes

       base.LayoutUpdated += new EventHandler(Connector_LayoutUpdated);

     }

     void Connector_LayoutUpdated(object sender, EventArgs e)

     {

       DesignerCanvas designer = GetDesignerCanvas(this);

       if (designer != null)

       {

         //get center position of this Connector relative to the DesignerCanvas

         this.Position = this.TransformToAncestor(designer).Transform

           (new Point(this.Width / 2, this.Height / 2));

       }

     }

   ...

  }
連接點裝飾模板 ConnectorDecoratorTemplate
DesignerItem的樣式文件中包含了連接點控件如下:
<Style TargetType="{x:Type s:DesignerItem}">

   <Setter Property="Template">

    <Setter.Value>

     <ControlTemplate TargetType="{x:Type s:DesignerItem}">

      <Grid DataContext="{Binding RelativeSource={RelativeSource TemplatedParent}}">

        <ContentPresenter />

       <Control x:Name="PART_ConnectorDecorator" Visibility="Hidden"

            Template="{StaticResource ConnectorDecoratorTemplate}"/>

      </Grid>

      <ControlTemplate.Triggers>

       <Trigger Property="IsMouseOver" Value="true">

        <Setter TargetName="PART_ConnectorDecorator" Property="Visibility"

           Value="Visible"/>

       </Trigger>

      </ControlTemplate.Triggers>

     </ControlTemplate>

    </Setter.Value>

   </Setter>

  </Style>
連接點控件樣式如下:
<ControlTemplate x:Key="ConnectorDecoratorTemplate" TargetType="{x:Type Control}">

   <Grid Margin="-5">

    <s:Connector Orientation="Left" VerticalAlignment="Center"

       HorizontalAlignment="Left"/>

    <s:Connector Orientation="Top" VerticalAlignment="Top"

       HorizontalAlignment="Center"/>

    <s:Connector Orientation="Right" VerticalAlignment="Center"

       HorizontalAlignment="Right"/>

    <s:Connector Orientation="Bottom" VerticalAlignment="Bottom"

       HorizontalAlignment="Center"/>

   </Grid>

  </ControlTemplate>
連接Connection
兩個連接點之間連線後生成連接對象Connection,Connection有兩個屬性Source和Sink,分別代碼源Connector和目的Connector,當這 兩個Connector的Position改變時會通知Connection調用UpdatePathGeometry算法來更新連接線路徑。
Connection的代碼如下:
代碼
public class Connection : Control, ISelectable, INotifyPropertyChanged

  {

     private Connector source;

     public Connector Source

     {

       get

       {

         return source;

       }

       set

       {

         if (source != value)

         {

           if (source != null)

           {

             source.PropertyChanged -=

               new PropertyChangedEventHandler(OnConnectorPositionChanged);

             source.Connections.Remove(this);

           }

           source = value;

           if (source != null)

           {

             source.Connections.Add(this);

             source.PropertyChanged +=

               new PropertyChangedEventHandler(OnConnectorPositionChanged);

           }

           UpdatePathGeometry();

         }

       }

     }

    void OnConnectorPositionChanged(object sender, PropertyChangedEventArgs e)

    {

      if (e.PropertyName.Equals("Position"))

      {

        UpdatePathGeometry();

      }

    }

    ....

  }
定制化連接點布局
ConnectorDecoratorTemplate
有時缺省的四個連接點可能並不是我們所需要的,如一個三角形DesignerItem的定義如下:
<Path IsHitTestVisible="False"

     Fill="Orange"

     Stretch="Fill"

     Data="M 0,10 5,0 10,10 Z">

   <s:DesignerItem.DragThumbTemplate>

    <ControlTemplate>

      <Path Fill="Transparent" Stretch="Fill"

           Data="M 0,10 5,0 10,10 Z"/>

    </ControlTemplate>

   </s:DesignerItem.DragThumbTemplate>

  </Path>
這個三角形顯示的默認連接點如下圖左邊所示,但是我們需要的是下面所示的連接點,那麼我們是如何定制化連接點布局的呢?
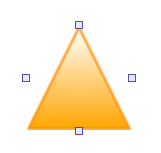
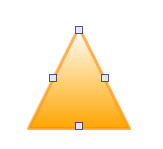
設計器通過DesignerItem的附加屬性DesignerItem.ConnectorDecoratorTemplate來讓我們自定義連接點裝飾模板,為了定義出上圖右 邊所示的連接點,我們可以修改三角形的定義如下:
<Path IsHitTestVisible="False"

     Fill="Orange"

     Stretch="Fill"

     Data="M 0,10 5,0 10,10 Z">

   <!-- Custom DragThumb Template -->

   <s:DesignerItem.DragThumbTemplate>

    <ControlTemplate>

      <Path Fill="Transparent" Stretch="Fill"

         Data="M 0,10 5,0 10,10 Z"/>

    </ControlTemplate>

   <s:DesignerItem.DragThumbTemplate>

   <!-- Custom ConnectorDecorator Template -->

   <s:DesignerItem.ConnectorDecoratorTemplate>

     <ControlTemplate>

      <Grid Margin="0">

        <s:Connector Orientation="Top" HorizontalAlignment="Center"

           VerticalAlignment="Top" />

        <s:Connector Orientation="Bottom" HorizontalAlignment="Center"

           VerticalAlignment="Bottom" />

        <UniformGrid Columns="2">

         <s:Connector Grid.Column="0" Orientation="Left" />

         <s:Connector Grid.Column="1" Orientation="Right"/>

        </UniformGrid>

      </Grid>

     </ControlTemplate>

   </s:DesignerItem.ConnectorDecoratorTemplate>

  </Path>
RelativePositionPanel和RelativePositionPanel.RelativePosition
以上三角形的連接點屬於比較規格的圖形,有時候遇到不規則圖形時可能就比較難按照上面這種布局方式去設計了,於是我們設計了一 個處理相對位置布局的一個RelativePositionPanel ,並給Connector 加了一個附加屬性RelativePositionPanel.RelativePosition來處 理使用相對位置來設置連接點的情況。
以下為定義五角星的示例:

上圖五角星的定義如下:
<Path IsHitTestVisible="False"

     Fill="Orange"

     Stretch="Fill"

     Data="M 9,2 11,7 17,7 12,10 14,15 9,12 4,15 6,10 1,7 7,7 Z">

   <!-- Custom DragThumb Template -->

   <s:DesignerItem.DragThumbTemplate>

    <ControlTemplate>

      <Path Fill="Transparent" Stretch="Fill"

         Data="M 9,2 11,7 17,7 12,10 14,15 9,12 4,15 6,10 1,7 7,7 Z"/>

    </ControlTemplate>

   </s:DesignerItem.DragThumbTemplate>

   <!-- Custom ConnectorDecorator Template -->

   <s:DesignerItem.ConnectorDecoratorTemplate>

     <ControlTemplate>

      <c:RelativePositionPanel Margin="-4">

        <s:Connector Orientation="Top"

         c:RelativePositionPanel.RelativePosition="0.5,0"/>

        <s:Connector Orientation="Left"

         c:RelativePositionPanel.RelativePosition="0,0.385"/>

        <s:Connector Orientation="Right"

         c:RelativePositionPanel.RelativePosition="1,0.385"/>

        <s:Connector Orientation="Bottom"

         c:RelativePositionPanel.RelativePosition="0.185,1"/>

        <s:Connector Orientation="Bottom"

         c:RelativePositionPanel.RelativePosition="0.815,1"/>

      </c:RelativePositionPanel>

     </ControlTemplate>

   </s:DesignerItem.ConnectorDecoratorTemplate>

  </Path>
MetaModelEngine將增加一種布局方式:按絕對位置布局連接點