希望通過分析能更好的理解wpf控件的開發
一.日歷的header布局
包含兩部分,兩個按鈕和一個Title

首先定義按鈕的樣式(隨自己定),可以先定義幾個狀態為普通狀態,鼠標經過狀態,按下狀態和禁用4個狀態顯示不同的樣式.其中按鈕上還有一個小三角.所以還要定義一個三角的Geometry
代碼開始
1.畫出Geometry(涉及知識點為Geometry的畫法及迷你語法,如M Z等)
<PathGeometry x:Key="geometry" Figures="M0,0 4.5,4 9,0 5.5,0 4.5,1 3.5,0z"/>
2.定義4個不同狀態下的筆刷(可自由發揮)
Code
<LinearGradientBrush x:Key="MonthCalendarButtonFillNormal" StartPoint="0,0" EndPoint="1,1">

     <LinearGradientBrush.GradientStops>

       <GradientStop Color="#FFE1EAFE" Offset="0"/>

       <GradientStop Color="#FFC3D3FD" Offset="0.3"/>

       <GradientStop Color="#FFC3D3FD" Offset="0.6"/>

       <GradientStop Color="#FFBBCDF9" Offset="1"/>

     </LinearGradientBrush.GradientStops>

   </LinearGradientBrush>

   <LinearGradientBrush x:Key="MonthCalendarButtonFillHover" StartPoint="0, 0" EndPoint="1, 1">

     <LinearGradientBrush.GradientStops>

       <GradientStop Color="#FFD6E7FF" Offset="0"/>

       <GradientStop Color="#FFD6E7FF" Offset="0.6"/>

       <GradientStop Color="#FFB9DAFB" Offset="1"/>

     </LinearGradientBrush.GradientStops>

   </LinearGradientBrush>

   <LinearGradientBrush x:Key="MonthCalendarButtonFillPressed" StartPoint="0, 0" EndPoint="1, 1">

     <LinearGradientBrush.GradientStops>

       <GradientStop Color="#FF93A8D9" Offset="0"/>

       <GradientStop Color="#FFA5BDFB" Offset="0.3"/>

       <GradientStop Color="#FFA5BDFB" Offset="0.7"/>

       <GradientStop Color="#FFD2DEEB" Offset="1.0"/>

     </LinearGradientBrush.GradientStops>

   </LinearGradientBrush>

   <LinearGradientBrush x:Key="MonthCalendarButtonFillDisabled" StartPoint="0, 0" EndPoint="1, 1">

     <LinearGradientBrush.GradientStops>

       <GradientStop Color="#FFF7F7F7" Offset="0"/>

       <GradientStop Color="#FFF0F0F0" Offset="0.3"/>

       <GradientStop Color="#FFECECEC" Offset="0.6"/>

       <GradientStop Color="#FFE3E3E3" Offset="1.0"/>

     </LinearGradientBrush.GradientStops>

   </LinearGradientBrush>
3.定義按鈕樣式,按鈕上再使用上面的筆刷
Code
<Style x:Key="{ComponentResourceKey TypeInTargetAssembly={x:Type DateControls:MonthCalendar},ResourceId=PreviousButtonStyleKey}" TargetType="{x:Type ButtonBase}">

     <Setter Property="Width" Value="16" />

     <Setter Property="Height" Value="16" />

     <Setter Property="Background" Value="{StaticResource MonthCalendarButtonFillNormal}" />

     <Setter Property="Foreground" Value="#FF4D6185"/>

     <Setter Property="Focusable" Value="false"/>

     <Setter Property="VerticalAlignment" Value="Top"/>

   </Style>


   <Style x:Key="{ComponentResourceKey TypeInTargetAssembly={x:Type DateControls:MonthCalendar},ResourceId=NextButtonStyleKey}" TargetType="{x:Type ButtonBase}">

     <Setter Property="Width" Value="16" />

     <Setter Property="Height" Value="16" />

     <Setter Property="Background" Value="{StaticResource MonthCalendarButtonFillNormal}" />

     <Setter Property="Foreground" Value="#FF4D6185"/>

     <Setter Property="Focusable" Value="false"/>

     <Setter Property="VerticalAlignment" Value="Top"/>

   </Style>
注意點
1.這裡的TargetType是ButtonBase,因為有可能按鈕是Button或RepeatButton都有可能,這裡指向為ButtonBase是一種通用的做法
2.為何不直接定義還要為Button定義樣式?,這裡提供的樣式為默認樣式(下面我們會講到)
3.ComponentResourceKey將資源定義在指定程序集中,在後端訪問的方法如下
FindResource(new ComponentResourceKey(typeof(MonthCalendar), "PreviousButtonStyleKey")) as Style;
4.定義Title類,在靜態構造函數中用OverrideMetadata方法重寫樣式(多數控件都需要這麼做)
static MonthCalendarTitle()

     {

       DefaultStyleKeyProperty.OverrideMetadata(typeof(MonthCalendarTitle), new FrameworkPropertyMetadata(typeof(MonthCalendarTitle)));

     }
然後定義一個Title
Code
<Style x:Key="{x:Type DateControls:MonthCalendarTitle}" TargetType="{x:Type DateControls:MonthCalendarTitle}">

     <Setter Property="Background" Value="Blue"/>

     <Setter Property="Foreground" Value="White"/>

     <Setter Property="FontWeight" Value="Bold"/>

     <Setter Property="Padding" Value="8"/>

     <Setter Property="Focusable" Value="false"/>

     <Setter Property="HorizontalContentAlignment" Value="Center"/>

     <Setter Property="VerticalContentAlignment" Value="Center"/>

     <Setter Property="Template">

       <Setter.Value>

         <ControlTemplate TargetType="{x:Type DateControls:MonthCalendarTitle}">

           <Border Background="{TemplateBinding Background}" BorderBrush="{TemplateBinding BorderBrush}" BorderThickness="{TemplateBinding BorderThickness}">

           <TextBlock Text="{Binding Converter={StaticResource MonthCalendarMonthYearHeaderConverter}}"

         FontFamily="{TemplateBinding FontFamily}" FontSize="{TemplateBinding FontSize}" FontStretch="{TemplateBinding FontStretch}" FontStyle="{TemplateBinding FontStyle}" FontWeight="{TemplateBinding FontWeight}"

         HorizontalAlignment="{TemplateBinding HorizontalContentAlignment}" VerticalAlignment="{TemplateBinding VerticalContentAlignment}"

         Margin="{TemplateBinding Padding}" Foreground="{TemplateBinding Foreground}"/>

           </Border>

         </ControlTemplate>

       </Setter.Value>

     </Setter>

     <Style.Triggers>

       <Trigger Property="IsEnabled" Value="false">

         <Setter Property="Foreground" Value="{DynamicResource {x:Static SystemColors.GrayTextBrushKey}}"/>

       </Trigger>

     </Style.Triggers>

   </Style>
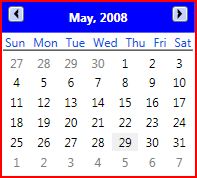
注意上面黑字,這裡使用了數據綁定的類型轉換器,只要給這個控件指定數據源就可以了,其作用是把日期轉換上面第二張截圖的格式
5.整合header
Code
<!--header beginer-->

                 <Grid x:Name="Title">


                   <DateControls:MonthCalendarTitle x:Name="TitleHost" DataContext="{TemplateBinding VisibleMonth}" Style="{TemplateBinding TitleStyle}"/>

                   <RepeatButton x:Name="PART_PreviousButton" Command="DateControls:MonthCalendar.PreviousCommand"

                     Margin="7 5 0 0" HorizontalAlignment="Left" >

                     <Viewbox>

                       <Path Data="{StaticResource geometry}" Fill="Black">

                         <Path.LayoutTransform>

                           <RotateTransform Angle="90"/>

                         </Path.LayoutTransform>

                       </Path>

                     </Viewbox>

                   </RepeatButton>

                   <RepeatButton x:Name="PART_NextButton" Command="DateControls:MonthCalendar.NextCommand"

                     Margin="0 5 7 0" HorizontalAlignment="Right">

                     <Viewbox>

                       <Path Data="{StaticResource geometry}" Fill="Black">

                         <Path.LayoutTransform>

                           <RotateTransform Angle="-90"/>

                         </Path.LayoutTransform>

                       </Path>

                     </Viewbox>

                   </RepeatButton>

                 </Grid>

                 <!--heander end-->
注意點:
1.使用DataContext作為數據源
2.用RepeatButton當作按鈕(可重復觸發事件)
3.使用LayoutTransform翻轉Geometry圖形
4.自定義樣式TitleStyle,默認為空
5.未見RepeatButton使用定義的ButtonBase樣式?(可與第四點比較)
下次繼續