WPF也提供3D圖形的功能,不過3D的建模和動畫比較復雜,這裡先做一個2D的 游戲引擎練練手。
實例
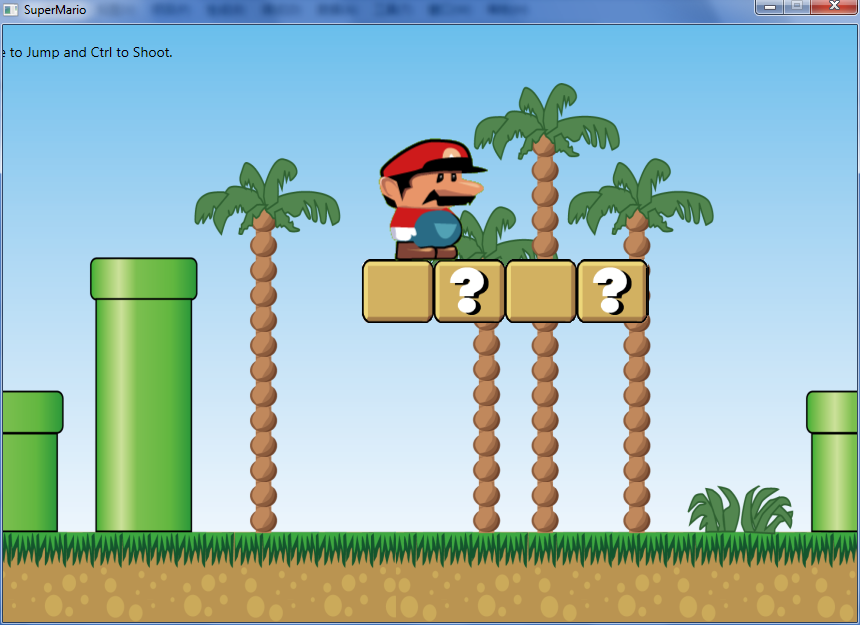
一直想做一個超級馬裡奧的游戲,就從這個游戲做起,畫了一部分圖,已經完 成的有走動、跳躍、發射子彈、邊界檢查和場景滾動,沒有關卡,沒有敵人。
下面是游戲截圖:
實現
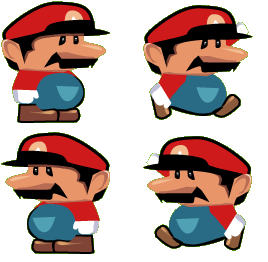
行走中邁腿擺臂的動畫是通過切換圖片幀來實現的,切換幀有兩種方法,一種 是放一個Image,然後用ObjectAnimationUsingKeyFrames來改變Image的Source屬 性:
<Storyboard x:Key="walkLeftStoryboard">

             <ObjectAnimationUsingKeyFrames Duration="00:00:00.4"  RepeatBehavior="Forever"

                                             Storyboard.TargetName="marioImage"  Storyboard.TargetProperty="Source" />

         </Storyboard>

         <Image Name="marioImage">

             <Image.RenderTransform>

                 <TranslateTransform x:Name="marioTranslate"  X="0"  Y="0"/>

             </Image.RenderTransform>

         </Image>
然後用C#代碼添加幀:
public static System.Drawing.Bitmap LoadBitmap(Uri uri)

         {

             StreamResourceInfo info =  Application.GetResourceStream(uri);

             return new System.Drawing.Bitmap (info.Stream);

         }

         public static BitmapSource CreateBitmapSource (System.Drawing.Bitmap frame)

         {

             BitmapSource bs =  System.Windows.Interop.Imaging.CreateBitmapSourceFromHBitmap(

               frame.GetHbitmap(), IntPtr.Zero,  Int32Rect.Empty, BitmapSizeOptions.FromEmptyOptions());

             return bs;

         }

         internal static void AddKeyFrames (ObjectAnimationUsingKeyFrames animation, params  System.Drawing.Bitmap[] frames)

         {

             double percent = 0;

             double pace = 1.0 / frames.Length;

             foreach (var frame in frames)

             {

                 BitmapSource bs =  CreateBitmapSource(frame);

                 animation.KeyFrames.Add(new  DiscreteObjectKeyFrame(bs, KeyTime.FromPercent(percent)));

                 percent += pace;

             }

         }
使用這種方法需要先把大圖在代碼裡切割成四個小圖,由於要用到 System.Drawing所以代碼不能遷移到Silverlight。
於是我又想了第二種方法,用ImageBrush做控件背景,然後用 ObjectAnimationUsingKeyFrames來切換它的ViewBox。
<Storyboard x:Key="walkLeftStoryboard">

             <ObjectAnimationUsingKeyFrames Duration="00:00:00.4"  RepeatBehavior="Forever"

                                             Storyboard.TargetName="marioImage"  Storyboard.TargetProperty="CurrentFrame" />

         </Storyboard>

         <game:AnimatedImage x:Name="marioImage"  Image="/SuperMario;component/Images/mario.png" CurrentFrame="0, 0,  0.5, 0.5" Width="134" Height="131">

             <game:AnimatedImage.RenderTransform>

                 <TranslateTransform x:Name="marioTranslate"  X="0"  Y="0"/>

             </game:AnimatedImage.RenderTransform>

         </game:AnimatedImage>
用C#代碼添加幀:
internal static void AddKeyFrames (ObjectAnimationUsingKeyFrames animation, Rect[] frames)

         {

             double percent = 0;

             double pace = 1.0 / frames.Length;

             foreach (var frame in frames)

             {

                 animation.KeyFrames.Add(new  DiscreteObjectKeyFrame(frame, KeyTime.FromPercent(percent)));

                 percent += pace;

             }

         }
AnimatedImage是一個自定義的控件,控件模板如下:
<Style TargetType="local:AnimatedImage">

         <Setter Property="Template">

             <Setter.Value>

                 <ControlTemplate TargetType="local:AnimatedImage">

                     <Border BorderThickness="0">

                         <Border.Background>

                             <ImageBrush ImageSource="{Binding Path=Image,RelativeSource= {RelativeSource TemplatedParent}}"

                                          Stretch="UniformToFill" AlignmentX="Left"  AlignmentY="Top" Viewbox="{Binding Path=CurrentFrame,RelativeSource= {RelativeSource TemplatedParent}}"/>

                         </Border.Background>

                     </Border>

                 </ControlTemplate>

             </Setter.Value>

         </Setter>

     </Style>
後來發現SliverLight裡的TileBrush沒有ViewBox屬性,所以還是無法遷移 ![]() 。
。
接下來就是在GameLoop中根據鍵盤按鍵控制動畫的開始和停止,並用 marioTranslate來改變人物的位置。
GameLoop可由CompositionTarget.Rendering事件指定:
GameLoop gameLoop;

         private void Window_Loaded(object sender,  RoutedEventArgs e)

         {

             ......

             gameLoop = new GameLoop(player,  Scenes.Level1);

             CompositionTarget.Rendering += new  EventHandler(CompositionTarget_Rendering);

         }

         void CompositionTarget_Rendering(object sender,  EventArgs e)

         {

             gameLoop.ProcessChanges();

         }
在GameLoop中還需要注意的就是跳躍過程中重力效果的模擬和對物體、台階、 邊界的碰撞檢查,這個就不多說了,看代碼:
public void ProcessChanges()

         {

             TimeSpan timeSpan = DateTime.Now -  lastTime;

             double step = timeSpan.TotalSeconds;

             lastTime = DateTime.Now;

             double x = Sprite.X;

             double y = Sprite.Y;

             double dx = step * Sprite.Speed;

             if (Sprite.IsWalkingLeft)

             {

                 x -= dx;

                 Scene.ScrollRightt(x, dx);

             }

             else if (Sprite.IsWalkingRight)

             {

                 x += dx;

                 Scene.ScrollLeft(x, dx);

             }

             if (Map.CanMoveTo(x, Sprite.Y,  Sprite.Width, Sprite.Height))

             {

                 Sprite.X = x;

             }

             if (Sprite.IsJumping)

             {

                 y -= (1 - Sprite.JumpTime) *  step * 400;

                 if (Sprite.JumpTime < 1  && Map.CanMoveTo(Sprite.X, y, Sprite.Width,  Sprite.Height))

                 {

                     Sprite.Y = y;

                     Sprite.JumpTime +=  step;

                 }

                 else

                 {

                     Sprite.IsJumping =  false;

                     Sprite.IsFalling =  true;

                     Sprite.JumpTime = 0;

                 }

             }

             else if (Sprite.IsFalling)

             {

                 y += 800 * Sprite.FallTime *  step;

                 if (Map.CanMoveTo(Sprite.X, y,  Sprite.Width, Sprite.Height))

                 {

                     Sprite.Y = y;

                     Sprite.FallTime +=  step;

                 }

                 else

                 {

                     Sprite.IsFalling =  false;

                     Sprite.FallTime = 0;

                 }

             }

             else

             {

                 y += 1;

                 if (Map.CanMoveTo(Sprite.X, y,  Sprite.Width, Sprite.Height))

                 {

                     Sprite.Y = y;

                     Sprite.IsFalling =  true;

                     Sprite.FallTime =  step;

                 }

             }

         }
下一步
下一步我打算用XAML矢量圖來做動畫,場景物體等也全都用矢量圖,這樣的好 處一是可以任意放大縮小,二是動畫效果會更加流暢一些。