在上一篇C#多線程之線程同步1中,我們主要學習了執行基本的原子操作、使用Mutex構造以及SemaphoreSlim構造,在這一篇中我們主要學習如何使用AutoResetEvent構造、ManualResetEventSlim構造和CountDownEvent構造。
四、使用AutoResetEvent構造
在這一小節中,我們將學習如何使用AutoResetEvent構造從一個線程向另一個線程發送通知。AutoResetEvent通知一個等待線程某個事件已經發生。具體步驟如下所示:
1、使用Visual Studio 2015創建一個新的控制台應用程序。
2、雙擊打開“Program.cs”文件,編寫代碼如下所示:
 1 using System;
 2 using System.Threading;
 3 using static System.Console;
 4 using static System.Threading.Thread;
 5
 6 namespace Recipe04
 7 {
 8     class Program
 9     {
10         private static AutoResetEvent workerEvent = new AutoResetEvent(false);
11         private static AutoResetEvent mainEvent = new AutoResetEvent(false);
12
13         static void Process(int seconds)
14         {
15             WriteLine("Starting a long running work...");
16             Sleep(TimeSpan.FromSeconds(seconds));
17             WriteLine("Work is done!");
18             workerEvent.Set();
19             WriteLine("Waiting for a main thread to complete its work");
20             mainEvent.WaitOne();
21             WriteLine("Starting second operation...");
22             Sleep(TimeSpan.FromSeconds(seconds));
23             WriteLine("Work is done!");
24             workerEvent.Set();
25         }
26
27         static void Main(string[] args)
28         {
29             var t = new Thread(() => Process(10));
30             t.Start();
31
32             WriteLine("Waiting for another thread to complete work");
33             workerEvent.WaitOne();
34             WriteLine("First operation is completed!");
35             WriteLine("Performing an operation on a main thread");
36             Sleep(TimeSpan.FromSeconds(5));
37             mainEvent.Set();
38             WriteLine("Now running the second operation on a second thread");
39             workerEvent.WaitOne();
40             WriteLine("Second operation is completed!");
41         }
42     }
43 }
3、運行該控制台應用程序,運行效果(每次運行效果可能不同)如下圖所示:
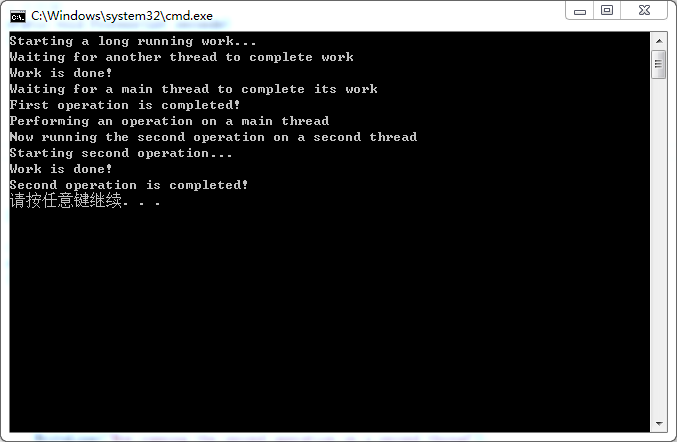
在第10~11行代碼處,我們定義了兩個AutoResetEvent實例:workerEvent和mainEvent。workerEvent用於從新建線程中向主線程發送通知,mainEvent用於從主線程向新建線程發送通知。在調用AutoResetEvent的構造方法的時候,我們給該構造方法的“initialState”參數傳遞了false值,指定AutoResetEvent實例的初始狀態為“無信號狀態”,這意味著調用AutoResetEvent實例的“WaitOne”方法的線程將會被阻塞,直到我們調用AutoResetEvent實例的“Set”方法之後,該線程才會繼續執行。如果我們將AutoResetEvent類的構造方法的“initialState”參數值設置為true,則AutoResetEvent實例的初始狀態為“信號狀態”,那麼第一個調用AutoResetEvent實例的“WaitOne”方法的線程將會被立即執行,然後AutoResetEvent實例的狀態自動變為“無信號狀態”,這個時候,當我們再次調用AutoResetEvent的“WaitOne”方法後,必須在另一個線程中調用AutoResetEvent的“Set”方法才能繼續執行當前的線程。
在第29行代碼處,我們創建了一個新的線程用於執行“Process”方法,並在第30行代碼處啟動線程。
在第33行代碼處,我們調用AutoResetEvent實例workerEvent的“WaitOne”方法,導致主線程被阻塞,然而在我們在第29行代碼處創建的線程中,我們調用了AutoResetEvent實例WorkerEvent的“Set”方法,因此,主線程得以繼續執行。當執行到第20行代碼處,我們在新建線程中調用了AutoResetEvent實例mainEvent的“WaitOne”方法,因此導致新建線程被阻塞,然而在主線程執行到第37行代碼處,我們調用了AutoResetEvent實例mainEvent的“Set”方法,因此,新建線程得以繼續執行。而主線程在執行到第39行代碼處,主線程又被阻塞,而新建線程執行到第24行代碼處,導致主線程得以繼續執行,因此,主線程執行到第40行代碼,控制台應用程序正常結束。
AutoResetEvent是kernel-time構造,因此,如果沒有必要,我們建議使用下一節介紹的ManualResetEventslim來替代AutoResetEvent。
五、使用ManualResetEventSlim構造
在這一小節中,我們將學習如何使用ManualResetEventSlim構造在多個線程之間更加靈活地發送通知。具體步驟如下所示:
1、使用Visual Studio 2015創建一個新的控制台應用程序。
2、雙擊打開“Program.cs”文件,編寫代碼如下所示:
 1 using System;
 2 using System.Threading;
 3 using static System.Console;
 4 using static System.Threading.Thread;
 5
 6 namespace Recipe05
 7 {
 8     class Program
 9     {
10         private static ManualResetEventSlim mainEvent = new ManualResetEventSlim(false);
11
12         static void TravelThroughGates(string threadName, int seconds)
13         {
14             WriteLine($"{threadName} falls to sleep");
15             Sleep(TimeSpan.FromSeconds(seconds));
16             WriteLine($"{threadName} waits for the gates to open!");
17             mainEvent.Wait();
18             WriteLine($"{threadName} enters the gates!");
19         }
20
21         static void Main(string[] args)
22         {
23             var t1 = new Thread(() => TravelThroughGates("Thread 1", 5));
24             var t2 = new Thread(() => TravelThroughGates("Thread 2", 6));
25             var t3 = new Thread(() => TravelThroughGates("Thread 3", 12));
26
27             t1.Start();
28             t2.Start();
29             t3.Start();
30
31             Sleep(TimeSpan.FromSeconds(6));
32             WriteLine("The gates are now open!");
33             mainEvent.Set();
34             Sleep(TimeSpan.FromSeconds(2));
35             mainEvent.Reset();
36             WriteLine("The gates have been closed!");
37             Sleep(TimeSpan.FromSeconds(10));
38             WriteLine("The gates are now open for the second time!");
39             mainEvent.Set();
40             Sleep(TimeSpan.FromSeconds(2));
41             WriteLine("The gates have been closed!");
42             mainEvent.Reset();
43         }
44     }
45 }
3、運行該控制台應用程序,運行效果(每次運行效果可能不同)如下圖所示:
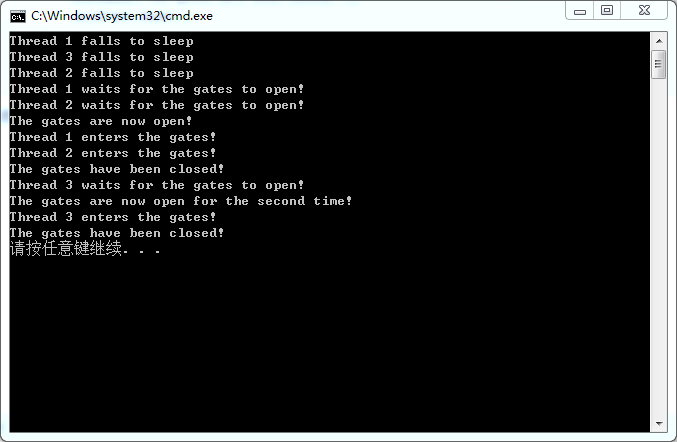
在第10行代碼處,我們定義了一個ManualResetEventSlim類型的實例mainEvent,並給它的構造方法的“initialState”參數傳遞了false值,表示該對象的初始狀態為“無信號狀態”。
在第23~25行代碼處,我們創建了三個線程t1、t2和t3。這三個線程都用於執行“TraveThroughGates”方法,在該方法的內部,我們調用了ManualResetEventSlim實例mainEvent的“Wait”方法,以阻塞t1、t2和t3線程的執行。
在第31行代碼處,我們讓主線程阻塞6秒鐘,在這六秒鐘內,線程t1和t2都執行到第17行代碼處,這個時候線程t1和t2都阻塞,並且等待mainEvent的“Set”方法被調用,以接收信號後繼續執行。主線程阻塞6秒鐘後,會執行第33行代碼,執行完畢這行代碼之後,線程t1和t2都會接收到通知,因此,線程t1和t2都會繼續往下執行,從而都執行第18行代碼,之後線程t1和t2執行完畢,結束。
由於線程t3在主線程執行到第33行代碼處的時候,還在阻塞(因為執行了第15行代碼)中,因此線程t3在主線程執行到第33行代碼處的時候不受影響,繼續阻塞。
當主線程執行到第34行代碼處的時候,線程t3依然在阻塞狀態中。在主線程執行了第35行代碼之後,mainEvent被重置為“無信號狀態”。當主線程執行到第37行代碼處,主線程被阻塞10秒鐘。在主線程被阻塞的10秒鐘內,線程t3會執行到第17行代碼處,從而t3線程被阻塞,等待通知的到來,才能繼續執行。
當主線程阻塞10秒鐘之後,會執行第39行代碼,從而導致線程t3繼續執行,因此會執行第18行代碼,線程t3結束。
然後主線程阻塞2秒鐘後,又將mainEvent重置為“無信號狀態”,然後主線程結束。
六、使用CountdownEvent構造
在這一小節中,我們將學習如何使用CountdownEvent構造等待發送一定數量的通知後,才繼續執行被阻塞的線程。學習步驟如下所示:
1、使用Visual Studio 2015創建一個新的控制台應用程序。
2、雙擊打開“Program.cs”文件,編寫代碼如下所示:
 1 using System;
 2 using System.Threading;
 3 using static System.Console;
 4 using static System.Threading.Thread;
 5
 6 namespace Recipe06
 7 {
 8     class Program
 9     {
10         private static CountdownEvent countdown = new CountdownEvent(2);
11
12         static void PerformOperation(string message, int seconds)
13         {
14             Sleep(TimeSpan.FromSeconds(seconds));
15             WriteLine(message);
16             countdown.Signal();
17         }
18
19         static void Main(string[] args)
20         {
21             WriteLine("Starting two operations");
22             var t1 = new Thread(() => PerformOperation("Operation 1 is completed", 4));
23             var t2 = new Thread(() => PerformOperation("Operation 2 is completed", 8));
24
25             t1.Start();
26             t2.Start();
27             countdown.Wait();
28             WriteLine("Both operations have been completed.");
29             countdown.Dispose();
30         }
31     }
32 }
3、運行該控制台應用程序,運行效果如下圖所示:
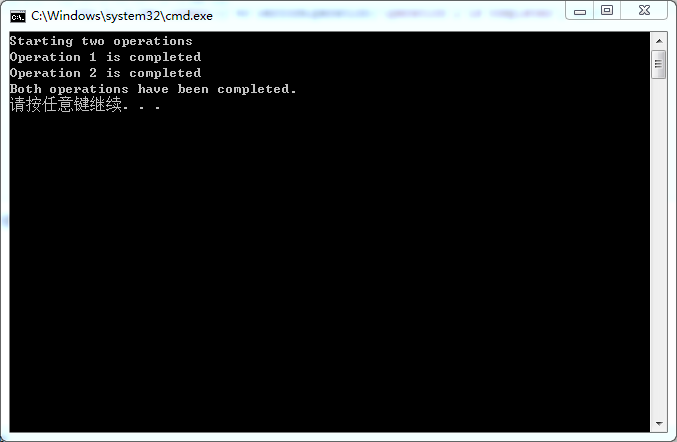
在第10行代碼處,我們創建了一個CountdownEvent的實例countdown,並給該構造方法的“initialCount”參數傳遞了數值2,表示我們希望等待2個通知發送完畢後,被阻塞的線程才能繼續執行。
在第22~23行代碼處,我們創建了兩個新線程用於執行“PerformOperation”方法,在該方法中,我們調用了countdown的“Signal”方法,用於發送通知,並減小CountdownEvent的CurrentCount的值,當CurrentCount的值減少到0時,被阻塞的線程才能繼續執行。
在第27行代碼處,我們在主線程中調用了countdown的“Wait”方法,從而主線程被阻塞,直到接收到通知並且CurrentCount的值為0時,主線程才能繼續執行。
注意,如果將第10行代碼處的2修改為3,再次運行該程序,主線程會一直等待,不會結束,因為CurrentCount的值沒有減少到0。