文檔目錄
本節內容:
簡介
來自它的網頁:“...使用一個Swagger-enabled Api,你將獲取交互文檔,客戶端SDK的創建和暴露。”。
Asp.net Core
安裝
基於Asp.net Core應用,你可以很方便的把Swagger集成到你的ABP裡。
安裝Nuget包
在你的Web項目裡安裝Swashbuckle包。
配置
在你的Startup.cs文件裡,在ConfigureServices方法裡添加代碼,配置入Swagger:
public IServiceProvider ConfigureServices(IServiceCollection services)
{
    //your other code...

    services.AddSwaggerGen();

    //your other code...
}
然後,為使用Swagger,在Startup.cs文件裡,在Configure方法裡添加如下代碼:
public void Configure(IApplicationBuilder app, IHostingEnvironment env, ILoggerFactory loggerFactory)
{
    //your other code...

    app.UseSwagger();
    app.UseSwaggerUi(); //URL: /swagger/ui
}
最後 ,當從Swagger UI測試動態Web Api服務時,為了發送CSRF令牌,你需要把Swagger UI的 index.html文件添加到你的項目裡,它應當放置在“wwwroot\swagger\ui”文件夾下,然後你需要在index.html裡,修改Swagger UI的onComplete方法,如下所示:
onComplete: function(swaggerApi, swaggerUi){
  if(typeof initOAuth == "function") {
    initOAuth({
      clientId: "your-client-id",
      clientSecret: "your-client-secret-if-required",
      realm: "your-realms",
      appName: "your-app-name",
      scopeSeparator: " ",
      additionalQueryStringParams: {}
    });
  }

  if(window.SwaggerTranslator) {
    window.SwaggerTranslator.translate();
  }

  var csrfToken = abp.security.antiForgery.getToken();
  var csrfCookieAuth = new SwaggerClient.ApiKeyAuthorization(abp.security.antiForgery.tokenHeaderName, csrfToken, "header");
  swaggerUi.api.clientAuthorizations.add(abp.security.antiForgery.tokenHeaderName, csrfCookieAuth);

}
查看Swashbuckle文檔獲取更多配置選項。
測試
到此就完成了,你可以浏覽Swagger UI:“/swagger/ui/index“。
Asp.net 5.x
安裝
基於應用,你可以很方便的把Swagger集成到你的ABP裡。
安裝Nuget包
在你的WebApi項目(或Web項目)裡安裝Swashbuckle.core包(kid1412注:此處應該是Swashbuckle包,Asp.net Core應用裡應該安裝Swashbuckle.Core包)。
配置
為Swagger添加配置代碼你的模塊的到Initialize方法裡,例如:
public class SwaggerIntegrationDemoWebApiModule : AbpModule
{
    public override void Initialize()
    {
        //your other code...

        ConfigureSwaggerUi();
    }

    private void ConfigureSwaggerUi()
    {
        Configuration.Modules.AbpWebApi().HttpConfiguration
            .EnableSwagger(c =>
            {
                c.SingleApiVersion("v1", "SwaggerIntegrationDemo.WebApi");
                c.ResolveConflictingActions(apiDescriptions => apiDescriptions.First());
            })
            .EnableSwaggerUi(c =>
            {
                c.InjectJavaScript(Assembly.GetAssembly(typeof(AbpProjectNameWebApiModule)), "AbpCompanyName.AbpProjectName.Api.Scripts.Swagger-Custom.js");
            });
    }
}
注意:在配置Swagger ui時我們注入了一個名為“Swagger-Custom.js”的javascript文件,這個腳本文件在從Swagger ui裡測試api服務時,添加CSRF令牌,同時你也需要在你的WebApi項目裡添加這個文件,當注入它時,使用它的邏輯名稱來注入javascript方法,它的內容如下所示:
var getCookieValue = function(key) {
    var equalities = document.cookie.split('; ');
    for (var i = 0; i < equalities.length; i++) {
        if (!equalities[i]) {
            continue;
        }

        var splitted = equalities[i].split('=');
        if (splitted.length !== 2) {
            continue;
        }

        if (decodeURIComponent(splitted[0]) === key) {
            return decodeURIComponent(splitted[1] || '');
        }
    }

    return null;
};

var csrfCookie = getCookieValue("XSRF-TOKEN");
var csrfCookieAuth = new SwaggerClient.ApiKeyAuthorization("X-XSRF-TOKEN", csrfCookie, "header");
swaggerUi.api.clientAuthorizations.add("X-XSRF-TOKEN", csrfCookieAuth);
查看Swashbuckle文檔獲取更多配置選項。
測試
到此就完成了,你可以浏覽Swagger UI:“/swagger/ui/index“。
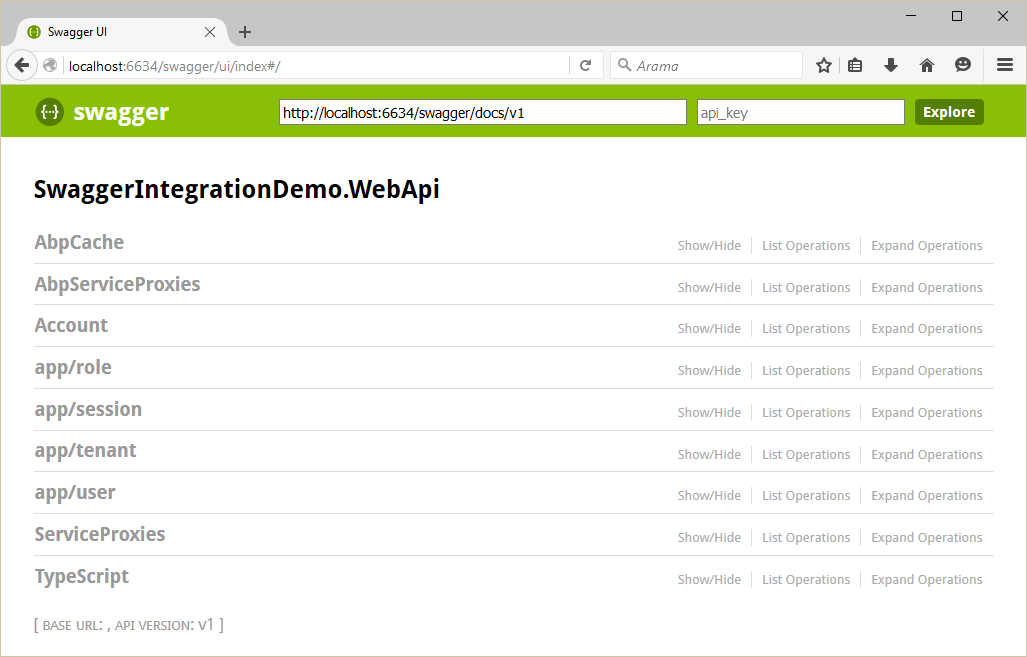
你可以看到所有的Web Api控制器(還有動態Web Api控制器),並可以測試它們。