0 Asp.Net Core 項目實戰之權限管理系統(0) 無中生有
1 Asp.Net Core 項目實戰之權限管理系統(1) 使用AdminLTE搭建前端
2 Asp.Net Core 項目實戰之權限管理系統(2) 功能及實體設計
3 Asp.Net Core 項目實戰之權限管理系統(3) 通過EntityFramework Core使用PostgreSQL
4 Asp.Net Core 項目實戰之權限管理系統(4) 依賴注入、倉儲、服務的多項目分層實現
5 Asp.Net Core 項目實戰之權限管理系統(5) 用戶登錄
6 Asp.Net Core 項目實戰之權限管理系統(6) 功能管理
7 Asp.Net Core 項目實戰之權限管理系統(7) 組織機構管理
github源碼地址
修改Fonour.Domain項目中IRepository接口,增加分頁查詢及根據條件刪除的操作接口。
/// <summary>
/// 根據條件刪除實體
/// </summary>
/// <param name="where">lambda表達式</param>
/// <param name="autoSave">是否自動保存</param>
void Delete(Expression<Func<TEntity, bool>> where, bool autoSave = true);

/// <summary>
/// 分頁獲取數據
/// </summary>
/// <param name="startPage">起始頁</param>
/// <param name="pageSize">頁面條目</param>
/// <param name="rowCount">數據總數</param>
/// <param name="where">查詢條件</param>
/// <param name="order">排序</param>
/// <returns></returns>
IQueryable<TEntity> LoadPageList(int startPage, int pageSize, out int rowCount, Expression<Func<TEntity, bool>> where, Expression<Func<TEntity, object>> order);
增加功能菜單管理的倉儲操作接口IMenuRepository
public interface IMenuRepository : IRepository<Menu>
{
}
在Fonour.EntityFrameworkCore項目的Repositories\FonourRepositoryBase.cs中實現上述接口。
/// <summary>
 /// 根據條件刪除實體
 /// </summary>
 /// <param name="where">lambda表達式</param>
 /// <param name="autoSave">是否自動保存</param>
 public void Delete(Expression<Func<TEntity, bool>> where, bool autoSave = true)
 {
     _dbContext.Set<TEntity>().Where(where).ToList().ForEach(it => _dbContext.Set<TEntity>().Remove(it));
     if (autoSave)
         Save();
 }
 /// <summary>
 /// 分頁查詢
 /// </summary>
 /// <param name="startPage">頁碼</param>
 /// <param name="pageSize">單頁數據數</param>
 /// <param name="rowCount">行數</param>
 /// <param name="where">條件</param>
 /// <param name="order">排序</param>
 /// <returns></returns>
 public IQueryable<TEntity> LoadPageList(int startPage, int pageSize, out int rowCount, Expression<Func<TEntity, bool>> where = null, Expression<Func<TEntity, object>> order = null)
 {
     var result = from p in _dbContext.Set<TEntity>()
                  select p;
     if (where != null)
         result = result.Where(where);
     if (order != null)
         result = result.OrderBy(order);
     else
         result = result.OrderBy(m => m.Id);
     rowCount = result.Count();
     return result.Skip((startPage - 1) * pageSize).Take(pageSize);
 }
在Fonour.Application項目中添加MenuApp文件夾,新增IMenuAppService接口及實現MenuAppService,以及數據傳輸對象MenuDto。
接口主要包含一下定義,具體實現代碼參見GitHub源碼。
/// <summary>
/// 獲取功能列表
/// </summary>
/// <returns></returns>
List<MenuDto> GetAllList();

/// <summary>
/// 根據父級Id獲取功能列表
/// </summary>
/// <param name="parentId">父級Id</param>
/// <param name="startPage">起始頁</param>
/// <param name="pageSize">頁面大小</param>
/// <param name="rowCount">數據總數</param>
/// <returns></returns>
List<MenuDto> GetMneusByParent(Guid parentId, int startPage, int pageSize, out int rowCount);

/// <summary>
/// 新增或修改功能
/// </summary>
/// <param name="dto">實體</param>
/// <returns></returns>
bool InsertOrUpdate(MenuDto dto);

/// <summary>
/// 根據Id集合批量刪除
/// </summary>
/// <param name="ids">功能Id集合</param>
void DeleteBatch(List<Guid> ids);

/// <summary>
/// 刪除
/// </summary>
/// <param name="id">功能Id</param>
void Delete(Guid id);

/// <summary>
/// 根據Id獲取實體
/// </summary>
/// <param name="id">功能Id</param>
/// <returns></returns>
MenuDto Get(Guid id);
AutoMapper是一個輕量級的類庫,主要功能是把一個對象轉換成另外一個對象,而避免我們每次重復的手工去逐個屬性賦值轉換。在將領域模型(Menu)與數據傳輸對象(MenuDto)互相轉化的過程中提供便利。
0 添加AutoMapper應用
通過NuGet程序包管理器安裝、通過NuGet程序包控制台安裝、或通過直接修改project.json都可用很方便的快速添加對AutoMapper類庫的引用。
1 FonourMapper類
AutoMapper最基本的使用是首先通過CreateMap<T1,T2>()方法創建兩個實體的映射關系,然後通過Mapper.Map<T1>(T2)實現實體T2到T1的轉換。這裡所有領域模型與Dto之間的映射關系創建都在應用服務層完成,應用服務層將接收到的Dto對象轉換為領域模型後傳入倉儲調用,同時將倉儲返回的領域模型轉換為Dto,返回給界面變現層使用。
在Fonour.Application項目中新增一個名稱為FonourMapper的類,裡面實現一個名稱為Initialize的靜態方法,以後所有的領域模型與Dto的映射關系都在這個FonourMapper類裡完成。
 /// <summary>
 /// Enity與Dto映射
 /// </summary>
 public class FonourMapper
 {
     public static void Initialize()
     {
         Mapper.Initialize(cfg =>
         {
             cfg.CreateMap<Menu, MenuDto>();
             cfg.CreateMap<MenuDto, Menu>();
         });
     }
 }
2 Startup啟動時調用
在應用程序啟動入口處初始化所有領域模型與Dto對象的映射關系,修改Startup.cs類的Startup方法,增加FonourMapper類Initialize靜態方法的調用。
//初始化映射關系
FonourMapper.Initialize();
3 AutoMapper進行實體轉換
使用AutoMapper進行實體轉換操作主要應用在應用服務接口的實現類中,如MenuAppService的GetAllList方法實現。
 public List<MenuDto> GetAllList()
 {
     var menus = _menuRepository.GetAllList().OrderBy(it=>it.SerialNumber);
     //使用AutoMapper進行實體轉換
     return Mapper.Map<List<MenuDto>>(menus);
 }
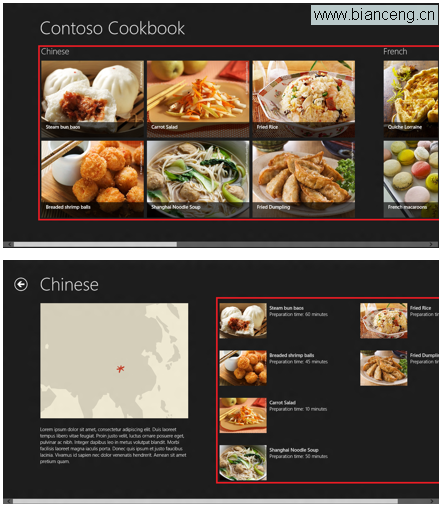
在功能及實體設計中我們將功能管理部分設計為左右結構,左邊為樹形結構,右邊為列表結構,當單擊左邊樹節點時,加載選中樹節點的下級數據至右側列表中。基於此設計,必不可少的必然包含一個樹形插件和一個帶有分頁功能的表格插件。
樹形插件這裡選擇使用JsTree,jsTree是一個 基於jQuery的Tree控件。支持XML,JSON,Html三種數據源。提供創建,重命名,移動,刪除,拖"放節點操作。可以自己自定義創建,刪 除,嵌套,重命名,選擇節點的規則。在這些操作上可以添加多種監聽事件,用以實現我們實際應用中的種種樹形操作需求。
0 JsTree前端包的安裝
通過Bower管理器,搜索JsTree,找到後直接安裝即可。或直接修改Fonour.MVC項目中的Bower.json文件:
{
  "name": "asp.net",
  "private": true,
  "dependencies": {
    "bootstrap": "3.3.6",
    "font-awesome": "4.6.1",
    "iCheck": "1.0.2",
    "layer": "*",
    "jquery.cookie": "1.4.1",
    "jstree": "3.3.0"
  }
}
1 JsTree的基本使用
在布局頁Shared/_Layout.cshtml中統一添加JsTree的css及js引用。
<link rel="stylesheet" href="~/lib/jstree/dist/themes/default/style.min.css">
<script src="~/lib/jstree/dist/jstree.js"></script>
在視圖文件中定義要渲染JsTree的Div對象
<div id="treeDiv" class="portlet-body">
</div>
JsTree的創建主要是通過調用$('#treeDiv').jstree()方法實現,下面是一個基本的使用ajax獲取json數據並綁定樹結構的過程,有關JsTree的更詳細的使用說明,請參看官方網站相關介紹。
//加載功能樹
function initTree() {
    $.jstree.destroy();
    $.ajax({
        type: "Get",
        url: "/Menu/GetMenuTreeData",    //獲取數據的ajax請求地址
         success: function (data) {
            $('#treeDiv').jstree({       //創建JsTtree
                'core': {
                 'data': data,        //綁定JsTree數據
                    "multiple": false    //是否多選
                },
                "plugins": ["state", "types", "wholerow"]  //配置信息
            })
            $("#treeDiv").on("ready.jstree", function (e, data) {   //樹創建完成事件
                data.instance.open_all();    //展開所有節點
            });
            $("#treeDiv").on('changed.jstree', function (e, data) {   //選中節點改變事件
                var node = data.instance.get_node(data.selected[0]);  //獲取選中的節點
                if (node) {
                    selectedMenuId = node.id;
                    loadTables(1, 10);
                };
            });
        }
    });

}
表格的顯示我們采用Bootstrap中的Table組件,並配合bootstrap-paginator提供的分頁功能實現列表數據的分頁展示。Bootstrap-paginator是一款基於Bootstrap的js分頁插件,功能很豐富,它提供了一系列的參數用來支持用戶的定制,提供了公共的方法可隨時獲得插件狀態的改變,以及事件來監聽用戶的動作。由於它暫不支持Bower,所以我們只能下載這個js文件,添加到我們項目的wwwroot\js\文件夾下。同時在布局頁中添加此js的引用。
<script src="~/js/bootstrap-paginator.js"></script>
一般的使用是首先在視圖頁中定義分頁插件的容器。
<div class="paging-toolbar">
    <ul id="grid_paging_part"></ul>
</div>
然後在列表數據的加載同時創建分頁插件,其中page,data.rowsCount,data.pageCount等定義需要在請求的控制器方法中通過json格式返回。
var elment = $("#grid_paging_part"); //分頁插件的容器id
if (data.rowCount > 0) {
    var options = { //分頁插件配置項
        bootstrapMajorVersion: 3,
       currentPage: page, //當前頁
        numberOfPages: data.rowsCount, //總數
        totalPages: data.pageCount, //總頁數
        onPageChanged: function (event, oldPage, newPage) { //頁面切換事件
            loadTables(newPage);
        }
    }
    elment.bootstrapPaginator(options); //分頁插件初始化
}
0 控制器
新建名稱為MenuController的控制器,控制器的構造函數中通過依賴注入獲取IMenuAppService的實現實例。
private readonly IMenuAppService _menuAppService;
public MenuController(IMenuAppService menuAppService)
{
    _menuAppService = menuAppService;
}
控制器中主要包括以下方法。
注:此處根據個人喜好,視圖界面采用盡量純淨的html,操作全部采用ajax請求,控制器統一返回Json格式的數據。當然你也可以通過使用TagHelper+模型綁定+Razor機制實現(控制器獲取實體或實體集合,返回View,View中得到實體,通過TagHelper實現模型綁定),可參考用戶登陸實現部分。
1 視圖
Views文件夾下新建Menu文件夾,在Menu文件夾下創建Index.cshtml視圖,以及名稱為_Edit.cshtml(新增/修改)的分部視圖,同時添加Index.js文件。
在布局頁_Layout.cshtml中增加RenderSection,用於渲染視圖頁中相關js方法。
@RenderSection("scripts", false)
Index.cshtml主要布局修改如下
<div class="row">
<div class="col-md-3">
<div class="box box-primary">
<div class="box-header with-border">
<h3 class="box-title">功能管理</h3>
</div>
<div class="box-body">
<div id="treeDiv" class="portlet-body">
</div>
</div>
</div>
</div>
<div class="col-md-9">
<div class="box box-primary">
<div class="box-header with-border">
<h3 class="box-title">功能列表</h3>
<div class="pull-right box-tools">
<button id="btnAddRoot" class="btn btn-primary" type="button" data-original-title="新增頂級功能" data-toggle="tooltip" data-widget="">
<i class="fa fa-plus-square"></i> 新增頂級
</button>
<button id="btnAdd" title="" class="btn btn-primary" type="button" data-original-title="新增功能" data-toggle="tooltip" data-widget="">
<i class="fa fa-plus-circle"></i> 新增
</button>
<button id="btnDelete" title="" class="btn btn-danger" type="button" data-original-title="刪除功能" data-toggle="tooltip" data-widget="">
<i class="fa fa-times"></i> 刪除
</button>
<button id="btnLoadRoot" title="" class="btn btn-success" type="button" data-original-title="加載頂級功能" data-toggle="tooltip" data-widget="">
<i class="fa fa-list"></i> 加載頂級
</button>
</div>
</div>
<div class="box-body">
<div class="table-scrollable">
<table class="table table-striped table-bordered table-hover dataTable no-footer" role="grid" aria-describedby="sample_2_info">
<thead>
<tr role="row">
<th class="table-checkbox" ><input id="checkAll" class="group-checkable" type="checkbox"></th>
<th tabindex="0" aria-label="">
功能名稱
</th>
<th tabindex="0" aria-label="">
功能編碼
</th>
<th tabindex="0" aria-label="">
地址
</th>
<th tabindex="0" aria-label="">
類型
</th>
<th tabindex="0" aria-label="">
功能描述
</th>
<th tabindex="0" aria-label="">
操作
</th>
</tr>
</thead>
<tbody id="tableBody"></tbody>
</table>
</div>
</div>
<div class="paging-toolbar">
<ul id="grid_paging_part"></ul>
</div>
</div>
</div>
</div>
@Html.Partial("_Edit")
@section scripts{
<script src="~/Views/Menu/Index.js"></script>
}
_Edit.cshtm采用Bootstrap的Modal彈出框組件,做為功能管理的新增和編輯界面
<div id="addRootModal" tabindex="-1" class="modal fade in" aria-hidden="true">
    <div class="modal-dialog">
        <div class="box box-info">
            <div class="box-header with-border">
                <h5 class="box-title" id="Title"></h5>
                <button class="close" aria-label="Close" type="button" data-dismiss="modal">
                    <span aria-hidden="true">×</span>
                </button>
            </div>
            <form class="form-horizontal">
                <input type="hidden" id="Id" />
                <input type="hidden" id="ParentId" />
                <div class="box-body">
                    <div class="form-group">
                        <label class="col-sm-2 control-label" for="">功能名稱</label>
                        <div class="col-sm-10">
                            <input class="form-control" id="Name" type="text" placeholder="功能名稱">
                        </div>
                    </div>
                    <div class="form-group">
                        <label class="col-sm-2 control-label" for="inputPassword3">功能編碼</label>
                        <div class="col-sm-10">
                            <input class="form-control" id="Code" type="text" placeholder="功能編碼">
                        </div>
                    </div>
                    <div class="form-group">
                        <label class="col-sm-2 control-label" for="inputPassword3">功能類型</label>
                        <div class="col-sm-10">
                            <select class="form-control" id="Type">
                                <option value="0">功能菜單</option>
                                <option value="1">操作按鈕</option>
                            </select>
                        </div>
                    </div>
                    <div class="form-group">
                        <label class="col-sm-2 control-label" for="">鏈接地址</label>
                        <div class="col-sm-10">
                            <input class="form-control" id="Url" type="text" placeholder="鏈接地址">
                        </div>
                    </div>
                    <div class="form-group">
                        <label class="col-sm-2 control-label" for="">功能圖標</label>
                        <div class="col-sm-10">
                            <input class="form-control" id="Icon" type="text" placeholder="功能圖標">
                        </div>
                    </div>
                    <div class="form-group">
                        <label class="col-sm-2 control-label" for="">功能序號</label>
                        <div class="col-sm-10">
                            <input class="form-control" id="SerialNumber" type="text" placeholder="功能序號">
                        </div>
                    </div>
                    <div class="form-group">
                        <label class="col-sm-2 control-label" for="">功能描述</label>
                        <div class="col-sm-10">
                            <textarea id="Remarks" class="form-control" rows="3"></textarea>
                        </div>
                    </div>
                </div>
                <div class="box-footer">
                    <div class="pull-right box-tools">
                        <button id="btnSave" class="btn btn-primary" type="button">保存</button>
                        <button class="btn btn-default" type="button" data-dismiss="modal">取消</button>
                    </div>
                </div>
            </form>
        </div>
    </div>
</div>
Index.js文件主要定義視圖文件與服務器的交互操作,主要包括以下定義。
前面我們已經介紹過靜態文件的使用需要在Startup中的Configure方法中增加
//使用靜態文件
app.UseStaticFiles();
這樣就可以訪問所有wwwroot目錄下的靜態文件,但是若想訪問Views/Menu/Index.js文件,還需要在Configure方法中增加
app.UseStaticFiles(new StaticFileOptions()
{
    FileProvider = new PhysicalFileProvider(Directory.GetCurrentDirectory())
});
這樣在客戶端就可以成功訪問Views/Menu/Index.js文件,調用相關方法了。
完成的功能管理界面大體如下。
主界面
編輯界面
刪除提示
本次我們通過使用AutoMapper、JsTree、Bootstrap-paginator等技術實現了功能管理的開發,接下來要實現組織機構管理功能的開發。