在Swift法式中完成手勢辨認的辦法。本站提示廣大學習愛好者:(在Swift法式中完成手勢辨認的辦法)文章只能為提供參考,不一定能成為您想要的結果。以下是在Swift法式中完成手勢辨認的辦法正文
在此次IOS運用開辟教程中,我們盤算完成手勢辨認。正如你所曉得的,IOS支撐年夜量的手勢操作,它們能供給了很好的運用掌握和精彩用戶體驗。
讓我們開端吧!
起首須要在Xcode中創立一個新的Single View Application:
然後點擊Next,彈出的窗口請求你填寫項目設置。在第一欄 (“Product name”) 中填入項目稱號後,點擊Next.
確保說話選擇的是 “Swift”.
設計界面
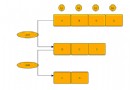
點擊 “Main.storyboard” 文件,拖出6個 UIViews放到視圖中.把視圖分列成如圖所示的模樣.當你分列UIViews時,在每一個view上面添加一個UILabel並依圖設定文本值。
我們開端寫代碼吧.
是時刻編纂完成文件了 (在我們的案例 “ViewController.swift” ).
為了聲明一些我們將會用到的變量,要在 “class ViewController: UIViewController “塊中添加以下代碼.
class ViewController: UIViewController {
@IBOutlet var tapView: UIView
@IBOutlet var swipeView: UIView
@IBOutlet var longPressView: UIView
@IBOutlet var pinchView: UIView
@IBOutlet var rotateView: UIView
@IBOutlet var panView: UIView
var lastRotation = CGFloat()
let tapRec = UITapGestureRecognizer()
let pinchRec = UIPinchGestureRecognizer()
let swipeRec = UISwipeGestureRecognizer()
let longPressRec = UILongPressGestureRecognizer()
let rotateRec = UIRotationGestureRecognizer()
let panRec = UIPanGestureRecognizer()
}
在第2 – 7行,我們聲清楚明了在之前界面裡分列過的 UIViews.
在第8行,我們聲清楚明了完成扭轉手勢要用到的變量(lastRotation).
在第 9 – 14行,我們為每一個view聲清楚明了一個手勢辨認對象.
留意: 在 Swift中,我們用let症結字聲明常量,這意味著它的值在法式運轉時弗成轉變。症結字var則聲明通俗變量。
當聲明完運用須要的重要變量後,在viewDidLoad 辦法中添加以下代碼.
override func viewDidLoad() {
super.viewDidLoad()
tapRec.addTarget(self, action: "tappedView")
pinchRec.addTarget(self, action: "pinchedView:")
swipeRec.addTarget(self, action: "swipedView")
longPressRec.addTarget(self, action: "longPressedView")
rotateRec.addTarget(self, action: "rotatedView:")
panRec.addTarget(self, action: "draggedView:")
tapView.addGestureRecognizer(tapRec)
swipeView.addGestureRecognizer(swipeRec)
pinchView.addGestureRecognizer(pinchRec)
longPressView.addGestureRecognizer(longPressRec)
rotateView.addGestureRecognizer(rotateRec)
panView.addGestureRecognizer(panRec)
rotateView.userInteractionEnabled = true
rotateView.multipleTouchEnabled = true
pinchView.userInteractionEnabled = true
pinchView.multipleTouchEnabled = true
tapView.userInteractionEnabled = true
swipeView.userInteractionEnabled = true
longPressView.userInteractionEnabled = true
panView.userInteractionEnabled = true
}
第 3 – 8行,為每一個視圖設定手勢辨認的目的。所謂的目的,就是每一個view中的手勢完成後要挪用的辦法。
第 9 -14行,把手勢辨認添加到視圖中.
第15 – 22行,把每一個視圖的 userInteractionEnabled 屬性設為ture,並把具有須要多點觸控(rotateView and pinchView)的手勢地點的視圖的multipleTouchEnabled 屬性設為true.
如今,我們編寫每一個手勢辨認器要挪用的辦法 (第3 – 8行設置的目的辦法 ).
添加以下代碼:
func tappedView(){
let tapAlert = UIAlertController(title: "Tapped", message: "You just tapped the tap view", preferredStyle: UIAlertControllerStyle.Alert)
tapAlert.addAction(UIAlertAction(title: "OK", style: .Destructive, handler: nil))
self.presentViewController(tapAlert, animated: true, completion: nil)
}
func swipedView(){
let tapAlert = UIAlertController(title: "Swiped", message: "You just swiped the swipe view", preferredStyle: UIAlertControllerStyle.Alert)
tapAlert.addAction(UIAlertAction(title: "OK", style: .Destructive, handler: nil))
self.presentViewController(tapAlert, animated: true, completion: nil)
}
func longPressedView(){
let tapAlert = UIAlertController(title: "Long Pressed", message: "You just long pressed the long press view", preferredStyle: UIAlertControllerStyle.Alert)
tapAlert.addAction(UIAlertAction(title: "OK", style: .Destructive, handler: nil))
self.presentViewController(tapAlert, animated: true, completion: nil)
}
這三種辦法都很好地完成統一件事.每次在手勢在響應的視圖中完成後,每種辦法都彈出一個對話框.
所以 tappedView() 辦法在用戶滑動視圖時彈出一個對話框,swipedView() 辦法在用戶觸摸滑動 swipe視圖時彈出對話框,而longPressedView() 辦法則在用戶長按long press view時彈出對話框.
另兩種手勢 (rotate and pinch ) 的代碼略微有點龐雜.
為扭轉手勢添加以下代碼:
func rotatedView(sender:UIRotationGestureRecognizer){
var lastRotation = CGFloat()
self.view.bringSubviewToFront(rotateView)
if(sender.state == UIGestureRecognizerState.Ended){
lastRotation = 0.0;
}
rotation = 0.0 - (lastRotation - sender.rotation)
var point = rotateRec.locationInView(rotateView)
var currentTrans = sender.view.transform
var newTrans = CGAffineTransformRotate(currentTrans, rotation)
sender.view.transform = newTrans
lastRotation = sender.rotation
}
這個辦法包括 sender:UIRotationGestureRecognizer 參數. sender 參數( UIRotationGestureRecognizer 類型) 含有這個辦法(在這個案例中是rotateRec)挪用的手勢辨認器的值.
第2行聲清楚明了 lastRotation.
第3行我們把 rotateView放到後面.
接上去,在 if語句中,我們檢討手勢能否完成,假如沒有完成,我們就將視圖扭轉。
第 8 – 10行,我們盤算rotate view的扭轉水平,第10行,我們設置rotate view的扭轉水平。
On line 12 we set the lastRotation 作為扭轉手勢辨認器確當前扭轉.
如今我們添加pinch 手勢的代碼:
func pinchedView(sender:UIPinchGestureRecognizer){
self.view.bringSubviewToFront(pinchView)
sender.view.transform = CGAffineTransformScale(sender.view.transform, sender.scale, sender.scale)
sender.scale = 1.0
}
在之後方法的第1行中,我們把pinch視圖放到了頂端。然後設置每一個pinch視圖的transform,並把pinchRec的scale設為1.
然後是完成 pan (drag) 手勢. 添加以下代碼:
func draggedView(sender:UIPanGestureRecognizer){
self.view.bringSubviewToFront(sender.view)
var translation = sender.translationInView(self.view)
sender.view.center = CGPointMake(sender.view.center.x + translation.x, sender.view.center.y + translation.y)
sender.setTranslation(CGPointZero, inView: self.view)
}
第2行,我們把 drag視圖放到頂端 (和後面的辦法一樣).
然後我們聲明變量translation,並用 sender.translationInView(self.view)的值給它賦值。 完成後,把sender.view object (panRec) 的center屬性設為盤算出來的新center ( 經由過程CGPointMake(sender.view.center.x + translation.x, sender.view.center.y + translation.y) 盤算) 並把translation 設為 sender (panRec).
如今,代碼部門算是完成了!
回到界面設計.
如今我們回到 “Main.storyboard” 文件. 選擇視圖掌握器並把聲明的每一個UIView銜接到響應的視圖,以下圖所示.
落成
如今你可以在模仿器或你的裝備上運轉該運用並測試手勢。
跋文
我願望這篇教程對你有所贊助。你可以鄙人載完全源代碼