import tkinter as tk
import ttkbootstrap
from tkinter import Frame, ttk, scrolledtext, Button, VERTICAL, NS, NSEW, END, Label
class RunMain(object):
def __init__(self):
pass
def interface_main(self):
self.window = ttkbootstrap.Window(themename="pulse")
# 設置標題
self.window.title('實驗界面')
# 窗口的位置和大小
sw = self.window.winfo_screenwidth()
# 得到屏幕寬度
sh = self.window.winfo_screenheight()
# 得到屏幕高度
ww = 820
wh = 600
# 窗口寬高為500
x = (sw-ww) / 2
y = (sh-wh) / 2
self.window.geometry("%dx%d+%d+%d" % (ww, wh, x, y))
""" 基本布局 """
lable1_line = Label(self.window, text='-' * 66, font=('微軟雅黑', 20), fg='black', bg='#C0D9D9')
lable1_line.place(x=0, y=40)
lable1_title = Label(self.window, text='實驗界面', font=('微軟雅黑', 30), fg='black', bg='#C0D9D9')
lable1_title.place(x=320, y=0)
lable1_edition = Label(self.window, text='版本號v1.0', font=('微軟雅黑', 10), fg='black', bg='#C0D9D9')
lable1_edition.place(x=720, y=30)
# 設置窗口是否可以變化長寬,默認可變
self.window.resizable(width=False, height=False)
frame = Frame(self.window)
# 創建表格
self.tree_date = ttk.Treeview(frame, show='tree headings', height=15)
frame.place(x=10, y=100, width=580)
# 設置x軸和y軸的滾動條
ybar = ttk.Scrollbar(frame, orient=VERTICAL)
ybar.pack(side='right', fill='y')
xbar = ttk.Scrollbar(frame, orient=tk.HORIZONTAL)
xbar.pack(side='bottom', fill='x')
self.tree_date.configure(yscrollcommand=ybar.set, xscrollcommand=xbar.set)
# 定義列
self.tree_date["columns"] = ["name", "age", "weight", "number", "hang", "X"]
self.tree_date.pack()
# 使用command參數來綁定treevievw
ybar.config(command=self.tree_date.yview)
xbar.config(command=self.tree_date.xview)
# 設置列寬度
self.tree_date.column("#0", width=90, anchor="center")
self.tree_date.column("name", width=70, anchor="center")
self.tree_date.column("age", width=70, anchor="center")
self.tree_date.column("weight", width=70, anchor="center")
self.tree_date.column("number", width=70, anchor="center")
self.tree_date.column("hang", width=70, anchor="center")
self.tree_date.column("X", width=160, anchor="center")
# 添加列名
self.tree_date.heading("#0", text="循環名")
self.tree_date.heading("name", text="姓名")
self.tree_date.heading("age", text="年齡")
self.tree_date.heading("weight", text="體重")
self.tree_date.heading("number", text="狀態")
self.tree_date.heading("hang", text="行")
self.tree_date.heading("X", text="完成時間")
# # 添加列名
# self.tree_date.heading("#0", text="制式")
# for j in date_columns:
# self.tree_date.heading(j, text=j)
""" 進度條 """
self.jin_du = ttkbootstrap.Meter(
master=self.window,
boot,
subtext,
metertype="full", # 將儀表顯示為一個完整的圓形或半圓形(semi)
# wedgesize=5, #設置弧周圍的指示器楔形長度,如果大於 0,則此楔形設置為以當前儀表值為中心的指示器
amounttotal=100, # 儀表的最大值,默認100
amountused=100, # 儀表的當前值
metersize=140, # 儀表大小
showtext=True, # 指示是否在儀表上顯示左、中、右文本標簽
interactive=False, # 是否可以手動調節數字的大小
textleft='進度:', # 插入到中心文本左側的短字符串
textright='%',
textfont="-size 15", # 中間數字大小
# subtext=" ",
subtextfont="-size 15", # 文本大小
)
self.jin_du.place(x=620, y=260)
""" 下方說明框 """
self.scr_explain = scrolledtext.ScrolledText(self.window, font=('微軟雅黑', 10), width=85, height=6)
self.scr_explain.place(x=10, y=450)
self.run_button = Button(self.window, text="開始運行", font=('微軟雅黑', 20))
self.run_button.place(x=620, y=100)
self.exit_button = Button(self.window, text="退出界面", font=('微軟雅黑', 20))
self.exit_button.place(x=620, y=180)
import time
import sys
import threading
from tkinter import END, messagebox
from configure import RunMain
test_item_num = 0
class MyThread(threading.Thread):
def __init__(self, func, *args):
super().__init__()
self.func = func
self.args = args
self.setDaemon(True)
self.start() # 在這⾥開始
def run(self):
self.func(*self.args)
class DataHandle(RunMain):
def __init__(self):
super().__init__()
# 計算所有的測試項的總數
def test_number(self):
all_number = 18
return all_number
# 進度條參數顯示
def step_number(self):
global test_item_num
all_number = self.test_number()
# print(all_number)
number = (1 / all_number) * 100
test_item_num = test_item_num + number
self.jin_du.configure(amountused=int(test_item_num))
# 輸出到下方提示框
def out_put(self, output: str):
self.scr_explain.insert(END, "{}\n".format(output))
self.scr_explain.yview_moveto(1)
def tool_exit(self):
confirmation_information = messagebox.askquestion('確認操作', '確定退出工具?')
if confirmation_information == "no":
self.out_put("退出操作已取消!")
return
sys.exit()
# 清空表格
def delButton(self, tree):
x = tree.get_children()
for item in x:
tree.delete(item)
def run_main(self):
# 清空表格和下方提示框
self.scr_explain.delete(0.0, END)
self.delButton(self.tree_date)
# 進度條清空
global test_item_num
test_item_num = 0
self.jin_du.configure(amountused=0)
# 進度條顯示變藍
self.jin_du.configure(boot)
self.scr_explain.delete(0.0, END)
self.delButton(self.tree_date)
# 建立起制式表頭
sf1 = self.tree_date.insert('', END, text='第一個循環', open=True)
complete_time = time.strftime("%Y.%m.%d %H:%M:%S", time.localtime())
for num in range(1, 10):
# 顯示進度條
self.step_number()
time.sleep(0.1)
self.out_put("表格加載第{}次!".format(num))
data = ["張三", "18", "70kg", "ok", num, complete_time]
# 直接在已有數據後填充
idd = self.tree_date.insert(sf1, END, values=tuple(data))
self.tree_date.see(idd)
self.tree_date.update()
num += 1
# 建立起制式表頭
sf2 = self.tree_date.insert('', END, text='第二個循環', open=True)
for num in range(1, 10):
# 顯示進度條
self.step_number()
time.sleep(0.1)
self.out_put("表格加載第{}次!".format(num))
data = ["李四", "18", "70kg", "ok", num, complete_time]
# 直接在已有數據後填充
idd = self.tree_date.insert(sf2, END, values=tuple(data))
self.tree_date.see(idd)
self.tree_date.update()
num += 1
# 進度條
test_item_num = 0
self.jin_du.configure(boot, amountused=100)
self.out_put("程序運行完成!")
def set_command(self):
self.exit_button.configure(command=self.tool_exit)
self.run_button.configure(command=lambda: MyThread(self.run_main))
# 用x鍵,防止文件未創建
self.window.protocol("WM_DELETE_WINDOW", self.tool_exit)
def main(self):
self.interface_main()
self.set_command()
self.window.mainloop()
if __name__ == '__main__':
data_handle = DataHandle()
data_handle.main()
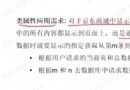
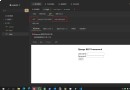
整體界面如下: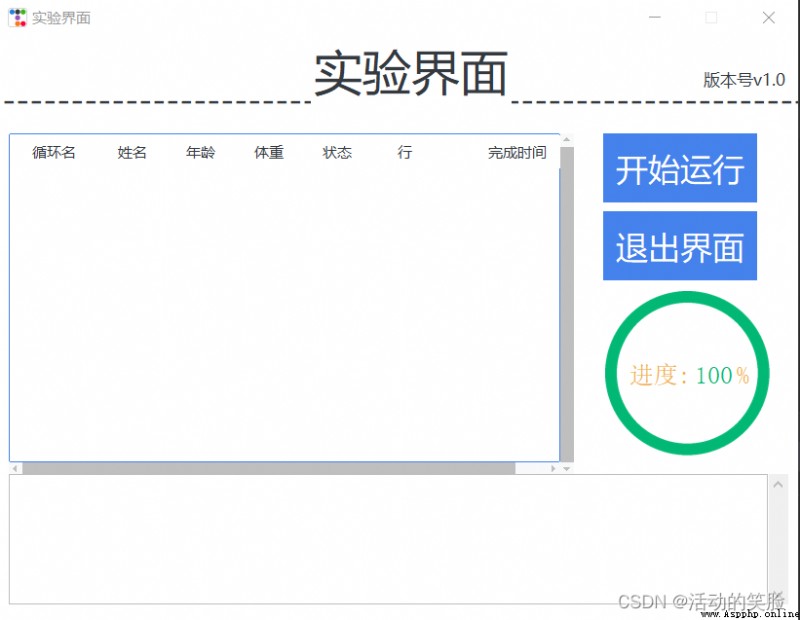
這裡采用了界面與邏輯分類的寫法,代碼整體簡潔和易讀,同時增加一下新功能,能更全面反饋代碼運行的過程。