ZOS-API Is a powerful tool,在 ZOS-API 中,The user can execute it programmaticallyOpticStudio All actions possible in the user interface(以及更多操作).本文將展示如何使用 Python 與 ZOS-API interact to create a single lens、Add merit function ( Merit Function ) 目標,並優化系統.(Contact us for article attachments)
此示例使用 COM 接口通過 pywin32 模塊將 Python 連接到 ZOS-API.But we don't recommend doing this right now.
本文將通過使用 ZOS-API 中的 Python Connect to build and optimize a single lens system step by step.Take advantage of standalone applications ( Standalone Application ) 功能,This feature allows the user to default Python code in the program,Then run to get working OpticStudio 文件.
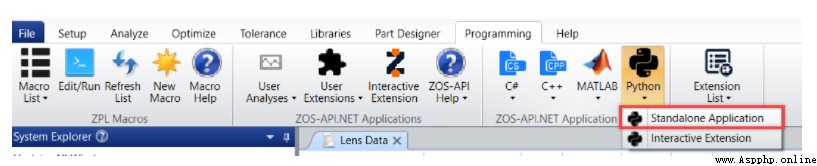
This article will focus on the standalone mode ( Standalone Mode ).The first step is by clicking:編程 ( Programming ) > Python > 獨立應用程序 ( Standalone Application ) ,Create template solutions.
Windows Explorer opens the folder with the solution {Zemax}\ZOS-API Projects\PythonStandaloneApplication.
Use the following tool pairsPythonProjects and scripts for testing:
Windows(64位)中安裝的 Python 3.7.2 (https://www.python.org/downloads/)-Python編譯器
用於 Windows 擴展的 Python (64位, Python 3.7) (https://github.com/mhammond/pywin32/releases) - 支持COM
Windows 桌面上的 Microsoft Visual Studio Express 2013 (https://www.visualstudio.com/en-us/products/visual-studio-express-vs.aspx) - 易於使用的 IDE
Visual Studio 中的 Python工具 (https://pytools.codeplex.com/)- 集成到 Visual Studio
注意,Visual Studio 和 PythonTools make development easier,但是 Python Scripts should run without them installed.如果安裝了 Visual Studio,It will open with the new solution,The solution contains template code that can be used as the basis for any standalone application.
A single lens with the following design specifications:
Light comes from infinity,The half field of view is 5°,單一波長(d光,0.587mm).
Collimated incident light is focused to a minimumRMSSpot radius,uniformly into the field of view.
F 數為10,The entrance pupil diameter is 40 mm.
材料為 N-BK7.
The diaphragm is a separate surface behind the lens,可以自由移動.
至少3sheet lens,And the center thickness does not exceed15mm.
The lens has a minimum edge thickness of 3mm,The air gap is a minimum of 0.5 mm
在腳本中,轉到 “# Insert Code Here” 然後輸入:
TheSystem = zosapi.TheSystem;
 TheSystem.New(False);
The above program represents a complete optical system,corresponds to independent . ZMX文件.Now create a string containing the path to the new file.To make the script more flexible,將使用 SamplesDirproperty to create the file path.
fileOut = zosapi.TheApplication.SamplesDir + "\Sequential\Objectives\Single Lens Example wizard+EFFL.zmx";
 zosapi.TheSystem.SaveAs(fileOut);
TheSystemDataContains all basic data of the system,It can be used to set the aperture、視場、波長等.
# Aperture
 TheSystemData = TheSystem.SystemData;
 TheSystemData.Aperture.ApertureValue = 40;

 # Fields
 TheSystemData.Fields.AddField(0,5.0,1.0);

 # Wavelength preset
 TheSystemData.Wavelengths.SelectWavelengthPreset(constants.WavelengthPreset_d_0p587);
For enum constants,如: WavelengthPreset, Python Create each constant as{enum name}_{enum value}.
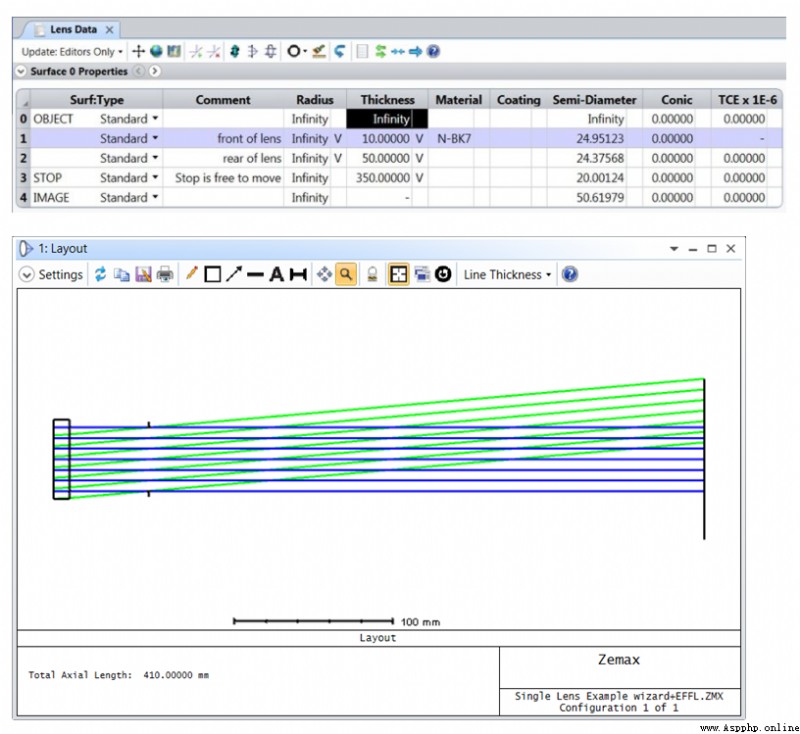
in the Shot Data Editor,Each row represents a surface defined in the system:表面0is the object plane,The last surface is the image surface.For a singlet lens located in front of the diaphragm,The front surface of the lens is the surface1,The rear surface of the lens is the surface2,The diaphragm is the surface3.
# Lens data
 TheLDE = TheSystem.LDE;
 TheLDE.InsertNewSurfaceAt(1);
 TheLDE.InsertNewSurfaceAt(1);
 Surface_1 = TheLDE.GetSurfaceAt(1);
 Surface_2 = TheLDE.GetSurfaceAt(2);
 Surface_3 = TheLDE.GetSurfaceAt(3);
 Surface_1.Thickness = 10.0;
 Surface_1.Comment = 'front of lens';
 Surface_1.Material = 'N-BK7';
 Surface_2.Thickness = 50.0;
 Surface_2.Comment = 'rear of lens';
 Surface_3.Comment = 'Stop is free to move';
 Surface_3.Thickness = 350.0;
可以用5independent variables to achieve the design goals——The front and rear radius of the lens、The thickness of the lens、The position of the diaphragm and the position of the image.
# Make thicknesses and radii variable
 Surface_1.RadiusCell.MakeSolveVariable();
 Surface_1.ThicknessCell.MakeSolveVariable();
 Surface_2.RadiusCell.MakeSolveVariable();
 Surface_2.ThicknessCell.MakeSolveVariable();
 Surface_3.ThicknessCell.MakeSolveVariable();
如果想在 OpticStudio Open the file in to see the current progress,First you need to save the lens file using the following code:
# Save and close
 The System.Save();
This code needs to stay at the end of anything else typed,But it will now be used to check the system.Make sure anything you add after this comes before this code in the editor.
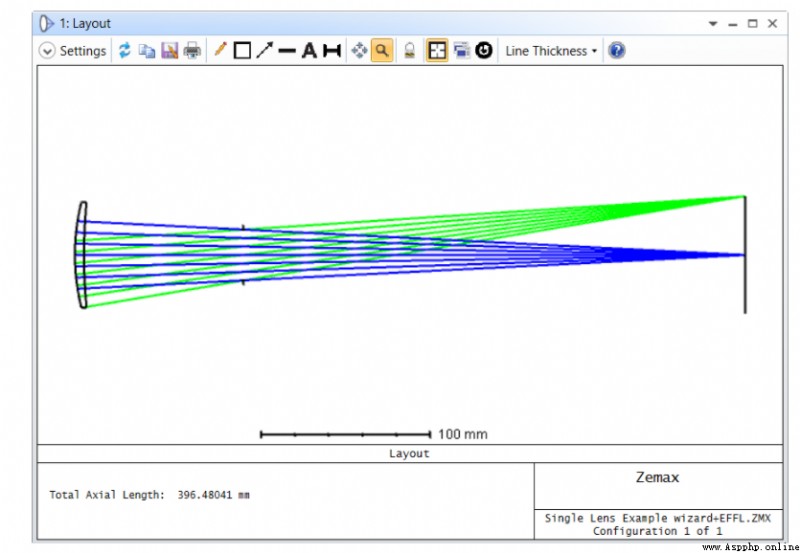
When running the code without getting any error message,Lens files can be opened by navigating to the directory specified above: {Zemax}\Samples\Sequential\Objectives ,並選擇文件.The Lens Data Editor will look like this:
Use the Sequence Optimization Wizard ( Sequential Optimization Wizard ) Specify the minimum spot radius in the default merit function ( Minimum Spot Radius ) 和玻璃/The target value of the air boundary condition.
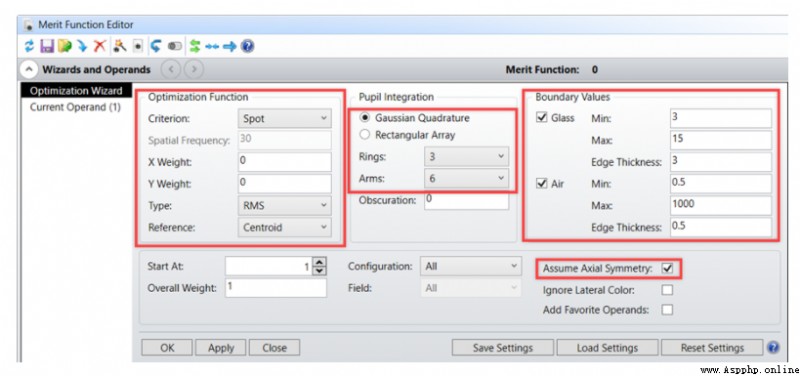
如上圖所示,Use the following code to set up the optimization wizard:
# Merit functions
 TheMFE = TheSystem.MFE;

 wizard = TheMFE.SEQOptimizationWizard;

 wizard.Type = 0;        # RMS
 wizard.Data = 1;        # Spot Radius
 wizard.Reference = 0;   # Centroid
 wizard.Ring = 2;        # 3 Rings
 wizard.Arm = 0;         # 6 Arms

 wizard.IsGlassUsed = True;
 wizard.GlassMin = 3;
 wizard.GlassMax = 15;
 wizard.GlassEdge = 3;

 wizard.IsAirUsed = True;
 wizard.AirMin = 0.5;
 wizard.AirMax = 1000;
 wizard.AirEdge = 0.5;

 wizard.IsAssumeAxialSymmetryUsed = True;
 wizard.CommonSettings.OK();
通過 OpticStudio of all available wizards CommonSettings 部分,可以實現“OK 按鈕”的功能.
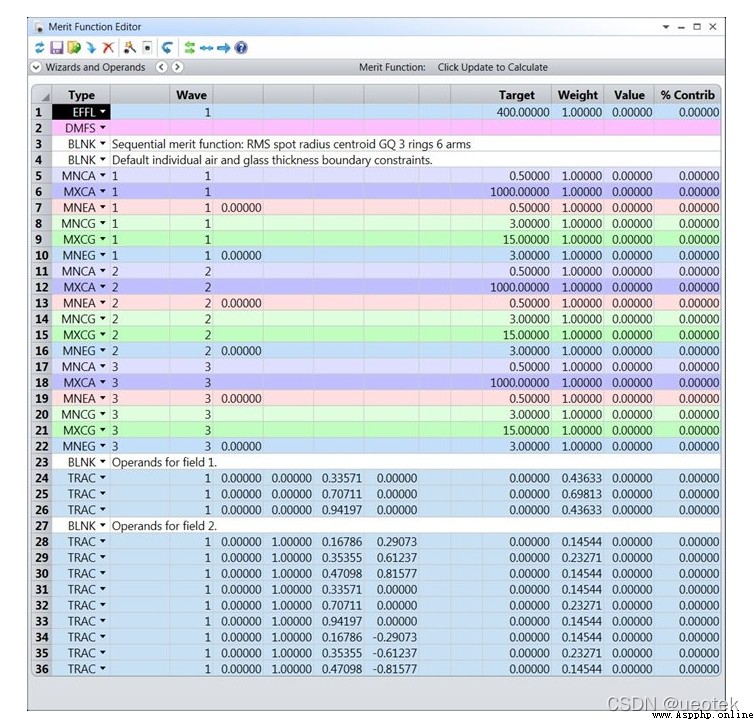
Since the lens is before the diaphragm,不能使用F數求解,We will not know which ray is the rim ray,until it reaches the edge of the diaphragm.這意味著除了 RMS The dot plot is outside the default merit function,還必須使用 EFFL 操作數.Add another line at the top of the evaluation function,Set the target value of the effective focal length as 400mm,權重設為1.
Operand_1=TheMFE.InsertNewOperandAt(1);
 Operand_1.ChangeType(constants.MeritOperandType_EFFL);
 Operand_1.Target = 400.0;
 Operand_1.Weight = 1.0;
設置完成之後,The evaluation function is shown below:
Now access properties and methods for running local optimizations,And make the settings in the graphical user interface as shown in the figure below:
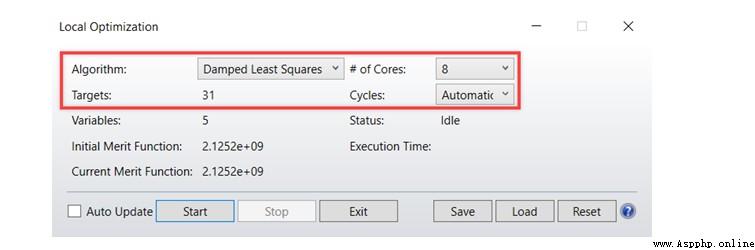
# Local optimisation till completion
 LocalOpt = TheSystem.Tools.OpenLocalOptimization();
 LocalOpt.Algorithm = constants.OptimizationAlgorithm_DampedLeastSquares;
 LocalOpt.Cycles = constants.OptimizationCycles_Automatic;
 LocalOpt.NumberOfCores = 8;
 baseTool = CastTo(LocalOpt, "ISystemTool")
 baseTool.RunAndWaitForCompletion();
 baseTool.Close();
由於 Python COM The way an interface handles inheritance,OpenLocalOptimization() 返回ILocalOptimization接口,And all run、Close and so on all return ISystemTool 接口.因此,A derived class object needs to be converted to a base class object,to access the content in the base class.
最後,Save the file after optimization is complete.
# Save and close
 TheSystem.Save();
運行腳本之後,在 OpticStudio 中打開. ZMX 文件,And check out the optimized footage.