三、緩存
Cache can be anywhere,如內存、文件、數據庫、memory of other machines, etc.
Django提供的緩存機制:
1、開發調試(虛擬緩存)
2、內存 (本地內存)
3、文件
4、數據庫
5、Memcache緩存(python-memcached模塊) (分布式內存)
6、Memcache緩存(pylibmc模塊) (分布式內存)
設置緩存:
緩存系統需要少量的設置.It is necessary to know where the cached data should be placed —— is in the database,Still on the file system,or directly in memory.這是一個重要的決定,will affect the performance of your cache;Some cache types are faster than others.
The cache settings items are located in the cache configuration of the configuration file.
在settings.py中增加:
CACHES = {
'default': {
'BACKEND': 'django.core.cache.backends.dummy.DummyCache', # 引擎
'TIMEOUT': 300, # 緩存超時時間,默認300,None表示永不過期,0表示立即過期
'OPTIONS': {
'MAX_ENTRIES': 300, # 最大緩存條數,默認300
'CULL_FREQUENCY': 3, # 當達到 MAX_ENTRIES 時,The proportion of entries that were deleted.The actual ratio is 1 / CULL_FREQUENCY
},
'KEY_PREFIX': '', # 緩存key的前綴(默認空
'VERSION': 1, # 緩存key的版本,默認1
'KEY_FUNCTION': hanshu_函數名, # 生成key的函數,默認函數會生成:【前綴:版本:key】
}
}
The above is the development and debugging,That is, the configuration of the virtual cache,其他的緩存,主要是BACKEND的不同:
'django.core.cache.backends.db.DatabaseCache'
'django.core.cache.backends.dummy.DummyCache'
'django.core.cache.backends.filebased.FileBasedCache'
'django.core.cache.backends.locmem.LocMemCache'
'django.core.cache.backends.memcached.PyMemcacheCache'
'django.core.cache.backends.memcached.PyLibMCCache'
Another important configuration item is LOCATION,Specifies the location of the cache.
對於內存緩存,'django.core.cache.backends.locmem.LocMemCache',其LOCATION指定緩存的名字,相當於一個變量名,A memory cache is an area in memory,可以看成是一個字典,這裡的LOCATIONis the name of this dictionary,‘LOCATION’:‘unique-snowflake’,
For file caching,'django.core.cache.backends.filebased.FileBasedCache',其LOCATIONSpecifies the folder location for the cache,如'LOCATION': '/var/tmp/django_cache',
For database caching,'django.core.cache.backends.db.DatabaseCache',其LOCATIONSpecifies the cached database table name,如‘LOCATION’:‘my_cache_table’,需要執行創建表命令:python manage.py createcachetable
對於Memcache——python-memcached,'django.core.cache.backends.memcached.PyMemcacheCache',其LOCATIONSpecify another machine:
1)‘LOCATION’:‘127.0.0.1:11211’, 以IPand port connection
2)‘LOCATION’:‘unix:/tmp/memcached.sock’,以socket方式連接,一個文件,The connection information is written in the file,Only connect to this unit.
3)'LOCATION':['172.1.1.1:12211','172.1.1.2:12211',],A list specifies multiple machines,It's a cluster,There can also be tuple items in the list,指定權重:
'LOCATION':[('172.1.1.1:12211',10),('172.1.1.2:12211',20),],
對於'django.core.cache.backends.memcached.PyLibMCCache'同上面.
應用:Mainly used throughout the site、單獨視圖緩存、局部視圖使用
1、單獨視圖緩存
首先配置settings,然後使用裝飾器cache_page:
# settings中的配置
CACHES = {
'default': {
'BACKEND': 'django.core.cache.backends.filebased.FileBasedCache',
'LOCATION': os.path.join(BASE_DIR,'cache'),
}
}
Individual view functions use decorators to use the cache:
# 後台視圖函數,引入裝飾器,Use caching for individual functions
from django.views.decorators.cache import cache_page
@cache_page(20) # The parameter represents the timeout period,單位是秒
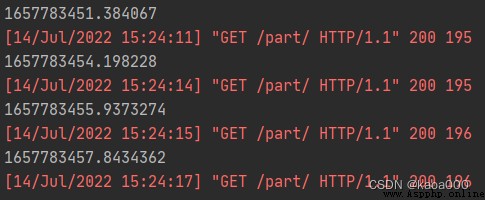
def cache(req):
import time
v = time.time()
print(v)
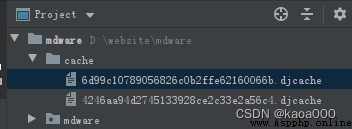
return HttpResponse(v)運行後,The contents appear in the folder:
看運行結果:
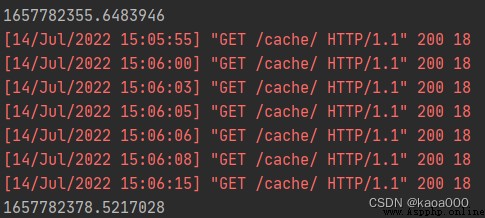
第一次請求時,The view function runs and prints the time,None of the subsequent requests were run,20秒後,緩存過期,The function runs again,打印.
2、Local cache usage,(Partial caching of front-end pages)
used on templates,在模板中,Introduce the template tag first,即引入TemplateTag:{% load cache %}
Then use the cache:{% cache 10 緩存key %} 緩存內容 {% endcache %}
視圖函數:
def part(req):
import time
v = time.time()
print(v)
return render(req,'part.html',{'v':v})
前端模板:
{% load cache %}
<!DOCTYPE html>
<html lang="en">
<head>
<meta charset="UTF-8">
<title>Title</title>
</head>
<body>
<h1>{
{ v }}</h1>
{% cache 20 key-11 %}
<h3>{
{ v }}</h3>
{% endcache %}
</body>
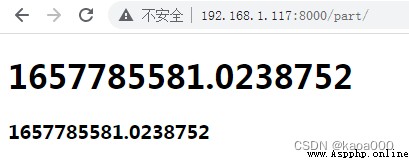
</html>cache here<h3>的內容,在緩存中,The value of its key will be “:1:key-11”.
訪問時:在緩存時間內,H1數據一直變化,H3是不變的,This data comes from the cache.
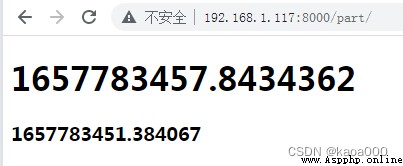
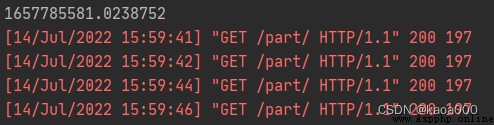
Printing results in the background:
It is printed on every request,That is, the function is executed,Description function is not cached.
3、全站使用,(To use middleware)
Generally two middleware are used,One is placed at the beginning of the middleware chain,一個放在最後,in the last middleware,執行process_request,Put the first middleware,執行process_response.
The reason for this:A request comes,is required to go through allprocess_request的,It's like passing a security check,安檢過後,to determine whether it is in the cache,That is, the cache is judged before executing the view function,If not on the last one,It is possible that the data can be obtained even if the security check is not passed,This is the reason for the last middleware,This middleware is the function of fetching the cache,There is also a middleware in the first place,It mainly performs the caching function of data,是執行process_response,This is because for what is returned,Other middleware may be modified,如果不是第一個,It's not the last executionprocess_response的中間件,The cached content may not be final.(It must be understood in conjunction with the execution order of the previous middleware).
One of these two middleware is'django.middleware.cache.UpdateCacheMiddleware'——Update cache content,Implement content caching and 'django.middleware.cache.FetchFromCacheMiddleware'——Get content from cache.
配置如下:
MIDDLEWARE = [
'django.middleware.cache.UpdateCacheMiddleware',
# 其他中間件...
'django.middleware.cache.FetchFromCacheMiddleware',
]
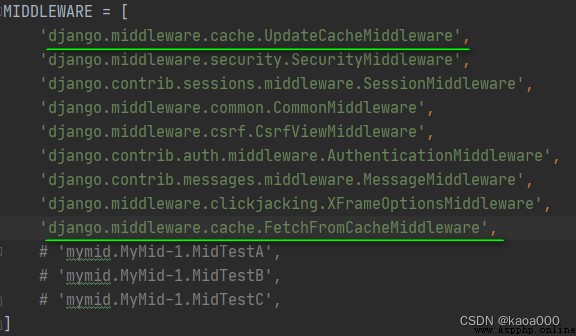
這樣配置後,Sitewide caching is enabled.
Then visit the previous onepart頁面時,H1和H3content has not changed,都進行了緩存.
四、信號(Django預留的鉤子)
Django有一個“信號調度器(signal dispatcher)”,用來幫助解耦的應用獲知框架內任何其他地方發生了操作.簡單地說,信號允許某些 發送器 去通知一組 接收器 某些操作發生了.當許多代碼段都可能對同一事件感興趣時,信號特別有用.
內置信號集 使用戶代碼能夠獲得 Django 自身某些操作的通知
內置信號:
Model signals
pre_init # django的model執行其構造方法前,自動觸發
post_init # django的model執行其構造方法後,自動觸發
pre_save # django的model對象保存前,自動觸發
post_save # django的model對象保存後,自動觸發
pre_delete # django的model對象刪除前,自動觸發
post_delete # django的model對象刪除後,自動觸發
m2m_changed # django的model中使用m2m字段操作第三張表(add,remove,clear)前後,自動觸發
class_prepared # 程序啟動時,檢測已注冊的app中modal類,對於每一個類,自動觸發
Management signals
pre_migrate # 執行migrate命令前,自動觸發
post_migrate # 執行migrate命令後,自動觸發
Request/response signals
request_started # 請求到來前,自動觸發
request_finished # 請求結束後,自動觸發
got_request_exception # 請求異常後,自動觸發
Test signals
setting_changed # 使用test測試修改配置文件時,自動觸發
template_rendered # 使用test測試渲染模板時,自動觸發
Database Wrappers
connection_created # 創建數據庫連接時,自動觸發
對於Django內置的信號,僅需注冊指定信號,當程序執行相應操作時,自動觸發注冊函數:
from django.core.signals import request_finished
from django.core.signals import request_started
from django.core.signals import got_request_exception
from django.db.models.signals import class_prepared
from django.db.models.signals import pre_init, post_init
from django.db.models.signals import pre_save, post_save
from django.db.models.signals import pre_delete, post_delete
from django.db.models.signals import m2m_changed
from django.db.models.signals import pre_migrate, post_migrate
from django.test.signals import setting_changed
from django.test.signals import template_rendered
from django.db.backends.signals import connection_created
def callback(sender, **kwargs):
print("xxoo_callback")
print(sender,kwargs)
xxoo.connect(callback)
# xxoo指上述導入的內容,即pre_init、post_init等,如pre_init.connect(callback)
注冊的時機,Because it is to perform signal processing on all one-class operations,All programs must be registered as soon as they run.So generally written in the application__init__.py中.
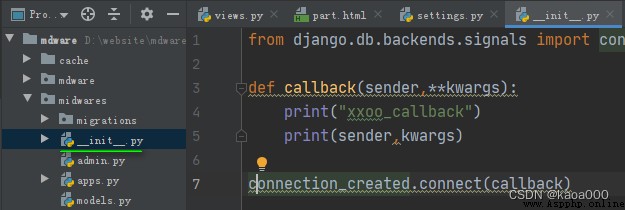
啟動項目,會打印:
xxoo_callback
<class 'django.db.backends.sqlite3.base.DatabaseWrapper'> {'signal': <django.dispatch.dispatcher.Signal object at 0x000000000B796160>, 'connection': <django.db.backends.sqlite3.base.DatabaseWrapper object at 0x000000000AD99C50>}
測試model的信號pre_init和post_init:
創建models類:
from django.db import models
# Create your models here.
from django.db import models
class User(models.Model):
username = models.CharField(max_length=32)
pwd = models.CharField(max_length=32)
注冊信號:
from django.db.backends.signals import connection_created
from django.core.signals import request_finished
from django.core.signals import request_started
from django.core.signals import got_request_exception
from django.db.models.signals import class_prepared
from django.db.models.signals import pre_init, post_init
from django.db.models.signals import pre_save, post_save
from django.db.models.signals import pre_delete, post_delete
from django.db.models.signals import m2m_changed
from django.db.models.signals import pre_migrate, post_migrate
from django.test.signals import setting_changed
from django.test.signals import template_rendered
def callback(sender,**kwargs):
print("xxoo_callback")
print(sender,"-----",kwargs)
def callback2(sender,**kwargs):
print("xxoo_callback2")
print(sender,"-----",kwargs)
connection_created.connect(callback)
pre_init.connect(callback)
post_init.connect(callback2)
視圖函數:
def signal(req):
from midwares import models
oo = models.User(username='root',pwd='123')
return HttpResponse('ok')
urls中增加 : path('signal/',views.signal),
前端訪問signal:打印結果
xxoo_callback
<class 'midwares.models.User'> ----- {'signal': <django.db.models.signals.ModelSignal object at 0x000000000AFF3198>, 'args': (), 'kwargs': {'username': 'root', 'pwd': '123'}}
xxoo_callback2
<class 'midwares.models.User'> ----- {'signal': <django.db.models.signals.ModelSignal object at 0x000000000AFF34A8>, 'instance': <User: User object (None)>}
對於callback,是pre_initinformation is registered,Executed before instantiation,sender是<class 'midwares.models.User'>,說明是UserClass-triggered signal,參數中args是位置參數,No positional parameters are passed here,kwargs是我們創建UserParameters passed when class object,username=root,pwd=123,These can then be logged before instantiation.
對於callback2,is executed after instantiation,參數instance是實例化後的對象
以上是DjangoDefined built-in signals,Next we customize our own signal:
1)定義信號:
import django.dispatch
pizza_done = django.dispatch.Singnal(providing_args=["toppings","size"])
def mysignal(req):
from midwares import pizza_done # 從應用的__init__.py模塊中引入,Just write the name of the application,不必加__init__
pizza_done.send(sender='調用者',toppings='123',size='456') # 自定義的信號,You need to trigger it yourself,A trigger is a callsend方法
return HttpResponse('ok')
2)注冊信號:
def callback(sender,**kwargs):
print("callback")
print(sender,kwargs)
pizza_done.connect(callback)
3)觸發信號:
from 路徑 import pizza_done
pizza_done.send(sender='seven',toppings=123,size=456)
示例測試:
在__init__.pyDefine signals and register signals in :
# The following is the definition signal
import django.dispatch
pizza_done = django.dispatch.Signal(providing_args=['toppings','size'])
# 定義回調函數,注冊信號
def callback3(sender,**kwargs):
print("自定義信號callback3")
print(sender,kwargs)
pizza_done.connect(callback3)
觸發信號:You need to trigger it yourself in the view function
def mysignal(req):
from midwares import pizza_done # 從應用的__init__.py模塊中引入,Just write the name of the application,不必加__init__
pizza_done.send(sender='調用者',toppings='123',size='456') # 自定義的信號,You need to trigger it yourself,A trigger is a callsend方法
return HttpResponse('ok')
運行結果:
自定義信號callback3
調用者 {'signal': <django.dispatch.dispatcher.Signal object at 0x000000000B786198>, 'toppings': '123', 'size': '456'}
應用場景:Reserve plug-in interface,如某操作後,需要發送提醒,It started with text messages,Mail was added later,We are increasing WeChat、QQ等,Signals are used in this case,只要增加callback函數,Just register the signal.
五、BootStrap,集成了css、js一個文件夾 --- 響應式+模板
css:Introduce the corresponding in the front-end web pagecss,在head中:<link rel="stylesheet" href="/static/bootstrap/css/bootstrap.css" >
響應式:
<!DOCTYPE html>
<html lang="en">
<head>
<meta charset="UTF-8">
<title>Title</title>
<link rel="stylesheet" href="/static/bootstrap-5.1.3-dist/css/bootstrap.css">
<style>
.pg-header{
height: 48px;
background-color: black;
}
@media (max-width: 700px) {
.extra{
background-color: yellow;
}
}
</style>
</head>
<body>
<div class="pg-header extra"></div>
</body>
</html>

上面的頁面,As the width of the browser window changes,在700px以上,divThe background is black,縮小的700px以下時,背景變為黃色.這就是響應式.主要是使用@media,bootstrap中的containerIt's a responsive container
bootstrapGrid styles are provided in :col-sm-xx,col-md-xx
js:需要先引入jQuery,然後引入bootstrap.js