今天給大家分享一個簡單的Python腳本,使用python進行http接口的自動化測試,腳本很簡單,邏輯是:讀取excel寫好的測試用例,然後根據excel中的用例內容進行調用,判斷預期結果中的返回值和返回報文中的值是否一致,如果不一致則根據用例標題把bug提交到bug管理系統,這裡使用的bug管理系統是bugfree。最後統計測試結果:總共執行多少條用例、通過多少條用例,失敗多少條用例,郵件標題加上當前時間,將測試結果發送到指定郵箱。
實現步驟:
1、讀取excel,保存測試用例中的內容,這裡需要定義一個讀取excel的函數readExcel();
2、根據excel中的請求url和參數拼接請求報文,調用接口,並保存返回報文,這裡需要定義一個將請求數據轉換為字典的函數param_To_Dic();
3、讀取返回報文,和預期結果對比,不一致的往bugfree數據庫中寫入一條bug,並且把請求報文、返回報文和測試結果寫到測試用例的excel中,這裡需要定義一個比對預期結果和返回結果的函數contrastRes(),一個往bugfree提交bug的函數writeBug(),一個將測試結果寫入excel的函數copy_excel(),還需定義一個接口請求的函數interfaceTest()。
4、統計測試結果,發送測試郵件。需定義一個send_email()的函數。
http接口最常用的兩種請求方式,POST和GET兩種方法,這篇博客分享的就是最簡單常用的url請求。例如:http://192.168.21.129/bugfree/index.php/info/edit?type=bug&action=opened&product_id=1
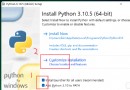
需要用的到幾個模塊有:requests、xlrd(讀取excel)、xlutils(寫excel)、pymysql(連接數據庫)、yagmail(發送郵件)這五個模塊都是第三方模塊,需要自己單獨安裝。
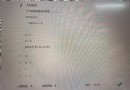
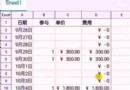
首先在excel中寫好用例,需要有的字段 項目、用例id、接口名稱、用例描述、請求方式、請求url、請求數據(多個的參數話用&分號隔開)、預期結果、請求報文、返回報文、測試人員、測試結果
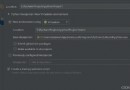
首先我們將項目框架建起來,如下圖所示:
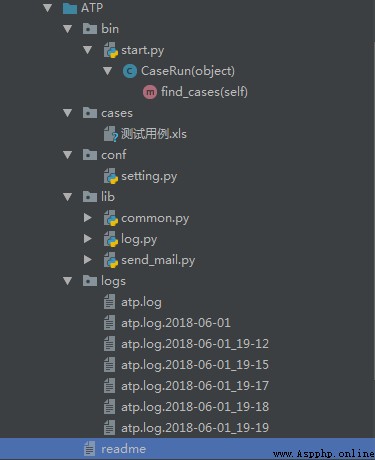
cases目錄中是放excel測試用例,conf文件夾是配置文件,lib目錄是存放主邏輯的,logs目錄裡是日志文件,bin目錄下是啟動文件,運行start.py即可運行該項目
1.excel中測試用例書寫格式如下圖所示:

2.我們編寫lib中的主邏輯,將上面分析出的所需要的函數寫在common.py中,代碼如下:
class OpCase(object):
def get_case(self,file_path):
cases = [] #存放所有的case
if file_path.endswith('.xls') or file_path.endswith('.xlsx'):
try:
book = xlrd.open_workbook(file_path)
sheet = book.sheet_by_index(0)
for i in range(1,sheet.nrows):
row_data = sheet.row_values(i)
cases.append(row_data[4:11])
atp_log.info('共讀取%s條用例'%(len(cases)))
self.file_path = file_path
except Exception as e:
atp_log.error('【%s】用例獲取失敗,錯誤信息:%s'%(file_path,e))
else:
atp_log.error('用例文件不合法的,%s'%file_path)
return cases
def my_request(self,url,method,data=None,cookie=None,header=None,files=None,is_json=False ):
method = method.upper()
data = self.dataToDict(data)
cookie = self.dataToDict(cookie)
header = self.dataToDict(header)
files = self.dataToDict(files)
atp_log.debug('【files轉為字典後是:%s】' % files)
data = data if data else {}
cookie = cookie if cookie else {}
header = header if header else {}
if files:
files = {
"file":open(files['files'],"rb")
}
else:
files = {}
try :
if method=='POST':
try:
if is_json:
res = requests.post(url, json=data, cookies=cookie, headers=header, files=files,verify=False).text
else:
res = requests.post(url, data=data, cookies=cookie, headers=header, files=files,verify=False).text
atp_log.debug('【接口返回數據:%s】' % res)
print('res...', res)
except Exception as e:
res = str(e) # 如果接口調用出錯的話,那麼就返回一個有錯誤信息的字典
atp_log.error('異常信息:接口調用失敗! url 【%s】 data 【%s】 實際結果是 【%s】' % (url, data, res))
elif method=='GET':
try:
# verify=False 的意思就是https能訪問
res = requests.get(url, params=data, cookies=cookie, headers=header, verify=False).text
atp_log.debug('【接口返回數據:%s】' % res)
except Exception as e:
res = str(e) # 如果接口調用出錯的話,那麼就返回一個有錯誤信息的字典
atp_log.error('異常信息:接口調用失敗! url 【%s】 data 【%s】實際結果是 【%s】' % (url, data,res))
return res
else:
atp_log.warning('該請求方式暫不支持。。')
res = '該請求方式暫不支持。。'
except Exception as e:
msg = '【%s】接口調用失敗,%s'%(url,e)
atp_log.error(msg)
res = msg
return res
def check_res(self,res,check):
res = res.replace('": "','=').replace('": ','=')
for c in check.split(','):
if c not in res:
atp_log.info('結果校驗失敗,預期結果:【%s】,實際結果【%s】'%(c,res))
return '失敗'
return '成功'
def write_excel(self,cases_res):
# [ ['dsfd',"通過"] ,['sdfsdf','失敗'] ]
book = xlrd.open_workbook(self.file_path)
new_book = copy.copy(book)
sheet = new_book.get_sheet(0)
row = 1
for case_case in cases_res:
sheet.write(row,11,case_case[0]) #寫第11列
sheet.write(row,12,case_case[1]) #寫第12列
row+=1
new_book.save(self.file_path.replace('xlsx','xls'))
def dataToDict(self,data=None):
if data:
#把數據轉成字典
res = {}
data = data.split(',')
for d in data:
#a=
k,v = d.split('=')
res[k]=v
return res
3.寫日志的模塊,代碼如下:
可以引用一個簡單的log模塊,只需要pip install nnlog即可使用,詳細教程參照牛牛博客:www:nnzhp.cn/archives/646
class MyLogger():
def __init__(self,file_name,level='info',backCount=5,when='D'):
logger = logging.getLogger() # 先實例化一個logger對象,先創建一個辦公室
logger.setLevel(self.get_level(level)) # 設置日志的級別的人
cl = logging.StreamHandler() # 負責往控制台輸出的人
bl = handlers.TimedRotatingFileHandler(filename=file_name, when=when, interval=1, backupCount=backCount, encoding='utf-8')
fmt = logging.Formatter('%(asctime)s - %(pathname)s[line:%(lineno)d] - %(levelname)s: %(message)s')
cl.setFormatter(fmt) # 設置控制台輸出的日志格式
bl.setFormatter(fmt) # 設置文件裡面寫入的日志格式
logger.addHandler(cl)
logger.addHandler(bl)
self.logger = logger
def get_level(self,str):
level = {
'debug':logging.DEBUG,
'info':logging.INFO,
'warn':logging.WARNING,
'error':logging.ERROR
}
str = str.lower()
return level.get(str)
path = os.path.join(setting.LOG_PATH,setting.LOG_NAME) #拼好日志的絕對路徑
atp_log = MyLogger(path,setting.LEVEL).logger
#直接在這裡實例化,用的時候就不用再實例化了
4.發送郵件函數,代碼如下:
def sendmail(title,content,attrs=None):
m = yagmail.SMTP(host=setting.MAIL_HOST,user=setting.MAIL_USER
,password=setting.MAIL_PASSWORD,smtp_ssl=True
)
m.send(to=setting.TO,subject=title,
contents=content,
attachments=attrs)
atp_log.info('發送郵件完成')
5.conf中配置文件進行參數的配置,詳細如下:
import os
BASE_PATH = os.path.dirname(
os.path.dirname(os.path.abspath(__file__))
)
MAIL_HOST='smtp.qq.com'
MAIL_USER='[email protected]'
MAIL_PASSWORD = 'xxxxxxxxxxx'
TO = [
'13[email protected]',
]
LEVEL = 'debug' #日志級別
LOG_PATH = os.path.join(BASE_PATH,'logs') #存放日志的路徑
CASE_PATH = os.path.join(BASE_PATH,'cases') #存放日志的路徑
LOG_NAME='atp.log' #日志的文件名
6.最後就是bin目錄下的運行文件start.py,代碼如下:
BASE_PATH = os.path.dirname(
os.path.dirname(os.path.abspath(__file__))
)
sys.path.insert(0,BASE_PATH)
from lib.common import OpCase
from lib.send_mail import sendmail
from conf import setting
class CaseRun(object):
def find_cases(self):
op = OpCase()
for f in os.listdir(setting.CASE_PATH):#每次循環的時候讀一個excel
abs_path = os.path.join(setting.CASE_PATH,f)
case_list = op.get_case(abs_path)
res_list = []
pass_count,fail_count = 0,0
for case in case_list:#循環每個excel裡面所有用例
url,method,req_data,cookie,header,files,check = case
res = op.my_request(url, method, req_data, cookie, header, files) # 調用完接口返回的結果
status = op.check_res(res,check)
res_list.append([res,status])
if status=='成功':
pass_count+=1
else:
fail_count+=1
op.write_excel(res_list) #寫入excel
msg = '''
xx你好:
本次共運行%s條用例,通過%s條,失敗%s條。
'''%(len(res_list),pass_count,fail_count)
# sendmail('測試用例運行結果',content=msg,attrs=abs_path)
CaseRun().find_cases()
7.另外readme裡面可以簡單介紹下該框架的運行環境,所依賴的模塊,簡單的思路和順序。
自此,基於數據驅動的接口自動化測試框架就已搭建成功,大家可以自己動手試試了。。。。
 Python calculates the area and perimeter of a circle. Analysis of the real problem of level 2 of the python programming level examination of the Electronic Society for youth programming march2021
Catalog python Calculate the a