ImageAI It's a python The library of , It enables developers to build applications and systems with deep learning and computer vision functions with a few lines of code . It is from Moses Olafenwa and John Olafenwa Developed and maintained by two .
Specifically git Address :https://github.com/OlafenwaMoses/ImageAI
Introduced a few years ago ImageAI How to use , But many small partners have encountered many problems, such as the versions of various dependent packages Cause failure of normal operation
Today again in git When looking at the update Found the official package Easy to download and use And name it DeepStack
file :https://docs.deepstack.cc/index.html
I will use several articles to briefly introduce DeepStack Use
a ImageAI It is more convenient
The official provides download methods for various environments
Here are CPU Two ways of version
docker It is a very popular container tool in recent years , It depends on Linux Kernel environment .
I won't give you too much introduction here , You can find installation tutorials on the Internet .
docker pull deepquestai/deepstack
Only need to deepstack Just pull it down A little big It's going to take a while 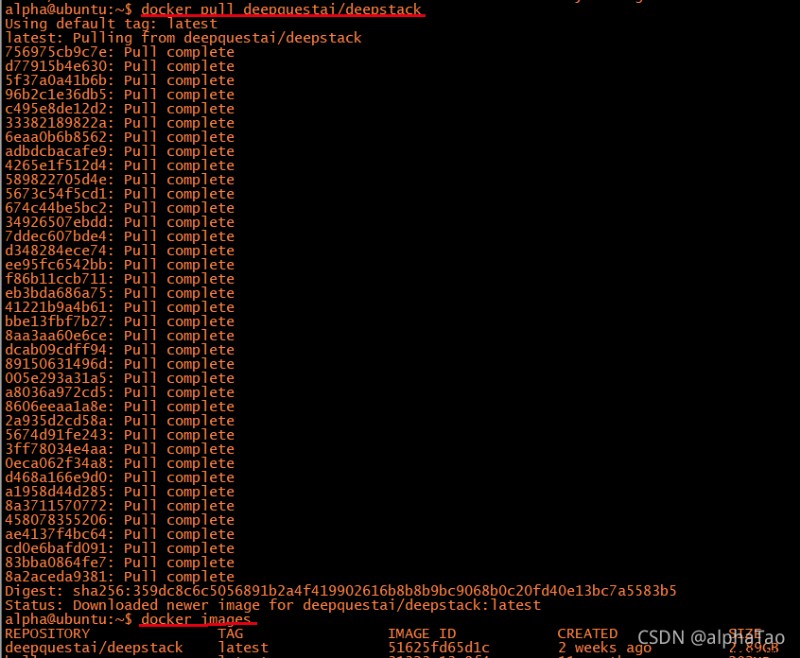
Address :https://docs.deepstack.cc/windows/
After downloading the installation package normally, click Install
Remember to add the installation address in the environment variable after installation
linux
docker run -e VISION-FACE=True -v localstorage:/datastore -p 8080:5000 deepquestai/deepstack
【 explain 】
-e VISION-FACE=True Open related face Of api
-v localstorage:/datastore Appoint DeepStack Where to store data
-p 8080:5000 Specifies that you can pass 8081 Port access DeepStack
windows
deepstack --VISION-FACE True --PORT 8080
After the installation starts, you can pass python call DeepStack
There are two ways of doing this 1. adopt url 2. Through the release of py package
If needed py package Need to download first
pip install deepstack-sdk --upgrade
Next, we will introduce face detection Face matching Face comparison
I will introduce both methods
import requests
from PIL import Image
import matplotlib.pyplot as plt
def useUrl():
host = "http://192.168.0.101:8080"
##load Images that need to be detected
image_data = open("jz.jpg","rb").read()
image = Image.open("jz.jpg").convert("RGB")
## call http://192.168.0.101:8080/v1/vision/face Detect the face in the picture
response = requests.post(host+"/v1/vision/face",files={
"image":image_data}).json()
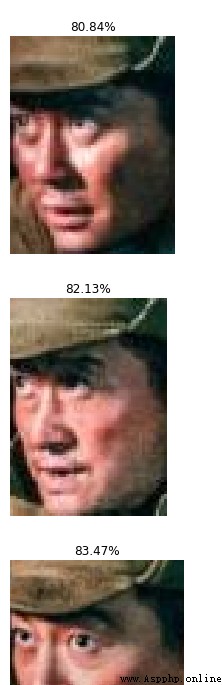
## Print the detected face
for face in response["predictions"]:
y_max = int(face["y_max"])
y_min = int(face["y_min"])
x_max = int(face["x_max"])
x_min = int(face["x_min"])
conf = face["confidence"]
confstr = format(conf*100,'.2f') ## The probability of face
cropped = image.crop((x_min,y_min,x_max,y_max))
plt.imshow(cropped)
plt.axis('off')
plt.title(confstr+"%")
plt.show()
Input pictures and results 
from deepstack_sdk import ServerConfig, Face
def pythonsdk():
## Connect DeepStack
config = ServerConfig("http://192.168.0.101:8080")
face = Face(config)
## Detect all faces in the picture
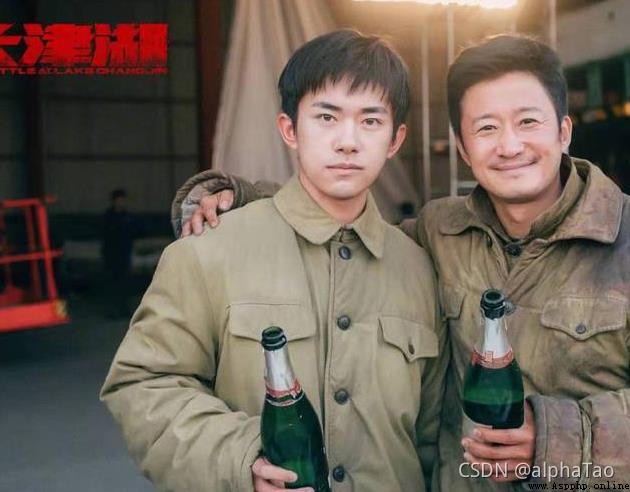
response = face.detectFace("jz.jpg",output="jz_output.jpg")
The results here will be shown in the picture
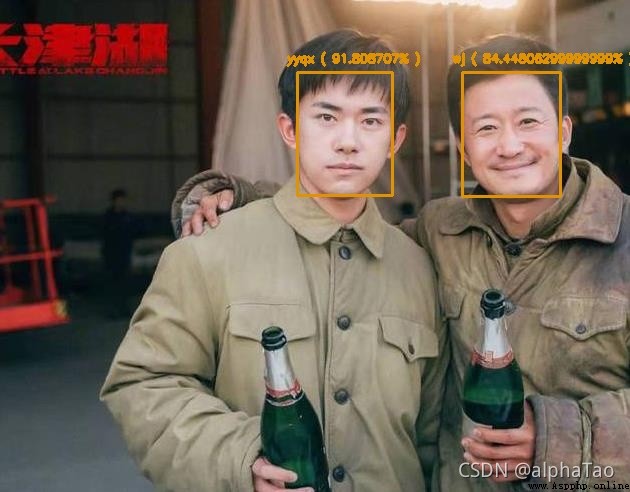
This function needs to prepare the tagged face in advance
After inputting the test picture Will match the faces in the picture
Functional specifications : You have prepared many photos of Wu Jing Then you can find Wu Jing in other group photos of Wu Jing and others
I used it here Photos of Wu Jing and Yiyang Qianxi
[ notes :] Because only two faces are used for labeling In order to get the ideal display results So the more similar the test face is to the label face, the better
import requests
from PIL import Image
import matplotlib.pyplot as plt
def useUrl():
host = "http://192.168.0.101:8080"
##/v1/vision/face/register Add a known face
user_image1 = open("wj1.jpg","rb").read()
user_image2 = open("wj2.jpg","rb").read()
response = requests.post(host+"/v1/vision/face/register",
files={
"image1":user_image1,"image2":user_image2},data={
"userid":"Wu Jing"}).json()
print(" Add Wu Jing ",response)
user_image1 = open("yy1.jpg","rb").read()
user_image2 = open("yy2.jpg","rb").read()
response = requests.post(host+"/v1/vision/face/register",
files={
"image1":user_image1,"image2":user_image2},data={
"userid":"Yi Yangqianxi"}).json()
print(" Add Yiyang Qianxi ",response)
##/v1/vision/face/list Print the currently recognizable face
faces = requests.post(host+"/v1/vision/face/list").json()
print(" Currently recognizable face :",faces["faces"])
##/v1/vision/face/recognize Detect the face in the picture
image_data = open("wjtest.jpg","rb").read()
image = Image.open("wjtest.jpg").convert("RGB")
response = requests.post(host+"/v1/vision/face/recognize",
files={
"image":image_data},data={
"min_confidence":0.4}).json()
for face in response["predictions"]:
userid = face["userid"]
y_max = int(face["y_max"])
y_min = int(face["y_min"])
x_max = int(face["x_max"])
x_min = int(face["x_min"])
conf = face["confidence"]
confstr = format(conf*100,'.2f')
cropped = image.crop((x_min,y_min,x_max,y_max))
plt.imshow(cropped)
plt.axis('off')
plt.title(userid+" "+confstr+"%")
plt.show()
## /v1/vision/face/delete Delete face
response = requests.post(host+"/v1/vision/face/delete",
data={
"userid":"Wu Jing"}).json()
print(" Delete Wu Jing ",response)
response = requests.post(host+"/v1/vision/face/delete",
data={
"userid":"Yi Yangqianxi"}).json()
print(" Delete Yiyang Qianxi ",response)

from deepstack_sdk import ServerConfig, Face
def pythonsdk():
## Connect DeepStack
config = ServerConfig("http://192.168.0.101:8080")
face = Face(config)
## Add known face information
wj = ["wj1.jpg","wj2.jpg"]
yy = ["yy1.jpg","yy2.jpg"]
response = face.registerFace(images=wj,userid="wj")
response = face.registerFace(images=yy,userid="yyqx")
## Print the currently recognizable face
response = face.listFaces()
for face in response:
print(" Currently recognizable face :",face)
## Detect the face in the picture
response = face.recognizeFace(image=r"wjtest.jpg",output="face_output.jpg",min_confidence=0.5)
This function requires the input of two avatar photos Output the similarity between the two
import requests
from PIL import Image
import matplotlib.pyplot as plt
def useUrl():
host = "http://192.168.0.101:8080"
## Face comparison
wj1 = open("wj.jpg","rb").read()
wj2 = open("wj2.jpg","rb").read()
yy1 = open("yy2.jpg","rb").read()
response = requests.post(host+"/v1/vision/face/match",files={
"image1":wj1,"image2":wj2}).json()
print(response)
response = requests.post(host+"/v1/vision/face/match",files={
"image1":yy1,"image2":wj2}).json()
print(response)

result
{‘success’: True, ‘similarity’: 0.6551768, ‘duration’: 0} wj1 wj2
{‘success’: True, ‘similarity’: 0.5895447, ‘duration’: 0} yy1 wj2
The official has not provided
import requests
from PIL import Image
import matplotlib.pyplot as plt
def useUrl():
host = "http://192.168.0.101:8080"
## Detect all faces in the picture
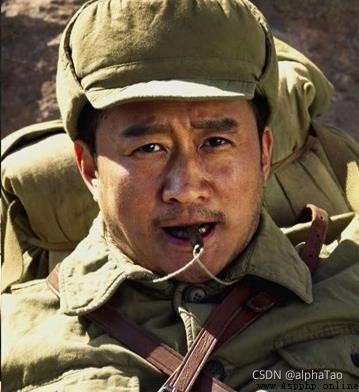
image_data = open("jz.jpg","rb").read()
image = Image.open("jz.jpg").convert("RGB")
response = requests.post(host+"/v1/vision/face",files={
"image":image_data}).json()
for face in response["predictions"]:
y_max = int(face["y_max"])
y_min = int(face["y_min"])
x_max = int(face["x_max"])
x_min = int(face["x_min"])
conf = face["confidence"]
confstr = format(conf*100,'.2f')
cropped = image.crop((x_min,y_min,x_max,y_max))
plt.imshow(cropped)
plt.axis('off')
plt.title(confstr+"%")
plt.show()
return
## Add a known face
user_image1 = open("wj1.jpg","rb").read()
user_image2 = open("wj2.jpg","rb").read()
response = requests.post(host+"/v1/vision/face/register",
files={
"image1":user_image1,"image2":user_image2},data={
"userid":"Wu Jing"}).json()
print(" Add Wu Jing ",response)
user_image1 = open("yy1.jpg","rb").read()
user_image2 = open("yy2.jpg","rb").read()
response = requests.post(host+"/v1/vision/face/register",
files={
"image1":user_image1,"image2":user_image2},data={
"userid":"Yi Yangqianxi"}).json()
print(" Add Yiyang Qianxi ",response)
## Print the currently recognizable face
faces = requests.post(host+"/v1/vision/face/list").json()
print(" Currently recognizable face :",faces["faces"])
## Detect the face in the picture
image_data = open("wjtest.jpg","rb").read()
image = Image.open("wjtest.jpg").convert("RGB")
response = requests.post(host+"/v1/vision/face/recognize",
files={
"image":image_data},data={
"min_confidence":0.4}).json()
for face in response["predictions"]:
userid = face["userid"]
y_max = int(face["y_max"])
y_min = int(face["y_min"])
x_max = int(face["x_max"])
x_min = int(face["x_min"])
conf = face["confidence"]
confstr = format(conf*100,'.2f')
cropped = image.crop((x_min,y_min,x_max,y_max))
plt.imshow(cropped)
plt.axis('off')
plt.title(userid+" "+confstr+"%")
plt.show()
## Delete face
response = requests.post(host+"/v1/vision/face/delete",
data={
"userid":"Wu Jing"}).json()
print(" Delete Wu Jing ",response)
response = requests.post(host+"/v1/vision/face/delete",
data={
"userid":"Yi Yangqianxi"}).json()
print(" Delete Yiyang Qianxi ",response)
## Face comparison
wj1 = open("wj1.jpg","rb").read()
wj2 = open("wj2.jpg","rb").read()
yy1 = open("yy2.jpg","rb").read()
response = requests.post(host+"/v1/vision/face/match",files={
"image1":wj1,"image2":wj2}).json()
print(response)
response = requests.post(host+"/v1/vision/face/match",files={
"image1":yy1,"image2":wj2}).json()
print(response)
from deepstack_sdk import ServerConfig, Face
def pythonsdk():
config = ServerConfig("http://192.168.0.101:8080")
face = Face(config)
## Detect all faces in the picture
response = face.detectFace("jz.jpg",output="jz_output.jpg")
## Add known face information
wj = ["wj1.jpg","wj2.jpg"]
yy = ["yy1.jpg","yy2.jpg"]
response = face.registerFace(images=wj,userid="wj")
response = face.registerFace(images=yy,userid="yyqx")
## Print the currently recognizable face
response = face.listFaces()
for face in response:
print(" Currently recognizable face :",face)
## Detect the face in the picture
response = face.recognizeFace(image=r"wjtest.jpg", output="face_output.jpg",min_confidence=0.5)
## Delete face
response = face.deleteFace("wj")
response = face.deleteFace("yyqx")
## Face comparison
## Did not provide a
useUrl()
pythonsdk()