前記
1.Asyncio的入口
2.兩種Coroutine調用方法的區別
3.Task與Future
3.1.Future
3.2.Task
4.總結
前記上一遍文章《Python中Async語法協程的實現》介紹了Python是如何以生成器來實現協程的以及Python Asyncio通過Future和Task的封裝來實現協程的調度,而在Python Asyncio之中Coroutines, Tasks和Future都屬於可等待對象,在使用的Asyncio的過程中,經常涉及到三者的轉換和調度,開發者容易在概念和作用上犯迷糊,本文主要闡述的是三者之間的關系以及他們的作用。
1.Asyncio的入口協程是線程中的一種特例,協程的入口和切換都是靠事件循環來調度的,在新版的Python中協程的入口是Asyncio.run,當程序運行到Asyncio.run後,可以簡單的理解為程序由線程模式切換為協程模式(只是方便理解,對於計算機而言,並沒有這樣區分),
以下是一個最小的協程例子代碼:
import asyncioasync def main(): await asyncio.sleep(0)asyncio.run(main())在這段代碼中,main函數和asyncio.sleep都屬於Coroutine,main是通過asyncio.run進行調用的,接下來程序也進入一個協程模式,asyncio.run的核心調用是Runner.run,它的代碼如下:
class Runner: ... def run(self, coro, *, context=None): """Run a coroutine inside the embedded event loop.""" # 省略代碼 ... # 把coroutine轉為task task = self._loop.create_task(coro, context=context) # 省略代碼 ... try: # 如果傳入的是Future或者coroutine,也會專為task return self._loop.run_until_complete(task) except exceptions.CancelledError: # 省略代碼 ...這段代碼中刪去了部分其它功能和初始化的代碼,可以看到這段函數的主要功能是通過loop.create_task方法把一個Coroutine對象轉為一個Task對象,然後通過loop.run_until_complete等待這個Task運行結束。
可以看到,Asycnio並不會直接去調度Coroutine,而是把它轉為Task再進行調度,這是因為在Asyncio中事件循環的最小調度對象就是Task。不過在Asyncio中並不是所有的Coroutine的調用都會先被轉為Task對象再等待,比如示例代碼中的asyncio.sleep,由於它是在main函數中直接await的,所以它不會被進行轉換,而是直接等待,通過調用工具分析展示的圖如下:
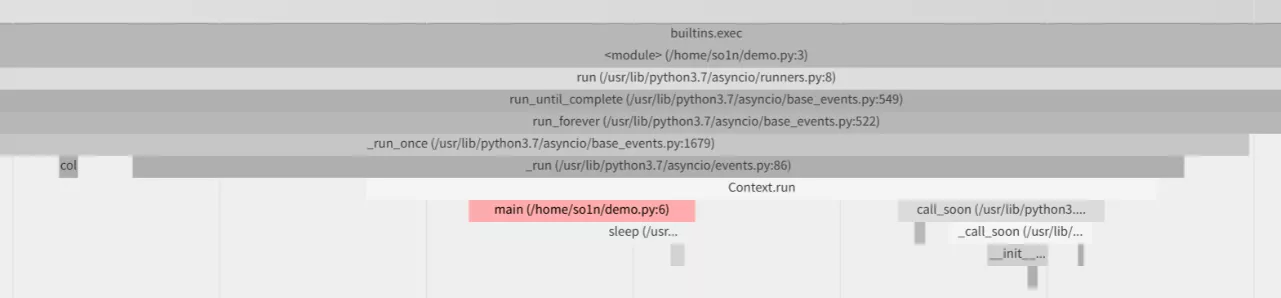
在這個圖示中,從main函數到asyncio.sleep函數中沒有明顯的loop.create_task等把Coroutine轉為Task調用,這裡之所以不用進行轉換的原因不是做了一些特殊優化,而是本因如此, 這個await asyncio.sleep函數實際上還是會被main這個Coroutine轉換成的Task繼續調度到。
在了解Task的調度原理之前,還是先回到最初的調用示例,看看直接用Task調用和直接用Coroutine調用的區別是什麼。
如下代碼,我們顯示的執行一個Coroutine轉為Task的操作再等待,那麼代碼會變成下面這樣:
import asyncioasync def main(): await asyncio.create_task(asyncio.sleep(0))asyncio.run(main())這樣的代碼看起來跟最初的調用示例很像,沒啥區別,但是如果進行一些改變,比如增加一些休眠時間和Coroutine的調用,就能看出Task對象的作用了,現在編寫兩份文件,
他們的代碼如下:
# demo_coro.pyimport asyncioimport timeasync def main(): await asyncio.sleep(1) await asyncio.sleep(2)s_t = time.time()asyncio.run(main())print(time.time() - s_t)# // Output: 3.0028765201568604# demo_task.pyimport asyncioimport timeasync def main(): task_1 = asyncio.create_task(asyncio.sleep(1)) task_2 = asyncio.create_task(asyncio.sleep(2)) await task_1 await task_2s_t = time.time()asyncio.run(main())print(time.time() - s_t)# // Output: 2.0027475357055664其中demo_coro.py進行了兩次await調用,程序的運行總時長為3秒,而demo_task.py則是先把兩個Coroutine對象轉為Task對象,然後再進行兩次await調用,程序的運行總時長為2秒。可以發現,demo_task.py的運行時長近似於其中運行最久的Task對象時長,而demo_coro.py的運行時長則是近似於兩個Coroutine對象的總運行時長。
之所以會是這樣的結果,是因為直接awaitCoroutine對象時,這段程序會一直等待,直到Coroutine對象執行完畢再繼續往下走,而Task對象的不同之處就是在創建的那一刻,就已經把自己注冊到事件循環之中等待被安排運行了,然後返回一個task對象供開發者等待,由於asyncio.sleep是一個純IO類型的調用,所以在這個程序中,兩個asyncio.sleepCoroutine被轉為Task從而實現了並發調用。
上述的代碼之所以通過Task能實現並發調用,是因為Task中出現了一些與事件循環交互的函數,正是這些函數架起了Coroutine並發調用的可能, 不過Task是Future的一個子對象,所以在了解Task之前,需要先了解Future。
3.1.Future與Coroutine只有讓步和接收結果不同的是Future除了讓步和接收結果功能外,它還是一個只會被動進行事件調用且帶有狀態的容器,它在初始化時就是Pending狀態,這時可以被取消,被設置結果和設置異常。而在被設定對應的操作後,Future會被轉化到一個不可逆的對應狀態,並通過loop.call_sonn來調用所有注冊到本身上的回調函數,同時它帶有__iter__和__await__方法使其可以被await和yield from調用,它的主要代碼如下:
class Future: ... def set_result(self, result): """設置結果,並安排下一個調用""" if self._state != _PENDING: raise exceptions.InvalidStateError(f'{self._state}: {self!r}') self._result = result self._state = _FINISHED self.__schedule_callbacks() def set_exception(self, exception): """設置異常,並安排下一個調用""" if self._state != _PENDING: raise exceptions.InvalidStateError(f'{self._state}: {self!r}') if isinstance(exception, type): exception = exception() if type(exception) is StopIteration: raise TypeError("StopIteration interacts badly with generators " "and cannot be raised into a Future") self._exception = exception self._state = _FINISHED self.__schedule_callbacks() self.__log_traceback = True def __await__(self): """設置為blocking,並接受await或者yield from調用""" if not self.done(): self._asyncio_future_blocking = True yield self # This tells Task to wait for completion. if not self.done(): raise RuntimeError("await wasn't used with future") return self.result() # May raise too. __iter__ = __await__ # make compatible with 'yield from'.單看這段代碼是很難理解為什麼下面這個future被調用set_result後就能繼續往下走:
async def demo(future: asyncio.Future): await future print("aha")這是因為Future跟Coroutine一樣,沒有主動調度的能力,只能通過Task和事件循環聯手被調度。
3.2.TaskTask是Future的子類,除了繼承了Future的所有方法,它還多了兩個重要的方法__step和__wakeup,通過這兩個方法賦予了Task調度能力,這是Coroutine和Future沒有的,Task的涉及到調度的主要代碼如下(說明見注釋):
class Task(futures._PyFuture): # Inherit Python Task implementation # from a Python Future implementation. _log_destroy_pending = True def __init__(self, coro, *, loop=None, name=None, context=None): super().__init__(loop=loop) # 省略部分初始化代碼 ... # 托管的coroutine self._coro = coro if context is None: self._context = contextvars.copy_context() else: self._context = context # 通過loop.call_sonn,在Task初始化後馬上就通知事件循環在下次有空的時候執行自己的__step函數 self._loop.call_soon(self.__step, context=self._context) def __step(self, exc=None): coro = self._coro # 方便asyncio自省 _enter_task(self._loop, self) # Call either coro.throw(exc) or coro.send(None). try: if exc is None: # 通過send預激托管的coroutine # 這時候只會得到coroutine yield回來的數據或者收到一個StopIteration的異常 # 對於Future或者Task返回的是Self result = coro.send(None) else: # 發送異常給coroutine result = coro.throw(exc) except StopIteration as exc: # StopIteration代表Coroutine運行完畢 if self._must_cancel: # coroutine在停止之前被執行了取消操作,則需要顯示的執行取消操作 self._must_cancel = False super().cancel(msg=self._cancel_message) else: # 把運行完畢的值發送到結果值中 super().set_result(exc.value) # 省略其它異常封裝 ... else: # 如果沒有異常拋出 blocking = getattr(result, '_asyncio_future_blocking', None) if blocking is not None: # 通過Future代碼可以判斷,如果帶有_asyncio_future_blocking屬性,則代表當前result是Future或者是Task # 意味著這個Task裡面裹著另外一個的Future或者Task # 省略Future判斷 ... if blocking: # 代表這這個Future或者Task處於卡住的狀態, # 此時的Task放棄了自己對事件循環的控制權,等待這個卡住的Future或者Task執行完成時喚醒一下自己 result._asyncio_future_blocking = False result.add_done_callback(self.__wakeup, context=self._context) self._fut_waiter = result if self._must_cancel: if self._fut_waiter.cancel(msg=self._cancel_message): self._must_cancel = False else: # 不能被await兩次 new_exc = RuntimeError( f'yield was used instead of yield from ' f'in task {self!r} with {result!r}') self._loop.call_soon( self.__step, new_exc, context=self._context) elif result is None: # 放棄了對事件循環的控制權,代表自己托管的coroutine可能有個coroutine在運行,接下來會把控制權交給他和事件循環 # 當前的coroutine裡面即使沒有Future或者Task,但是子Future可能有 self._loop.call_soon(self.__step, context=self._context) finally: _leave_task(self._loop, self) self = None # Needed to break cycles when an exception occurs. def __wakeup(self, future): # 其它Task和Future完成後會調用到該函數,接下來進行一些處理 try: # 回收Future的狀態,如果Future發生了異常,則把異常傳回給自己 future.result() except BaseException as exc: # This may also be a cancellation. self.__step(exc) else: # Task並不需要自己托管的Future的結果值,而且如下注釋,這樣能使調度變得更快 # Don't pass the value of `future.result()` explicitly, # as `Future.__iter__` and `Future.__await__` don't need it. # If we call `_step(value, None)` instead of `_step()`, # Python eval loop would use `.send(value)` method call, # instead of `__next__()`, which is slower for futures # that return non-generator iterators from their `__iter__`. self.__step() self = None # Needed to break cycles when an exception occurs.這份源碼的Task對象中的__setp方法比較長,經過精簡後可以發現他主要做的工作有三個:
1.通過send或者throw來驅動Coroutine進行下一步
2.通過給被自己托管的Future或者Task添加回調來獲得完成的通知並重新獲取控制權
3.通過loop.call_soon來讓步,把控制權交給事件循環
單通過源碼分析可能很難明白, 以下是以兩種Coroutine的代碼為例子,簡單的闡述Task與事件循環調度的過程,首先是demo_coro,這個例子中只有一個Task:
# demo_coro.pyimport asyncioimport timeasync def main(): await asyncio.sleep(1) await asyncio.sleep(2)s_t = time.time()asyncio.run(main())print(time.time() - s_t)# // Output: 3.0028765201568604這個例子中第一步是把main轉為一個Task,然後調用到了對應的__step方法,這時候__step方法會會調用main()這個Coroutine的send(None)方法。
之後整個程序的邏輯會直接轉到main函數中的await asyncio.sleep(1)這個Coroutine中,await asyncio.sleep(1)會先生成一個Future對象,並通過loop.call_at告訴事件循環在1秒後激活這個Future對象,然後把對象返回。這時候邏輯會重新回到Task的__step方法中,__step發現send調用得到的是一個Future對象,所以就在這個Future添加一個回調,讓Future完成的時候來激活自己,然後放棄了對事件循環的控制權。接著就是事件循環在一秒後激活了這個Future對象,這時程序邏輯就會執行到Future的回調,也就是Task的__wakeup方法,於是Task的__step又被調用到了,而這次遇到的是後面的await asyncio.sleep(2),於是又走了一遍上面的流程。當兩個asyncio.sleep都執行完成後,Task的__step方法裡在對Coroutine發送一個send(None)後就捕獲到了StopIteration異常,這時候Task就會通過set_result設置結果,並結束自己的調度流程。
可以看到demo_core.py中只有一個Task在負責和事件循環一起調度,事件循環的開始一定是一個Task,並通過Task來調起一個Coroutine,通過__step方法把後續的Future,Task,Coroutine都當成一條鏈來運行,而demo_task.py則不一樣了,它有兩個Task,代碼如下:
# demo_task.pyimport asyncioimport timeasync def main(): task_1 = asyncio.create_task(asyncio.sleep(1)) task_2 = asyncio.create_task(asyncio.sleep(2)) await task_1 await task_2s_t = time.time()asyncio.run(main())print(time.time() - s_t)# // Output: 2.0027475357055664這個例子中第一步還是跟demo_coro一樣,但跳轉到main函數後就開始有區別了,首先在這函數中創建了task1和task2兩個Task,他們分別都會通過__step方法中的send激活對應的asyncio.sleepCoroutine,然後等待對應的Future來通知自己已經完成了。而對於創建了這兩個Task的main Task來說,通過main函數的awati task_1和await task_2來獲取到他們的“控制權“。首先是通過await task_1語句,main Task中的__step方法裡在調用send後得到的是task_1對應的Future,這時候就可以為這個Future添加一個回調,讓他完成時通知自己,自己再走下一步,對於task_2也是如此。 直到最後兩個task都執行完成,main Task也捕獲到了StopIteration異常,通過set_result設置結果,並結束自己的調度流程。
可以看到demo_task.py與demo_coro.py有個明顯的區別在於main Task在運行的生命周期中創建了兩個Task,並通過await托管了兩個Task,同時兩個Task又能實現兩個協程的並發,所以可以發現事件循環運行期間,當前協程的並發數永遠小於事件循環中注冊的Task數量。此外,如果在main Task中如果沒有顯式的進行await,那麼子Task就會逃逸,不受main Task管理,如下:
# demo_task.pyimport asyncioimport timedef mutli_task(): task_1 = asyncio.create_task(asyncio.sleep(1)) task_2 = asyncio.create_task(asyncio.sleep(2))async def main(): mutli_task() await asyncio.sleep(1.5) s_t = time.time()asyncio.run(main())print(time.time() - s_t)# // Output: 1.5027475357055664 在這段代碼中,main Task在執行到mutli_task時,會創建出兩個task,但是在__step中的coro.send(None)調用得到的結果卻是await asyncio.sleep(1.5)返回的Future,所以main Task只能調用到這個Future的add_don_callback來裝載自己的__wakeup方法,最終導致到main Task只能托管到await asyncio.sleep(1.5)的Future,而mutli_task創建的task則逃逸了,成為另一條鏈的頂點Task。
不過這個程序的事件循環只管理到了main Task所以事件循環會一直運行,直到main Task運行結束的時候才退出,這時程序會跟著一起退出,所以程序的運行時間只有1.5秒左右。
此外由於另外的Task也是注冊到這個事件循環上面,所以事件循環會幫忙把task_1執行完畢,而task_2定義的休眠時間是2秒,程序退出之前事件循環會發現有個Task尚未執行完畢,於是會對這個Task進行清理並打印一條警報。
在深入了Task,Future的源碼了解後,了解了Task和Future在Asyncio的作用,同時也發現Task和Future都跟loop有一定的耦合,而loop也可以通過一定的方法來創建Task和Future,所以如果要真正的理解到Asyncio的調度原理,還需要更進入一步,通過Asyncio的源碼來了解整個Asyncio的設計。
到此這篇關於Python Asyncio中Coroutines,Tasks,Future可等待對象的關系及作用的文章就介紹到這了,更多相關Python Asyncio 內容請搜索軟件開發網以前的文章或繼續浏覽下面的相關文章希望大家以後多多支持軟件開發網!