Resource download address :https://download.csdn.net/download/sheziqiong/85787751
Resource download address :https://download.csdn.net/download/sheziqiong/85787751
Deep learning develops rapidly ,MNIST Handwritten numeral data set, as an early data set of machine learning, has been recognized as a fruit fly experiment in the field of machine learning (Hinton One year ), Convolutional neural network is a very effective architecture for image recognition , So use CNN Recognize handwritten numbers It has become a classic experiment in machine learning . In this repo I will present the most basic CNN distinguish MNIST Data set process .
The main steps are as follows :
The main languages and platforms used are as follows :
Installation includes Python Language and a few necessary Pytorch package , Use Linux The installation method of the system is as follows :
Check the Python Language :
$ python3 --version
Python 3.7.7
pip install torch
pip install torchvision
pip install matplotlib
Complete the installation , We can start training neural networks to recognize numbers , The first step is to load data .
First load the data , All MNIST The handwritten numeral data set comes from Yann LeCun Website , Here we use torchvision.datasets There are already MNIST Data sets , Same effect as downloading from the website :
from torchvision.datasets import MNIST
train_data = MNIST(root='./data', train=True, download=True, transform=transform)
test_data = MNIST(root='./data', train=False, download=True, transform=transform)
To build a good model , First of all, we need to be familiar with what the data set we are dealing with ,MNIST Every handwritten digital image in the data set of is grayscale 28*28 Pictures of the , Ditto with a correct 0-9 Of label. Let's take a look at the training set and the test set :
print(train_data)
Dataset MNIST
Number of datapoints: 60000
Root location: ./data
Split: Train
StandardTransform
Transform: Compose(
ToTensor()
Normalize(mean=(0.5,), std=(0.5,))
)
print(test_data)
Dataset MNIST
Number of datapoints: 10000
Root location: ./data
Split: Test
StandardTransform
Transform: Compose(
ToTensor()
Normalize(mean=(0.5,), std=(0.5,))
)
The training focuses on 60000 Handwritten digits and label, The test set has 10000 individual , Now let's see what handwritten numerals look like :
# Before the exhibition 40 Write numbers by hand
import matplotlib.pyplot as plt
num_of_images = 40
for index in range(1, num_of_images + 1):
plt.subplot(4, 10, index)
plt.axis('off')
plt.imshow(train_data.data[index], cmap='gray_r')
plt.show()
This paragraph code use matplotlib Before drawing 40 Handwritten digits in Zhang's training set , Present in the same picture , The graph is as follows :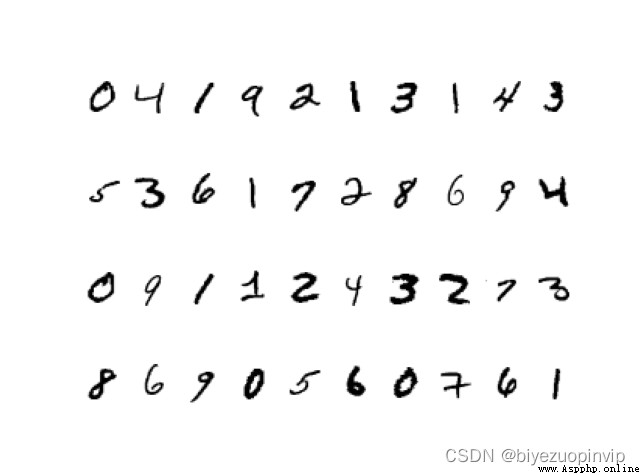
Our task is to see only the pictures of handwritten digits , Build a CNN The model successfully identifies that it is 0-9 Which number of .
The model we chose was not complicated , First, two-layer convolution is used to extract the features, Next, the two layers are fully connected for identification ( Pay attention to the last layer output yes 10 individual , Corresponding number 0-9):
# Convolution network layer
self.conv1 = nn.Conv2d(in_channels=1, out_channels=5, kernel_size=3, stride=1, padding=1)
self.maxpool1 = nn.MaxPool2d(kernel_size=2, stride=2)
self.conv2 = nn.Conv2d(in_channels=5, out_channels=10, kernel_size=3, stride=1, padding=1)
self.maxpool2 = nn.MaxPool2d(kernel_size=2, stride=2)
# Fully connected to the network layer
self.fc1 = nn.Linear(in_features=7*7*10, out_features=128)
self.fc2 = nn.Linear(in_features=128, out_features=10)
The structure of a convolutional neural network can be defined forward Function :
def forward(self, x):
"""forward."""
# The convolution sum of the first layer is the maximum
x = F.relu(self.conv1(x))
x = self.maxpool1(x)
# The convolution sum of the second layer is the maximum
x = F.relu(self.conv2(x))
x = self.maxpool2(x)
# Fully connected layer
x = x.view(-1, 7*7*10)
x = F.relu(self.fc1(x))
x = F.relu(self.fc2(x))
return x
That's it CNN Model building .
Let's take a look at how many parameters of our model need to be trained ( Spoiler : quite a lot )
total_params = sum(p.numel() for p in model.parameters())
print(total_params)
64648
6 More than ten thousand parameters are waiting for training … First define Loss Function and optimizer, Use here CrossEntropy and Adam:
# Define neural network and training parameters
model = CNN()
criterion = nn.CrossEntropyLoss()
optimizer = optim.Adam(model.parameters(), lr=3e-4, weight_decay=0.001)
batch_size = 100
epoch_num = int(train_data.data.shape[0]) // batch_size
there batch_size yes 100, Which means that we have 60000 Data is in the training set , To train 600 It takes a round to complete the training . Training process :
for epoch in range(1, epoch_num+1):
# Every batch Training together , Update the neural network weights
for idx, (img, label) in enumerate(train_loader):
optimizer.zero_grad()
output = model(img)
loss = criterion(output, label)
loss.backward()
optimizer.step()
print("Training Epoch {} Completed".format(epoch))
The training time is quite long , It is recommended to use Amazon Web Service Or other machines with strong computing power .
Because my machine is too weak , After two rounds of training, I cut it off , That means only 200 Number of training sets , It is estimated that the performance will be poor ( There is a suspense here )

After finishing the training, our main task has been completed , Next, let's take a look at our CNN Whether the training is good or not , Test set 10000 A handwritten number for our CNN New data for the model , So we use the test set to see the effect :
total = 0
correct = 0
for i, (test_img, test_label) in enumerate(test_loader):
# The prediction results are obtained through neural network
outputs = model(test_img)
predicted = torch.max(outputs.data, 1)[1]
print("Correct label is", test_label)
print("Prediction is", predicted)
# Total number and correct number
total += len(test_label)
correct += (predicted == test_label).sum()
accuracy = correct / total
print('Testing Results:\n Loss: {} \nAccuracy: {} %'.format(loss.data, accuracy*100))
Let's see the test results :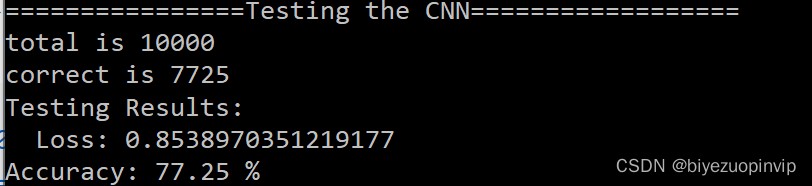
Even as high as 77%…… I just used it 200 Training set .
Resource download address :https://download.csdn.net/download/sheziqiong/85787751
Resource download address :https://download.csdn.net/download/sheziqiong/85787751