When used python complete Django web After the project is developed locally , This can only be browsed by yourself , You need to put the code on the server , So that users can access , Details are provided below Django How to deploy the project to linux The server .
Centos The next installation steps are as follows :
yum groupinstall "Development tools" -yyum install zlib-devel bzip2-devel pcre-devel openssl-devel ncurses-devel sqlite-devel readline-devel tk-devel -yeasy_install The package link : https://pypi.python.org/pypi/distribute
Installation steps :
 cd ~
yum install wget -y
wget https://pypi.python.org/packages/source/d/distribute/distribute-0.6.49.tar.gz
ls
tar xf distribute-0.6.49.tar.gz
cd distribute-0.6.49
python setup.py install
CentOS7:python2.7 setup.py install
CentOS6:python2.7 setup.py install
Test for successful installation :easy_install --version
sudo yum install python-devel -y
1、 install wget,gcc-c++ gcc*:
yum install -y wget gcc-c++ epel-release -y
2、 install pip
yum install python-pip -y
3、 upgrade pip
pip install --upgrade pip
4、Uwsgi install
pip install uwsgi
Successfully installed uwsgi-2.0.17.1
5、 see uwsgi edition
uwsgi --version
CentOS 7.0 It uses firewall As a firewall , The default firewall is on
View firewall status :firewall-cmd --state
stop it firewall:systemctl stop firewalld.service
prohibit firewall Boot up :systemctl disable firewalld.service
uwsgi:https://pypi.python.org/pypi/uWSGI
uwsgi Parameters, :http://uwsgi-docs.readthedocs.org/en/latest/Options.html
test uwsgi If there is something wrong :
newly build test.py file , The contents are as follows :
def application(env, start_response):
start_response('200 OK', [('Content-Type','text/html')])
return "Hello World"
Then run at the terminal :uwsgi --http :8001 --wsgi-file test.py
Type... In the browser :http:// The server IP Address :8001
Check to see if there is "Hello World" Output , If there is no output , Please check your installation process .
Django The version corresponds to Python edition :
1、Django install pip install django==1.8
2、Python Version view :
 Mode one :pip list
Mode two :python
import django
print(django.get_version())
3、 test django:
cd ~
django-admin.py startproject mysite
cd mysite
Go to the project folder /data/wwwroot/mysite
, add to static and templates, It is used to store static files and template files respectively .
django-admin.py startapp blog
Allow access to all hosts
Add applications
python manage.py runserver 0.0.0.0:8002
( Be careful 0.0.0.0 This IP Address )
Type... In the browser :http://127.0.0.1:8002, Check django Whether it operates normally .
yum install nginx -y
Nginx Master profile :/etc/nginx/nginx.conf
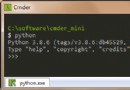
See what is installed on the server nginx Version number , Mainly through ngix Of -v or -V Options , The viewing method is shown in the figure below :
-v Show nginx Version of .
-V Show nginx Version of , Compiler version and configuration parameters .
Sometimes I want to know nigix Is it in normal operation , Need to use linux Command view nginx Operation of the . Carry out orders :
ps -A | grep nginx
If the result is returned , Description yes nginx Running , Service started .
nginx start-up 、 stop it 、 Uninterrupted service restart :
service nginx start
service nginx stop
service nginx reload
Enter... In the browser IP Address :
The following interface appears nginx Installation successful !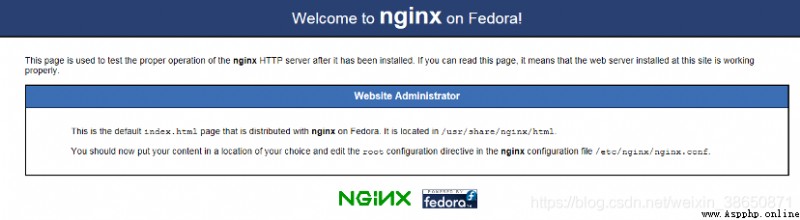
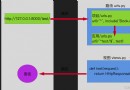
Django After normal operation, we will start to configure uwsgi.
Our website project path is /data/wwwroot/mysite/, Create... In the project root directory mysite.xml file , Enter the following :
<uwsgi>
<socket>127.0.0.1:8997</socket><!-- The internal port , Customize -->
<chdir>/data/wwwroot/mysite/</chdir><!-- Project path -->
<module>mysite.wsgi</module>
<processes>4</processes> <!-- Number of processes -->
<daemonize>uwsgi.log</daemonize><!-- Log files -->
</uwsgi>
And save
In the configuration file mysite This is the name of our project .
First switch to nginx The path of the configuration file for :cd /etc/nginx
Back it up nginx.conf file , In case of accident ,cp nginx.conf nginx.conf.bak
Then open the nginx.conf, Delete the original content ,rm -rf nginx.conf
Add the following directly :(nginx.conf)
worker_processes 1;
events {
worker_connections 1024;
}
http {
include mime.types;
default_type application/octet-stream;
sendfile on;
server {
listen 80;
server_name www.django.cn;
charset utf-8;
location / {
include uwsgi_params;
uwsgi_pass 127.0.0.1:8997;
uwsgi_param UWSGI_SCRIPT mysite.wsgi;
uwsgi_param UWSGI_CHDIR /data/wwwroot/mysite; # Project path
}
location /static/ {
alias /data/wwwroot/mysite/static/; # Static resource path
}
}
}
Note that the path in the configuration file should be the same as mysite.xml Project path corresponding to .
Execute the following command to check the configuration file for errors nginx -t, If there is no mistake, execute the following command :nginx
Terminal proof without any prompt nginx Successful launch . You can use your server address to view , After success, you will see a nginx The welcome page .
Enter the website project directory :cd /data/wwwroot/mysite/
Execute the following command :uwsgi -x mysite.xml
If there are no mistakes in the above steps , Execute the following command to restart nginx .nginx -s reload
Then visit your project address in the browser !