What is? GUI Well ?
GUI yes Graphical User Interface The acronym of , Image user interface , The simple understanding is , We window Windows and various buttons in the system 、 Input box 、 Menu bar, etc .
Such as below , Development GUI The purpose of is to make users better use of software and computers .
Did you learn java My friends should all know java Inside GUI Programming ,java Use in swing perhaps awt library .Python Of GUI Programming and java Basically the same ,Python Use in Tkinter Those components in the library , for instance :Label( label )、Entry( Input box )、Button( Button )、Text( The text box ) To achieve GUI Programming .
This technology has been phased out , But you have to study , Next, let's use real cases and code to learn .
# coding:utf-8
# Import tkinter library , And rename to tk
import tkinter as tk
# adopt tk create a window
window = tk.Tk()
# Give the window a title
window.title(" New window ")
# Set the size of the window
window.geometry("1000x500")
# Create a string variable in the component , Use... In components
var = tk.StringVar()
# Set labels , The first parameter is the parent component of the component , Other parameters set specific attributes
l = tk.Label(window, textvariable=var, bg="red", font=("Arial", 12), width=15,
height=2)
# Prevent labels
l.pack()
on_hit = False
def hit():
global on_hit
# By default, there is no point at first
if on_hit == False:
on_hit = True
# adopt set Method to set variables in the component
var.set(" You clicked on me ")
else:
on_hit = False
var.set("")
# Create button , And pass command Perform function processing after clicking
b = tk.Button(window, text="hit me", width=15, height=2, command=hit)
# Place the button
b.pack()
# Keep the window updated
window.mainloop()
design sketch :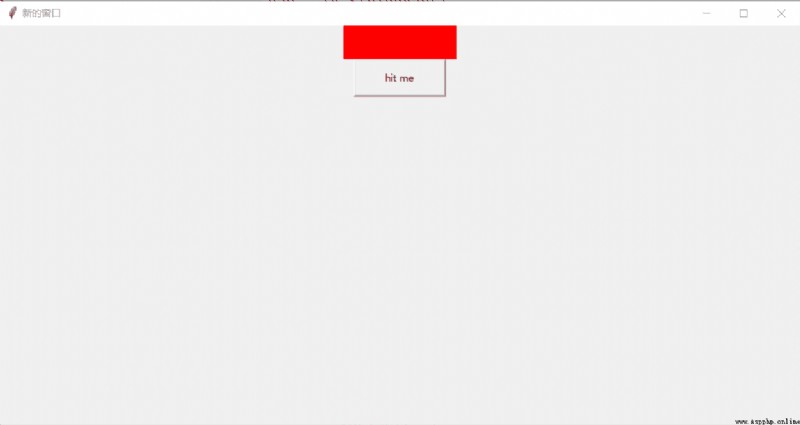
# coding:utf-8
import tkinter as tk
""" entry and text Use of control """
# Get the upper window
window = tk.Tk()
# Set the name of the window
window.title(" Little trick ")
# Set the size of the window
window.geometry("1000x500")
# Set the input box
entry = tk.Entry(window, show=None)
# Place the input box
entry.pack()
# Insert at end
def insert_end():
e_content = entry.get()
t.insert("end", e_content)
# Insert at the insertion point
def insert_point():
e_content = entry.get()
t.insert("insert", e_content)
# Setting button 1, Insert at the end
b1 = tk.Button(window, text="end insert", command=insert_end)
# Setting button 2, Insert at the insertion point
b2 = tk.Button(window, text="point insert", command=insert_point)
# Place the button 1
b1.pack()
# Place the button 2
b2.pack()
# Set the display box
t = tk.Text()
# Placement position
t.pack()
# Let the window loop , Keep updating
window.mainloop()
design sketch :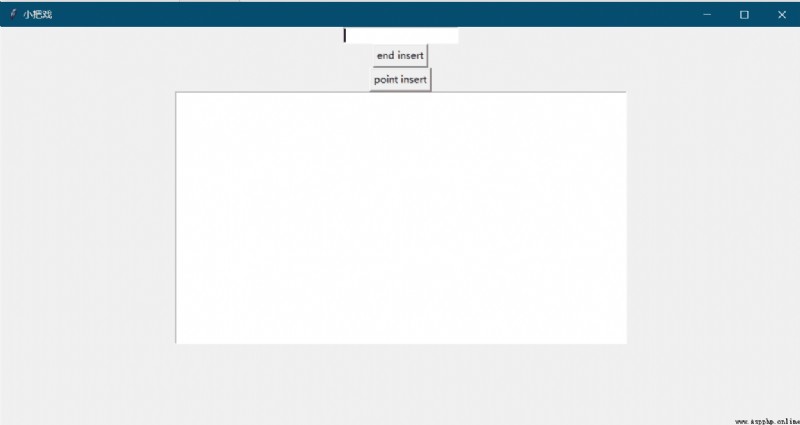
# coding:utf-8
import tkinter as tk
""" Use of lists """
# Get the window
window = tk.Tk()
# Set the name of the window
window.title(" Use of lists ")
# Set the size of the window
window.geometry("1000x500")
var1 = tk.StringVar()
# Create a label
l = tk.Label(window, textvariable=var1, bg="yellow", width=15, height=2)
# Place labels
l.pack()
def job():
# Get the content of the current mouse click item
v = lb.get(lb.curselection())
# Set label content
var1.set(v)
# Create button
b = tk.Button(window, text=" You go up to me ", command=job)
# Place the button
b.pack()
var2 = tk.StringVar()
var2.set((" Tsinghua University ", " Peking University, ", " Fudan University ", " Jiaotong University "))
# Create a list box
lb =tk.Listbox(window, listvariable=var2)
list_item = [1, 2, 3, 4]
# Circular insert
for m in list_item:
lb.insert("end", m)
lb.insert(1, "first")
lb.insert(2, "second")
lb.delete(2)
lb.pack()
# Loop window
window.mainloop()
design sketch :
# coding:utf-8
import tkinter as tk
""" Use radio buttons """
window = tk.Tk()
window.title(" The lottery system ")
window.geometry("1000x500")
# tkinter The variables in are all like this
var = tk.StringVar()
# Use the label to display the results after radio selection
l = tk.Label(window, text=" ", bg="green", width=30, height=2)
# Place labels
l.pack()
def job():
l.config(text = " Congratulations on getting " + var.get())
# Create radio buttons A
rb1 = tk.Radiobutton(window, text=" gift A", variable=var, value="MacBook", command=job)
rb1.pack()
# Create radio buttons B
rb2 = tk.Radiobutton(window, text=" gift B", variable=var, value="iphone", command=job)
rb2.pack()
# Create radio buttons C
rb3 = tk.Radiobutton(window, text=" gift C", variable=var, value="ipad", command=job)
rb3.pack()
# Cycle it
window.mainloop()
design sketch :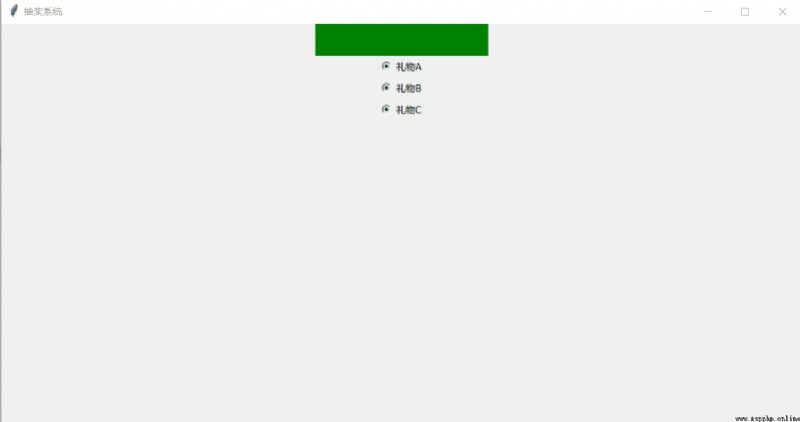
# coding:utf-8
import tkinter as tk
""" scale Use """
# Get the window
window = tk.Tk()
# Set the title of the window
window.title(" Adjust the volume ")
# Set the size of the window
window.geometry("1000x500")
# Set the label
l = tk.Label(window, bg="yellow", width=30, height=2, text="")
# Place labels
l.pack()
# scale parts , By default, its own value will be passed as a parameter
def job(v):
l.config(text=" Now the volume is " + v)
# Define a scale, Set its length , Specific starting point , horizontal direction , Precision etc.
scale = tk.Scale(window, length=500, orient=tk.HORIZONTAL,from_ = 0,to=100,
tickinterval=10, resolution=0.01, showvalue=1, command=job)
# place scale
scale.pack()
# Let the window loop
window.mainloop()
design sketch :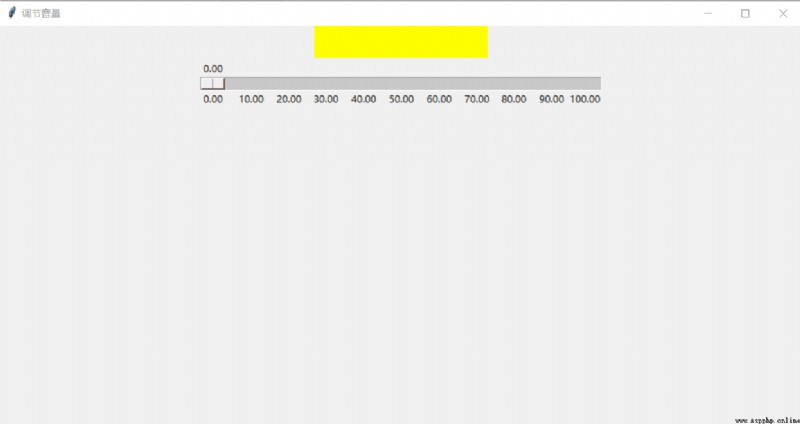
# coding:utf-8
import tkinter as tk
""" Use of multiple selection buttons """
# create a window
window = tk.Tk()
# Set the title of the window
window.title(" Practice multiple buttons ")
# Set the size of the window
window.geometry("1000x500")
# The writing of integer variables in components
var1 = tk.IntVar()
var2 = tk.IntVar()
# label
l = tk.Label(window, bg="yellow", text="", width=20, height=2)
# Place labels
l.pack()
def job():
if var1.get() == 1 and var2.get() == 0:
l.config(text="I only love C++")
elif var1.get() == 0 and var2.get() == 1:
l.config(text="I only love Python")
elif var1.get() == 0 and var2.get() == 0:
l.config(text="I don't love either")
else:
l.config(text="I both love them")
# Multiple buttons
cb1 = tk.Checkbutton(window, text="C++", variable=var1, onvalue=1, offvalue=0, command=job)
cb2 = tk.Checkbutton(window, text="Python", variable=var2, onvalue=1, offvalue=0, command=job)
cb1.pack()
cb2.pack()
# loop
window.mainloop()
design sketch :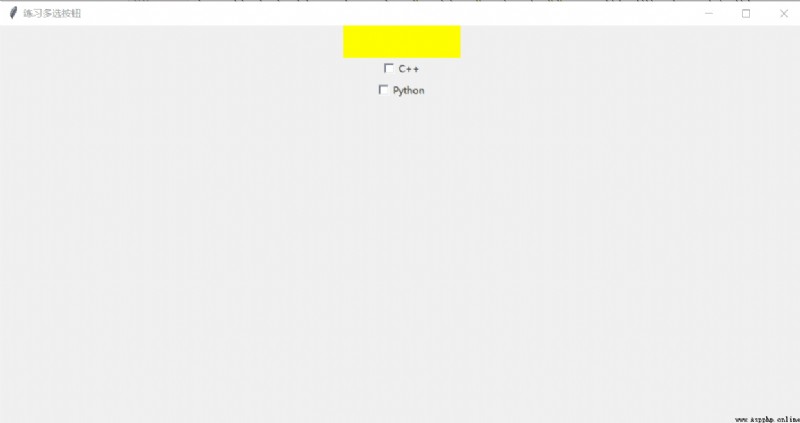
# coding:utf-8
import tkinter as tk
""" The use of canvas """
# create a window
window = tk.Tk()
# Set the title of the window
window.title(" The use of canvas ")
# Set the size of the canvas
window.geometry("1000x500")
# Create a canvas
canvas = tk.Canvas(window, bg="blue", height=400, width=700)
# Load picture file
image_file = tk.PhotoImage(file="F:\\ Graduate student 0 grade \\learnAI\\a.png")
# Place the picture in a specific position on the canvas
image = canvas.create_image(10, 10, anchor="nw", image = image_file)
# Draw various shapes on the canvas
x0, y0, x1, y1 = 50, 50 ,80, 80
# Draw line
line = canvas.create_line(x0, y0, x1, y1)
# Circular
circular = canvas.create_oval(x0, y0, x1, y1, fill="red")
# Sector
arc = canvas.create_arc(x0+30, y0+30, x1+30, y1+30, start=0, extent=120)
# Square , Side length is 20
rect = canvas.create_rectangle(100, 30, 100+20, 30+20)
canvas.pack()
# Moving functions
def move():
canvas.move(rect, 0, 20)
# Button
b = tk.Button(window, text=" Move ", command=move)
b.pack()
# Cycle it
window.mainloop()
design sketch :
# coding:utf-8
import tkinter as tk
""" menubar menu bar """
# Get the window
window = tk.Tk()
# Set the window name
window.title(" Use of the menu bar ")
# Set the size of the window
window.geometry("1000x500")
# Put a label
l = tk.Label(window, text="", width=50, height=5, bg="yellow")
l.pack()
counter = 0
def job():
global counter
l.config(text="do %d" %counter)
counter += 1
# Get menu bar
menubar = tk.Menu(window)
# menu 1 File menu
filemenu = tk.Menu(menubar, tearoff=0)
# Use the menu bar to add the file menu
menubar.add_cascade(label=" file ", menu=filemenu)
filemenu.add_command(label=" newly build ", command=job)
filemenu.add_command(label=" open ", command=job)
filemenu.add_command(label=" preservation ", command=job)
# Split line
filemenu.add_separator()
# sign out
filemenu.add_command(label=" sign out ", command=window.quit)
# menu 2 University of
universitymenu = tk.Menu(menubar, tearoff=0)
# Use the menu bar to set the menu 2 Add in
menubar.add_cascade(label=" university ", menu=universitymenu)
universitymenu.add_command(label=" Tsinghua University ", command=job)
universitymenu.add_command(label=" Peking University, ", command=job)
universitymenu.add_command(label=" Zhejiang University ", command=job)
# Create a secondary menu , The file menu is the first level menu , So it's the parent component
second_menu = tk.Menu(filemenu)
# The file menu parent component adds the secondary menu
filemenu.add_cascade(label=" Import ", menu=second_menu, underline=0)
# Put specific items in the secondary menu
second_menu.add_command(label=" Hello ",command=job)
# The menu bar that will be created , Modify into the original window
window.config(menu=menubar)
# Cycle it
window.mainloop()
design sketch :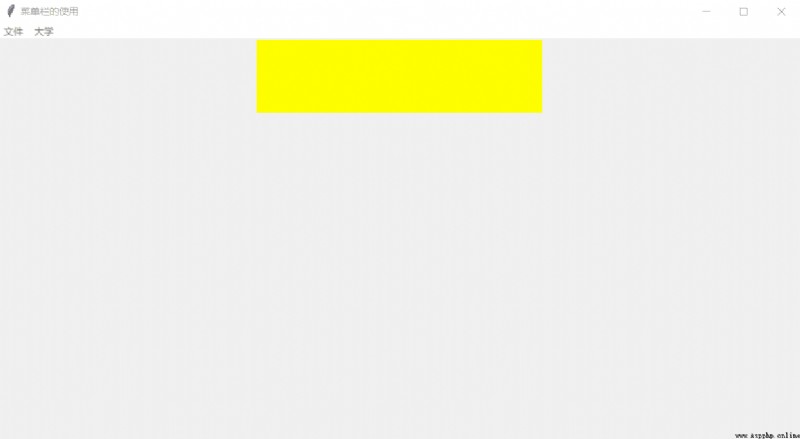
# coding:utf-8
import tkinter as tk
""" frame frame Use """
# create a window
window = tk.Tk()
# Set the title of the window
window.title(" In fact, it's just to divide areas ")
# Set the size of the window
window.geometry("1000x500")
# First create a label , And place
l = tk.Label(text="on the window").pack()
# The big frame inside the window
frm = tk.Frame(window)
# Place this frame
frm.pack()
# Left frame
frm1 = tk.Frame(frm,)
# Place the frame to the left
frm1.pack(side="left")
# Right frame
frm2 = tk.Frame(frm,)
# Place the frame to the right
frm2.pack(side="right")
# After dividing the area , Label by region
tk.Label(frm1, text=" Left label 1").pack()
tk.Label(frm1, text=" Left label 2").pack()
tk.Label(frm2, text=" Right label ").pack()
# Loop the window
window.mainloop()
design sketch :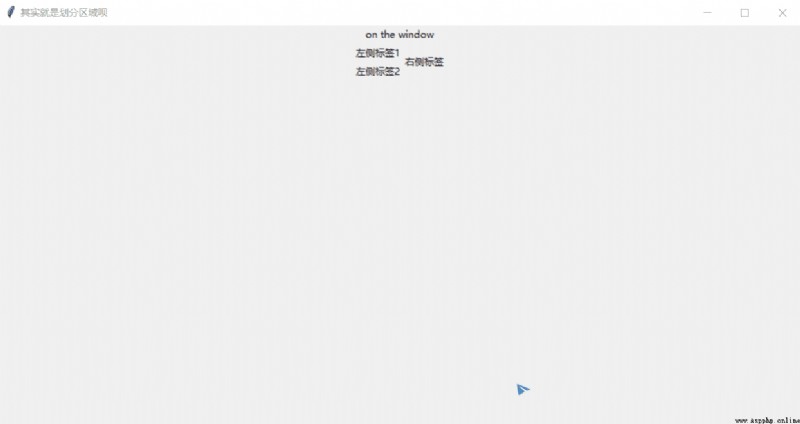
# coding:utf-8
import tkinter as tk
import tkinter.messagebox
from tkinter import messagebox
""" The use of pop ups """
# Get the window
window = tk.Tk()
# Set the window title
window.title(" The use of pop ups ")
# Set the size of the window
window.geometry("1000x500")
def job():
# Pop up window to display information
tkinter.messagebox.showinfo(title="Hi", message='hahahah')
# warning
# tkinter.messagebox.showwarning(title="warining", message=" Warning ")
# error
# tkinter.messagebox.showerror(title="error", message=" error ")
# Inquiry frame , return yes perhaps no
# print(tk.messagebox.askquestion(title=" inquiry yes or no", message="Are you OK?"))
# Inquiry frame , return True perhaps FALSE
# print(tk.messagebox.askyesno(title=" inquiry true or false", message="Do you love me?"))
# Ask to confirm or cancel , return true and false
# print(tk.messagebox.askokcancel(title=" shopping ", message=" Are you sure you want to buy ?"))
# Ask to retry or cancel , return true and false
# print(tk.messagebox.askretrycancel(title=" Love ", message=" Do you love me? ?"))
b = tk.Button(window, text=" Let me try ", command=job).pack()
# Cycle it
window.mainloop()
design sketch :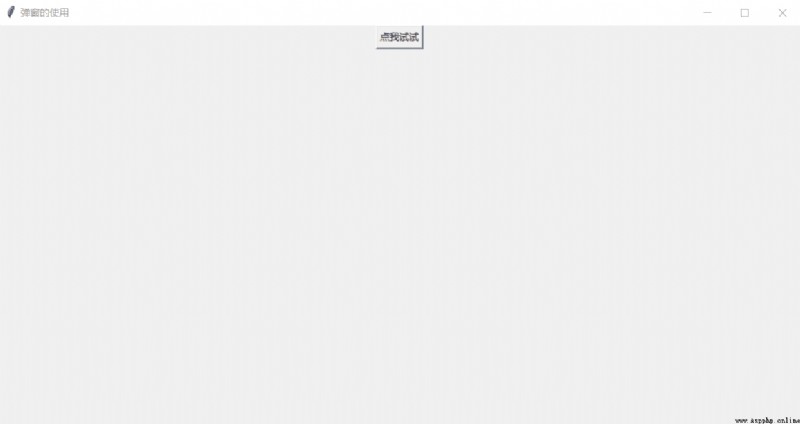
# coding:utf-8
import tkinter as tk
""" pack、gird、place Three placement methods """
# Get the window
window = tk.Tk()
# Set the title of the window
window.title(" Three ways to place components ")
# Set the window size
window.geometry("1000x500")
tk.Label(window, text=" above ").pack(side="top")
tk.Label(window, text=" below ").pack(side="bottom")
tk.Label(window, text=" left side ").pack(side="left")
tk.Label(window, text=" right side ").pack(side="right")
# Cycle it
window.mainloop()
design sketch :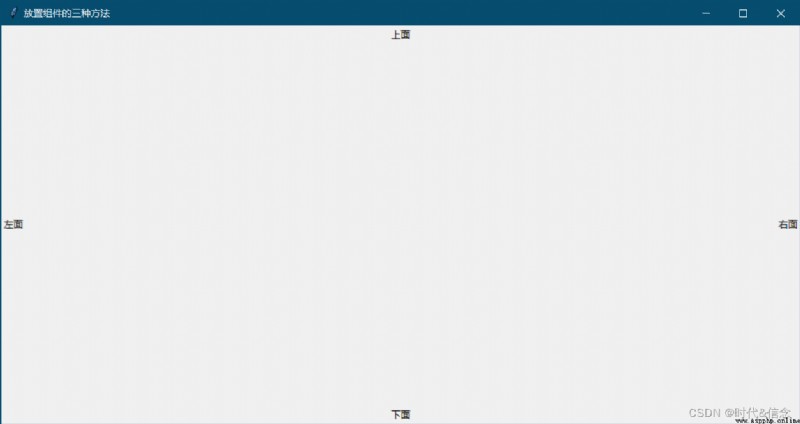
# coding:utf-8
import tkinter as tk
""" pack、grid、place Three placement methods """
# Get the window
window = tk.Tk()
# Set the title of the window
window.title(" Three ways to place components ")
# Set the window size
window.geometry("1000x500")
for i in range(4):
for j in range(3):
# padx and pady Is used to expand the size of each square
tk.Label(window, text="love").grid(row=i, column=j, padx=50, pady=50)
# Cycle it
window.mainloop()
design sketch :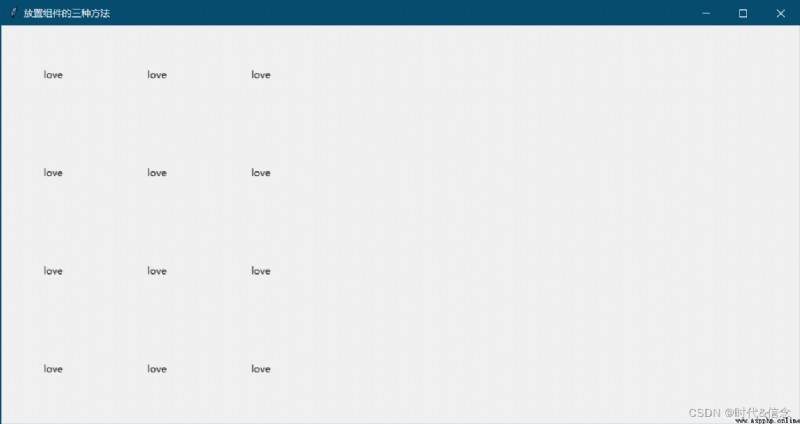
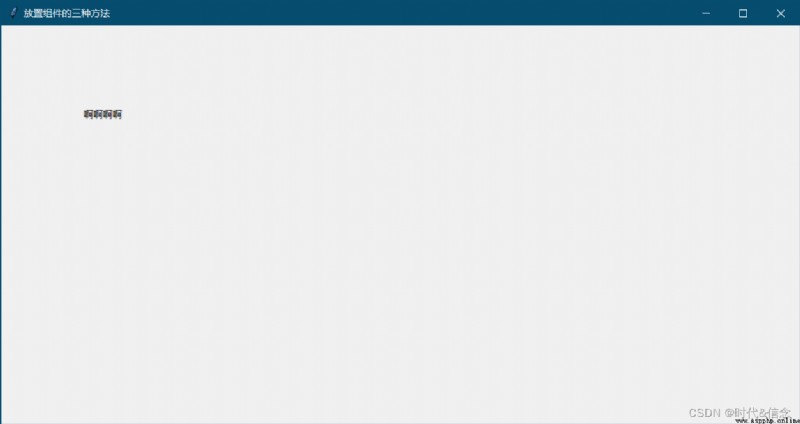
# coding:utf-8
import tkinter as tk
""" pack、grid、place Three placement methods """
# Get the window
window = tk.Tk()
# Set the title of the window
window.title(" Three ways to place components ")
# Set the window size
window.geometry("1000x500")
# Take the most northwest direction as the coordinate origin , In concrete xy coordinates , place
tk.Label(window, text=" Ah ah ah ").place(x=100, y=100, anchor="nw")
# Cycle it
window.mainloop()
design sketch :