代碼創建如下:
''' 創建測試數據集 '''
def createDataset():
dataSet = [['sunny', 'hot', 'high', 'weak', 'no'],
['sunny', 'hot', 'high', 'strong', 'no'],
['overcast', 'hot', 'high', 'weak', 'yes'],
['rain', 'mild', 'high', 'weak', 'yes'],
['rain', 'cool', 'normal', 'weak', 'yes'],
['rain', 'cool', 'normal', 'strong', 'no'],
['overcast', 'cool', 'normal', 'strong', 'yes'],
['sunny', 'mild', 'high', 'weak', 'no'],
['sunny', 'cool', 'normal', 'weak', 'yes'],
['rain', 'mild', 'normal', 'weak', 'yes'],
['sunny', 'mild', 'normal', 'strong', 'yes'],
['overcast', 'mild', 'high', 'strong', 'yes'],
['overcast', 'hot', 'normal', 'weak', 'yes'],
['rain', 'mild', 'high', 'strong', 'no']] # 數據集
labels = ['outlook', 'temperature', 'humidity', 'wind'] # 分類屬性
return dataSet, labels
代碼創建的表與上述表格一一對應!
通常熵表示事物的混亂程度,熵越大表示混亂程度越大,越小表示混亂程度越小。
假定當前樣本集合 𝐷 共包含 ℓ 類樣本, 其中第 𝑘 類樣本所占的比例為 𝑝𝑘 (𝑘 = 1, 2, · · · , ℓ), 則 𝐷 的信息熵定義為:
以活動是否進行為例,在活動這一欄屬性中,活動的取值有兩種:取消(5個)和進行(9個),則可以通過計算得到H(活動),即活動的信息熵:
代碼運算如下:
''' 計算香農熵 '''
def shannonEnt(dataSet):
len_dataSet = len(dataSet) # 得到數據集的行數
labelCounts = {
} # 創建一個字典,用於計算,每個屬性值出現的次數
shannonEnt = 0.0 # 令香農熵初始值為0
for element in dataSet: # 對每一條數據進行逐條分析
currentLabel = element[-1] # 提取屬性值信息
if currentLabel not in labelCounts.keys(): # 以屬性名作為labelCounts這個字典的key
labelCounts[currentLabel] = 0 # 設定字典的初始value為0
labelCounts[currentLabel] += 1 # value值逐漸加一,達到統計標簽出現次數的作用
for key in labelCounts: # 遍歷字典的key
proportion = float(labelCounts[key])/len_dataSet
shannonEnt -= proportion*log(proportion, 2) # 根據公式得到香農熵
print('屬性值出現的次數結果:{}'.format(labelCounts))
print('活動的信息熵為:{}'.format(shannonEnt))
return shannonEnt

假定離散屬性 𝑎 有 𝑚 個可能的取值 {𝑎1, 𝑎2, · · · , 𝑎𝑚}, 若使用 𝑎 來對 樣本集 𝐷 進行劃分, 則會產生 𝑚 個分支結點, 其中第 𝑖 個分支結點包含 了 𝐷 中所有在屬性 𝑎 上取值為 𝑎𝑖 的樣本, 記為 𝐷𝑖. 可根據公式計算 出 𝐷𝑖 的信息熵, 再考慮到不同的分支結點所包含的樣本數不同, 給分支 結點賦予權重 |𝐷𝑖|/|𝐷|, 即樣本數越多的分支結點的影響越大, 於是可計算出用屬性 𝑎 對樣本集 𝐷 進行劃分所獲得的“信息增益。
其實也就是信息熵減去條件熵。
以求天氣屬性的信息增益為例
天氣屬性共有三種取值:晴(5個)、陰(4個)、雨(5個)


由此可以計算天氣屬性不同取值劃分時的帶權平均熵:
那麼信息增益Gain(活動,天氣)為:
同理,可以計算出Gain(活動,溫度)、Gain(活動,濕度)、Gain(活動,風速),通過比較大小,得到最大信息增益,並選擇最大信息增益對應的屬性作為決策樹的根節點。
代碼計算如下:
''' 劃分數據集,從而更方便地計算條件熵 dataSet:數據集 i:劃分數據集的屬性(如:天氣)的索引(0) value:需要返回的屬性的值(如:晴天) '''
def splitDataSet(dataSet, i, value):
splitDataSet = [] # 創建一個列表,用於存放 劃分後的數據集
for example in dataSet: # 遍歷給定的數據集
if example[i] == value:
splitExample = example[:i]
splitExample.extend(example[i+1:])
splitDataSet.append(splitExample) # 去掉i屬性這一列,生成新的數據集,即劃分的數據集
return splitDataSet # 得到劃分的數據集
''' 計算信息增益,從而選取最優屬性(標簽) '''
def chooseBestFeature(dataSet):
numFeature = len(dataSet[0]) - 1 # 求屬性的個數
baseEntropy = shannonEnt(dataSet) # 測試數據集的香農熵,即信息熵
bestInfoGain = 0.0 # 創建初始的最大信息增益,用於得到最終的最大信息增益
bestFeature = -1 # 用於得到最大信息增益對應的屬性 在數據集中的索引;其中-1,可以為任意數字(數字范圍:小於0或大於等於numFeature)
for i in range(numFeature):
featList = [example[i] for example in dataSet] # 得到第i個屬性,對應的全部屬性值
featValue = set(featList) # 創建一個set集合(集合中的元素不可重復),更容易看出全部屬性值
newEntropy = 0.0 # 創建初始條件熵,初始值為0
for value in featValue: # 對每一個屬性值進行遍歷
subDataSet = splitDataSet(dataSet, i, value) # 調用函數,進行數據集劃分
proportion = float(len(subDataSet)/len(dataSet))
newEntropy += proportion*shannonEnt(subDataSet) # 通過公式計算條件熵
infoGain = baseEntropy - newEntropy # 通過公式計算信息增益
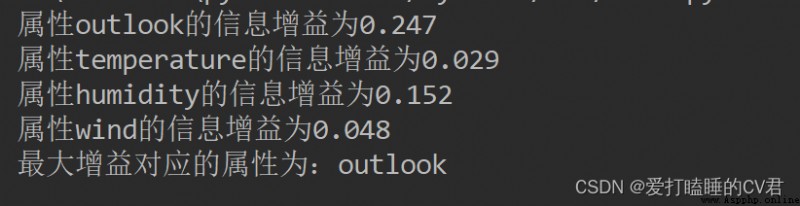
print('屬性%s的信息增益為%.3f' % (labels[i], infoGain)) # 打印每個屬性對應的信息增益
if infoGain > bestInfoGain: # 通過比較,選出最大的信息增益及其對應屬性在數據集中的索引
bestInfoGain = infoGain
bestFeature = i
print('最大增益對應的屬性為:%s' % labels[bestFeature])
return bestFeature
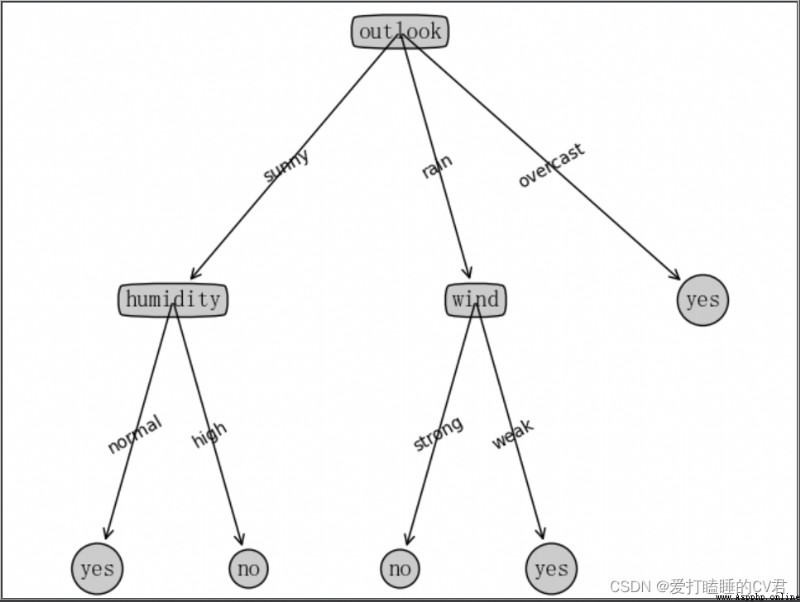
函數的圖解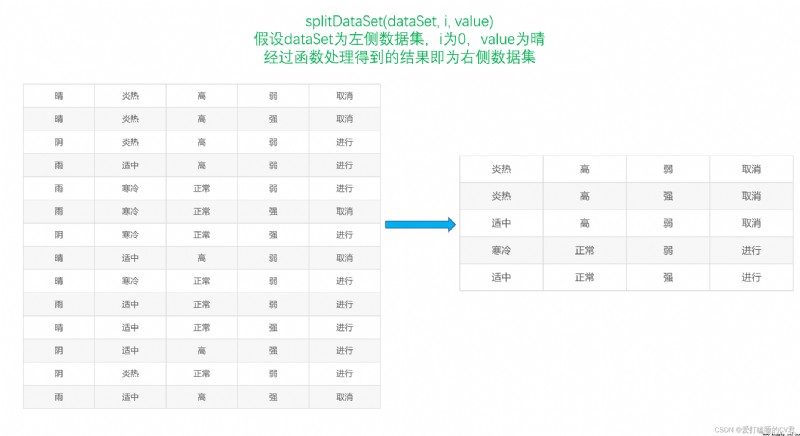
ID3決策樹算法:
''' 統計classList中出現最多的類標簽 '''
def maxLabel(classList):
classCount = {
}
for vote in classList: # 統計classCount中元素出現的次數
if vote not in classCount.keys():
classCount[vote] = 0
classCount += 1
# 根據字典的值降序排序,得到的結果是一個列表,列表中的元素是元組
sortedClassCount = sorted(classCount.items(), key=operator.itemgetter(1), reverse=True)
return sortedClassCount[0][0] # 返回classCount中出現次數最多的元素
''' 構建決策樹 '''
def creatTree(dataSet, labels, featLabels):
classList = [example[-1] for example in dataSet] # 獲取分類標簽(yes或no)
if classList.count(classList[0]) == len(classList): # 如果分類標簽相同,則停止劃分
return classList[0]
if len(dataSet[0]) == 1: # 如果遍歷完所有的屬性,則返回結果中出現次數最多的分類標簽
return maxLabel(classList)
bestFeature = chooseBestFeature(dataSet) # 得到最大信息增益對應的屬性在數據集中的索引
bestFeatureLabel = labels[bestFeature] # 得到最大信息增益對應的屬性(如:天氣)
featLabels.append(bestFeatureLabel)
myTree = {
bestFeatureLabel: {
}} # 根據最大信息增益的標簽生成樹
del(labels[bestFeature]) # 刪除已經使用的屬性
featureList = [example[bestFeature] for example in dataSet] # 得到數據集中最優屬性的屬性值(如:晴天,下雨)
featureValue = set(featureList) # 創建集合,去除重復的屬性值
for value in featureValue:
subLabels = labels[:] # 新的屬性標簽集合(與labels相比,去掉了已經使用的屬性標簽)
# 遞歸調用creatTree,從而創建決策樹
myTree[bestFeatureLabel][value] = creatTree(splitDataSet(dataSet, bestFeature, value), subLabels, featLabels)
# print(featLabels)
return myTree

''' 使用決策樹進行分類 '''
def classify(myTree, featLabels, testData):
# global classLabel
firstStr = next(iter(myTree)) # 得到決策樹根節點
# print(firstStr)
secondDict = myTree[firstStr] # 下一個字典
# print(secondDict)
featIndex = featLabels.index(firstStr) # 得到根節點屬性在測試數據集中對應的索引
# print(featIndex)
for key in secondDict.keys():
if testData[featIndex] == key:
if type(secondDict[key]).__name__ == 'dict': # type().__name__的作用是,判斷數據類型
classLabel = classify(secondDict[key], featLabels, testData)
else:
classLabel = secondDict[key]
return classLabel

# -*- coding: UTF-8 -*-
""" # @Time: 2022/6/18 16:19 # @Author: 愛打瞌睡的CV君 # @CSDN: https://blog.csdn.net/qq_44921056 """
from math import log
import operator
''' 創建測試數據集 '''
def createDataset():
dataSet = [['sunny', 'hot', 'high', 'weak', 'no'],
['sunny', 'hot', 'high', 'strong', 'no'],
['overcast', 'hot', 'high', 'weak', 'yes'],
['rain', 'mild', 'high', 'weak', 'yes'],
['rain', 'cool', 'normal', 'weak', 'yes'],
['rain', 'cool', 'normal', 'strong', 'no'],
['overcast', 'cool', 'normal', 'strong', 'yes'],
['sunny', 'mild', 'high', 'weak', 'no'],
['sunny', 'cool', 'normal', 'weak', 'yes'],
['rain', 'mild', 'normal', 'weak', 'yes'],
['sunny', 'mild', 'normal', 'strong', 'yes'],
['overcast', 'mild', 'high', 'strong', 'yes'],
['overcast', 'hot', 'normal', 'weak', 'yes'],
['rain', 'mild', 'high', 'strong', 'no']] # 數據集
labels = ['outlook', 'temperature', 'humidity', 'wind'] # 分類屬性
return dataSet, labels
''' 計算香農熵 '''
def shannonEnt(dataSet):
len_dataSet = len(dataSet) # 得到數據集的行數
labelCounts = {
} # 創建一個字典,用於計算,每個屬性值出現的次數
shannonEnt = 0.0 # 令香農熵初始值為0
for element in dataSet: # 對每一條數據進行逐條分析
currentLabel = element[-1] # 提取屬性值信息
if currentLabel not in labelCounts.keys(): # 以屬性名作為labelCounts這個字典的key
labelCounts[currentLabel] = 0 # 設定字典的初始value為0
labelCounts[currentLabel] += 1 # value值逐漸加一,達到統計標簽出現次數的作用
for key in labelCounts: # 遍歷字典的key
proportion = float(labelCounts[key])/len_dataSet
shannonEnt -= proportion*log(proportion, 2) # 根據公式得到香農熵
# print('屬性值出現的次數結果:{}'.format(labelCounts))
# print('活動的信息熵為:{}'.format(shannonEnt))
return shannonEnt
''' 劃分數據集,從而更方便地計算條件熵 dataSet:數據集 i:劃分數據集的屬性(如:天氣)的索引(0) value:需要返回的屬性的值(如:晴天) '''
def splitDataSet(dataSet, i, value):
splitDataSet = [] # 創建一個列表,用於存放 劃分後的數據集
for example in dataSet: # 遍歷給定的數據集
if example[i] == value:
splitExample = example[:i]
splitExample.extend(example[i+1:])
splitDataSet.append(splitExample) # 去掉i屬性這一列,生成新的數據集,即劃分的數據集
return splitDataSet # 得到劃分的數據集
''' 計算信息增益,從而選取最優屬性(標簽) '''
def chooseBestFeature(dataSet):
numFeature = len(dataSet[0]) - 1 # 求屬性的個數
baseEntropy = shannonEnt(dataSet) # 測試數據集的香農熵,即信息熵
bestInfoGain = 0.0 # 創建初始的最大信息增益,用於得到最終的最大信息增益
bestFeature = -1 # 用於得到最大信息增益對應的屬性 在數據集中的索引;其中-1,可以為任意數字(數字范圍:小於0或大於等於numFeature)
for i in range(numFeature):
featList = [example[i] for example in dataSet] # 得到第i個屬性,對應的全部屬性值
featValue = set(featList) # 創建一個set集合(集合中的元素不可重復),更容易看出全部屬性值
newEntropy = 0.0 # 創建初始條件熵,初始值為0
for value in featValue: # 對每一個屬性值進行遍歷
subDataSet = splitDataSet(dataSet, i, value) # 調用函數,進行數據集劃分
proportion = float(len(subDataSet)/len(dataSet))
newEntropy += proportion*shannonEnt(subDataSet) # 通過公式計算條件熵
infoGain = baseEntropy - newEntropy # 通過公式計算信息增益
# print('屬性%s的信息增益為%.3f' % (labels[i], infoGain)) # 打印每個屬性對應的信息增益
if infoGain > bestInfoGain: # 通過比較,選出最大的信息增益及其對應屬性在數據集中的索引
bestInfoGain = infoGain
bestFeature = i
# print('最大增益對應的屬性為:%s' % labels[bestFeature])
return bestFeature
''' 統計classList中出現最多的類標簽 '''
def maxLabel(classList):
classCount = {
}
for vote in classList: # 統計classCount中元素出現的次數
if vote not in classCount.keys():
classCount[vote] = 0
classCount += 1
# 根據字典的值降序排序,得到的結果是一個列表,列表中的元素是元組
sortedClassCount = sorted(classCount.items(), key=operator.itemgetter(1), reverse=True)
return sortedClassCount[0][0] # 返回classCount中出現次數最多的元素
''' 構建決策樹 '''
def creatTree(dataSet, labels, featLabels):
classList = [example[-1] for example in dataSet] # 獲取分類標簽(yes或no)
if classList.count(classList[0]) == len(classList): # 如果分類標簽相同,則停止劃分
return classList[0]
if len(dataSet[0]) == 1: # 如果遍歷完所有的屬性,則返回結果中出現次數最多的分類標簽
return maxLabel(classList)
bestFeature = chooseBestFeature(dataSet) # 得到最大信息增益對應的屬性在數據集中的索引
bestFeatureLabel = labels[bestFeature] # 得到最大信息增益對應的屬性(如:天氣)
featLabels.append(bestFeatureLabel)
myTree = {
bestFeatureLabel: {
}} # 根據最大信息增益的標簽生成樹
del(labels[bestFeature]) # 刪除已經使用的屬性
featureList = [example[bestFeature] for example in dataSet] # 得到數據集中最優屬性的屬性值(如:晴天,下雨)
featureValue = set(featureList) # 創建集合,去除重復的屬性值
for value in featureValue:
subLabels = labels[:] # 新的屬性標簽集合(與labels相比,去掉了已經使用的屬性標簽)
# 遞歸調用creatTree,從而創建決策樹
myTree[bestFeatureLabel][value] = creatTree(splitDataSet(dataSet, bestFeature, value), subLabels, featLabels)
# print(featLabels)
return myTree
''' 使用決策樹進行分類 '''
def classify(myTree, featLabels, testData):
firstStr = next(iter(myTree)) # 得到決策樹根節點
# print(firstStr)
secondDict = myTree[firstStr] # 下一個字典
# print(secondDict)
featIndex = featLabels.index(firstStr) # 得到根節點屬性在測試數據集中對應的索引
# print(featIndex)
for key in secondDict.keys():
if testData[featIndex] == key:
if type(secondDict[key]).__name__ == 'dict': # type().__name__的作用是,判斷數據類型
classLabel = classify(secondDict[key], featLabels, testData)
else:
classLabel = secondDict[key]
return classLabel
if __name__ == '__main__':
dataSet, labels = createDataset() # 創建測試數據集及其標簽
featLabels = [] # 用於存放最佳屬性值
myTree = creatTree(dataSet, labels, featLabels) # 生成決策樹
# print('決策樹為:{}'.format(myTree))
testData = ['sunny', 'hot', 'high', 'weak'] # 測試數據
result = classify(myTree, featLabels, testData) # 進行測試
print('決策結果:{}'.format(result))
其中demo是上部分編寫決策樹源碼的文件名
繪圖所用函數可參考:https://matplotlib.org/stable/tutorials/text/annotations.html#sphx-glr-tutorials-text-annotations-py
# -*- coding: UTF-8 -*-
""" # @Time: 2022/6/19 16:44 # @Author: 愛打瞌睡的CV君 # @CSDN: https://blog.csdn.net/qq_44921056 """
from matplotlib.font_manager import FontProperties
import matplotlib.pyplot as plt
import demo
# 定義文本框和箭頭格式
decisionNode = dict(boxstyle='round4', fc='0.8')
leafNode = dict(boxstyle='circle', fc='0.8')
arrow_args = dict(arrowstyle='<-')
# 設置中文字體
font = FontProperties(fname=r"C:\Windows\Fonts\simsun.ttc", size=14)
""" 函數說明:獲取決策樹葉子結點的數目 Parameters: myTree - 決策樹 Returns: numLeafs - 決策樹的葉子結點的數目 """
def getNumLeafs(myTree):
numLeafs = 0 # 初始化葉子
# python3中myTree.keys()返回的是dict_keys,不在是list,所以不能使用myTree.keys()[0]的方法獲取結點屬性,
# 可以使用list(myTree.keys())[0]
firstStr = next(iter(myTree))
secondDict = myTree[firstStr] # 獲取下一組字典
for key in secondDict.keys():
if type(secondDict[key]).__name__ == 'dict': # 測試該結點是否為字典,如果不是字典,代表此結點為葉子結點
numLeafs += getNumLeafs(secondDict[key])
else:
numLeafs += 1
return numLeafs
""" 函數說明:獲取決策樹的層數 Parameters: myTree - 決策樹 Returns: maxDepth - 決策樹的層數 """
def getTreeDepth(myTree):
maxDepth = 0 # 初始化決策樹深度
# python3中myTree.keys()返回的是dict_keys,不在是list,所以不能使用myTree.keys()[0]的方法獲取結點屬性,
# 可以使用list(myTree.keys())[0]
firstStr = next(iter(myTree))
secondDict = myTree[firstStr] # 獲取下一個字典
for key in secondDict.keys():
if type(secondDict[key]).__name__ == 'dict': # 測試該結點是否為字典,如果不是字典,代表此結點為葉子結點
thisDepth = 1 + getTreeDepth(secondDict[key])
else:
thisDepth = 1
if thisDepth > maxDepth:
maxDepth = thisDepth # 更新層數
# print(maxDepth)
return maxDepth
""" 函數說明:繪制結點 Parameters: nodeTxt - 結點名 centerPt - 文本位置 parentPt - 標注的箭頭位置 nodeType - 結點格式 """
def plotNode(nodeTxt, centerPt, parentPt, nodeType):
arrow_args = dict(arrow) # 定義箭頭格式
font = FontProperties(fname=r"C:\Windows\Fonts\simsun.ttc", size=14) # 設置中文字體
createPlot.ax1.annotate(nodeTxt, xy=parentPt, xycoords='axes fraction', # 繪制結點
xytext=centerPt, textcoords='axes fraction',
va="center", ha="center", bbox=nodeType, arrowprops=arrow_args, fontproperties=font)
""" 函數說明:標注有向邊屬性值 Parameters: cntrPt、parentPt - 用於計算標注位置 txtString - 標注的內容 """
def plotMidText(cntrPt, parentPt, txtString):
xMid = (parentPt[0] - cntrPt[0]) / 2.0 + cntrPt[0] # 計算標注位置
yMid = (parentPt[1] - cntrPt[1]) / 2.0 + cntrPt[1]
createPlot.ax1.text(xMid, yMid, txtString, va="center", ha="center", rotation=30)
""" 函數說明:繪制決策樹 Parameters: myTree - 決策樹(字典) parentPt - 標注的內容 nodeTxt - 結點名 """
def plotTree(myTree, parentPt, nodeTxt):
decisionNode = dict(box, fc="0.8") # 設置結點格式
leafNode = dict(box, fc="0.8") # 設置葉結點格式
numLeafs = getNumLeafs(myTree) # 獲取決策樹葉結點數目,決定了樹的寬度
depth = getTreeDepth(myTree) # 獲取決策樹層數
firstStr = next(iter(myTree)) # 下個字典
cntrPt = (plotTree.xOff + (1.0 + float(numLeafs)) / 2.0 / plotTree.totalW, plotTree.yOff) # 中心位置
plotMidText(cntrPt, parentPt, nodeTxt) # 標注有向邊屬性值
plotNode(firstStr, cntrPt, parentPt, decisionNode) # 繪制結點
secondDict = myTree[firstStr] # 下一個字典,也就是繼續繪制子結點
plotTree.yOff = plotTree.yOff - 1.0 / plotTree.totalD # y偏移
for key in secondDict.keys():
if type(secondDict[key]).__name__ == 'dict': # 測試該結點是否為字典,如果不是字典,代表此結點為葉子結點
plotTree(secondDict[key], cntrPt, str(key)) # 不是葉結點,遞歸調用繼續繪制
else: # 如果是葉結點,繪制葉結點,並標注有向邊屬性值
plotTree.xOff = plotTree.xOff + 1.0 / plotTree.totalW
plotNode(secondDict[key], (plotTree.xOff, plotTree.yOff), cntrPt, leafNode)
plotMidText((plotTree.xOff, plotTree.yOff), cntrPt, str(key))
plotTree.yOff = plotTree.yOff + 1.0 / plotTree.totalD
""" 函數說明:創建繪制面板 Parameters: inTree - 決策樹(字典) """
def createPlot(inTree):
fig = plt.figure(1, facecolor='white') # 創建fig
fig.clf() # 清空fig
axprops = dict(xticks=[], yticks=[])
createPlot.ax1 = plt.subplot(111, frameon=False, **axprops) # 去掉x、y軸
plotTree.totalW = float(getNumLeafs(inTree)) # 獲取決策樹葉結點數目
plotTree.totalD = float(getTreeDepth(inTree)) # 獲取決策樹層數
plotTree.xOff = -0.5 / plotTree.totalW
plotTree.yOff = 1.0 # x偏移
plotTree(inTree, (0.5, 1.0), '') # 繪制決策樹
plt.show()
if __name__ == '__main__':
dataSet, labels = demo.createDataset()
featLabels = []
myTree = demo.creatTree(dataSet, labels, featLabels)
createPlot(myTree)
文章到這裡就要結束了,但故事還沒有結局
如果本文對你有幫助,記得點個贊喲,也是對作者最大的鼓勵。
如有不足之處可以在評論區多多指正,我會在看到的第一時間進行修正
作者:愛打瞌睡的CV君
CSDN:https://blog.csdn.net/qq_44921056
本文僅用於交流學習,未經作者允許,禁止轉載,更勿做其他用途,違者必究。