Use Ajax Filled please refer to : Exhibition PyEcharts Chart to Django Frame front page tutorial ( Step by step tutorial )
First of all, it needs to be clear ,pyechart It's through python To generate HTML(echart) Tools for , stay django in , We go through Pyechart Generate HTML after , Yes HTML Part of the picture is extracted , Then fill the front end
The first three parts of the process are all for project preparation :
Install necessary dependencies :
pip install django
pip install pyecharts
pip install bs4
edition :
python 3.7.13
Django 3.2.13
pyecharts 1.9.1
Then create django project
django-admin startproject pyecharts_django_demo
cd pyecharts_django_demo/
python manage.py startapp demo
pyecharts_django_demo/settings.py In file , modify INSTALLED_APPS Configuration of , In the file, put the demo Add configuration item , The final result is as follows :INSTALLED_APPS = [
'django.contrib.admin',
'django.contrib.auth',
'django.contrib.contenttypes',
'django.contrib.sessions',
'django.contrib.messages',
'django.contrib.staticfiles',
"demo",
]
INSTALLED_APPS Add the following code above , Convenient follow-up operation :import os
SETTINGS_PATH = os.path.dirname(os.path.dirname(__file__))
TEMPLATES Of DIRS, Before "DIRS" There is an empty list , Let's fill in , This is a fixed way of writing :TEMPLATES = [
{
'BACKEND': 'django.template.backends.django.DjangoTemplates',
'DIRS': [os.path.join(SETTINGS_PATH, 'templates')], # Explain your HTML Where are the documents , This folder will be added later , Here, first configure
'APP_DIRS': True,
'OPTIONS': {
'context_processors': [
'django.template.context_processors.debug',
'django.template.context_processors.request',
'django.contrib.auth.context_processors.auth',
'django.contrib.messages.context_processors.messages',
],
},
},
]
stay demo/ Create a new folder urls.py file , Then write... In the new file :
from django.urls import path
from . import views
urlpatterns = [
path(r'^index/$', views.IndexView.as_view(), name='demo'),
]
Here, let's match the paths first , After the connection is made, the logic will be connected
Navigate to the project root directory url.py file ( stay pyecharts_django_demo/urls.py This is the root directory of the project urls file ):
from django.urls import includedemo The routing The effect of the final modification is as follows :
"""pyecharts_django_demo URL Configuration The `urlpatterns` list routes URLs to views. For more information please see: https://docs.djangoproject.com/en/3.2/topics/http/urls/ Examples: Function views 1. Add an import: from my_app import views 2. Add a URL to urlpatterns: path('', views.home, name='home') Class-based views 1. Add an import: from other_app.views import Home 2. Add a URL to urlpatterns: path('', Home.as_view(), name='home') Including another URLconf 1. Import the include() function: from django.urls import include, path 2. Add a URL to urlpatterns: path('blog/', include('blog.urls')) """
from django.contrib import admin
from django.urls import path, include
urlpatterns = [
path('admin/', admin.site.urls),
path(r'demo/', include('demo.urls'))
]
Under the project root , And manage.py In the same directory , Create a templates Folder ( Don't mistake your name , Fixed writing ), The following file structure is :
templates Create one under the folder index.html file :<!DOCTYPE html>
<html lang="en">
<head>
<meta charset="UTF-8">
<title>Awesome-pyecharts</title>
<script src="https://cdn.bootcss.com/jquery/3.0.0/jquery.min.js"></script>
<script type="text/javascript" src="https://assets.pyecharts.org/assets/echarts.min.js"></script>
</head>
<body>
<div>
{% autoescape off %}
{
{ my_pic }}
{% endautoescape %}
</div>
</body>
</html>
Knowledge point :
{% xxxx %} And { { xxxx }} yes django Fill the front-end template {% xxxx %} Usually some logic or configuration items , Like here autoescape off It allows the back end to fill in the front end label , Instead of being django The default translation is string { { xxxx }} Usually the filling value , This pic_div It's the picture of the back end coming through demo/view.py writes :import json
from random import randrange
from rest_framework.views import APIView
from pyecharts.charts import Bar
from pyecharts import options as opts
from django.shortcuts import render
from django.views.generic import View
from bs4 import BeautifulSoup
# This is how to write the display page
class IndexView(View):
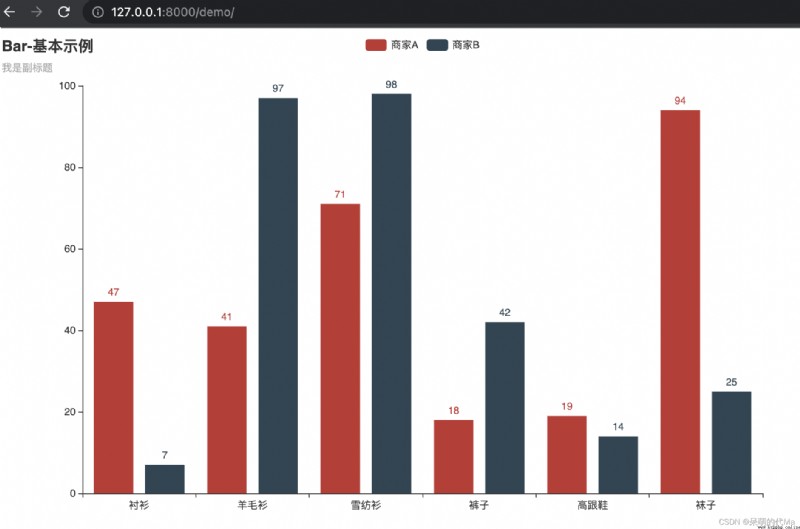
def get(self, request):
 my_pic = (
Bar()
.add_xaxis([" shirt ", " Woolen sweater ", " Snow spins unlined upper garment ", " The trousers ", " High heels ", " socks "])
.add_yaxis(" merchants A", [randrange(0, 100) for _ in range(6)])
.add_yaxis(" merchants B", [randrange(0, 100) for _ in range(6)])
.set_global_opts(title_opts=opts.TitleOpts(title="Bar- Basic example ", subtitle=" I'm the subtitle "))
)
html_embed = my_pic.render_embed()
soup = BeautifulSoup(html_embed, 'lxml')
my_pic = "\n".join([str(i).strip() for i in soup.body.contents]) # soup.body.contents It's a list , Turn the list into a string
return render(request, 'index.html', {
"my_pic": my_pic,
})
visit :http://127.0.0.1:8000/demo/
be familiar with django Words , The logic is still very simple , Mainly in the View in ,
my_pic = (
Bar()
.add_xaxis([" shirt ", " Woolen sweater ", " Snow spins unlined upper garment ", " The trousers ", " High heels ", " socks "])
.add_yaxis(" merchants A", [randrange(0, 100) for _ in range(6)])
.add_yaxis(" merchants B", [randrange(0, 100) for _ in range(6)])
.set_global_opts(title_opts=opts.TitleOpts(title="Bar- Basic example ", subtitle=" I'm the subtitle "))
)
Then use
html_embed = my_pic.render_embed()
You can get HTML The page of , We found that HTML The main content of this article is body in , With div and script label , So we went through BeautifulSoup hold HTML Of body Extract the content , And get rid of it <body></body> This label of itself , Finally, tidy up :
soup = BeautifulSoup(html_embed, 'lxml')
my_pic = "\n".join([str(i).strip() for i in soup.body.contents]) # soup.body.contents It's a list , Turn the list into a string
Leave the whole to the front end , And use :
<div>
{% autoescape off %}
{
{ my_pic }}
{% endautoescape %}
</div>
This allows us to put my_pic It can be interpreted as HTML label , Instead of being quoted as a string by default