Hi. , Hello, everyone , This is the demon king ~

For software installation package ,Pycharm The activation code of the professional version can be collected privately ~

choice file( file ) >>> setting( Set up ) >>> Project( project ) >>> python interpreter(python Interpreter )
Click on the gear , choice add
add to python The installation path
choice file( file ) >>> setting( Set up ) >>> Plugins( plug-in unit )
Click on Marketplace Enter the name of the plug-in you want to install such as : Translation plug-ins Input translation / Chinese plug-in Input Chinese
Select the corresponding plug-in and click install( install ) that will do
After successful installation Yes, it will pop up restart pycharm The option to Click ok , Restart to take effect

Web developer tools for packet capture analysis …

If you need the source code of this article 、 Installation package 、 Video tutorial 、 The answers can be answered privately ~
If you don't want to copy the source code one by one, you can also confide in me , I send you the complete source code ~
( Or view and click on the homepage ( article ) The mobile text on the left is free ~( You may need to row down ))

# Import data request module
import requests
# Import regular expression module
import re
# Import json modular
import json
# Import format output module
import pprint
# Import csv modular
import csv
# Import the time module
import time
# Import random module
import random
# It's no use utf-8 Save table data , Disorderly ?
Source code 、 answer 、 Tutorial can be added Q skirt :832157862 Free collection
f = open('data Multi page _1.csv', mode='a', encoding='utf-8', newline='') # Open a file data.csv
csv_writer = csv.DictWriter(f, fieldnames=[
' Position ',
' City ',
' Experience ',
' Education ',
' Salary ',
' company ',
' Fringe benefits ',
' Company area ',
' The company size ',
' Company type ',
' Release date ',
' Position details page ',
' Company details page ',
])
csv_writer.writeheader()
use python Code simulation browser for url Address send request
Don't attempt a lesson , Master everything , Learn to understand ideas , Why do we do this at every step …
know headers 1
I do not know! headers 2
headers Request header , Functional camouflage python Code , Pretend to be a browser
The dictionary form , Build a complete key value pair
If you headers When the disguise is not enough , You may be recognized by the server , You're a crawler , So it doesn't give you the corresponding data content
for page in range(1, 15):
print(f' Collecting No {page} The data content of the page ')
time.sleep(random.randint(1, 2))
url = f'https://search.51job.com/list/010000%252C020000%252C030200%252C040000%252C090200,000000,0000,00,9,99,python,2,{page}.html'
headers = {

'User-Agent': 'Mozilla/5.0 (Windows NT 10.0; WOW64) AppleWebKit/537.36 (KHTML, like Gecko) Chrome/101.0.0.0 Safari/537.36'
}
response = requests.get(url=url, headers=headers)
print(response) # <Response [200]> The response object
Get data , Not what you want , You may have been crawled backwards , Put on more disguise < Foreshadowing >
# print(response.text) String data type
re.findall() That is, where to find what kind of data content
[0] It means to extract the first element in the list —> list index out of range So your list is empty
Use regular expressions /css/xpath The extracted data returns an empty list —> 1. Your grammar is wrong 2. response.text No data you want
—> Is it creeping backwards ( Verification Code Need to log in ) Is it right? headers The parameters are missing Is it sealed IP
 html_data = re.findall('window.__SEARCH_RESULT__ = (.*?)</script>', response.text)[0]
# print(html_data)
json_data = json.loads(html_data)
# pprint.pprint(json_data)
# Through the dictionary value method Extract the position information list , adopt for Loop through one by one to extract position information
for index in json_data['engine_jds']:
# According to the content to the left of the colon , Extract the content to the right of the colon
# pprint.pprint(index)
try:
dit = {

' Position ': index['job_title'],
' City ': index['attribute_text'][0],
' Experience ': index['attribute_text'][1],
' Education ': index['attribute_text'][2],
' Salary ': index['providesalary_text'],
' company ': index['company_name'],
' Fringe benefits ': index['jobwelf'],
' Company area ': index['companyind_text'],
' The company size ': index['companysize_text'],
' Company type ': index['companytype_text'],
' Release date ': index['issuedate'],
' Position details page ': index['job_href'],
' Company details page ': index['company_href'],
}
csv_writer.writerow(dit)
print(dit)
except:
pass
----> What is the basic idea of a reptile ?
Data source analysis
Request and response Request that website ? What is the website What is the request method What are the request parameters ?
Send a request —> get data —> Parsing data —> Save the data
import requests
import parsel
url = 'https://jobs.51job.com/shanghai-jdq/137393082.html?s=sou_sou_soulb&t=0_0'
headers = {

'User-Agent': 'Mozilla/5.0 (Windows NT 10.0; WOW64) AppleWebKit/537.36 (KHTML, like Gecko) Chrome/101.0.0.0 Safari/537.36',
}
response = requests.get(url=url, headers=headers)
response.encoding = response.apparent_encoding # Automatic identification code
print(response.text)
selector = parsel.Selector(response.text)
content_1 = selector.css('.cn').get()
content_2 = selector.css('.tCompany_main').get()
content = content_1 + content_2
# file name Company name + Position name
with open('python.html', mode='w', encoding='utf-8') as f:
f.write(content)
import pandas as pd
from pyecharts.charts import *
from pyecharts import options as opts
import re
from pyecharts.globals import ThemeType
from pyecharts.commons.utils import JsCode
df = pd.read_csv(" Recruitment data .csv")
df.head()
df.info()
df[' Salary '].unique()
df['bottom']=df[' Salary '].str.extract('^(\d+).*')
df['top']=df[' Salary '].str.extract('^.*?-(\d+).*')
df['top'].fillna(df['bottom'],inplace=True)
df['commision_pct']=df[' Salary '].str.extract('^.*?·(\d{2}) pay ')
df['commision_pct'].fillna(12,inplace=True)
df['commision_pct']=df['commision_pct'].astype('float64')
df['commision_pct']=df['commision_pct']/12
df.dropna(inplace=True)
Source code 、 answer 、 Tutorial can be added Q skirt :261823976 Free collection
df['bottom'] = df['bottom'].astype('int64')
df['top'] = df['top'].astype('int64')
df[' Average salary '] = (df['bottom']+df['top'])/2*df['commision_pct']
df[' Average salary '] = df[' Average salary '].astype('int64')
df.head()
df[' Salary '] = df[' Salary '].apply(lambda x:re.sub('.* thousand / month ', '0.3-0.7 ten thousand / month ', x))
df[" Salary "].unique()
df['bottom'] = df[' Salary '].str.extract('^(.*?)-.*?')
df['top'] = df[' Salary '].str.extract('^.*?-(\d\.\d|\d)')
df.dropna(inplace=True)
df['bottom'] = df['bottom'].astype('float64')
df['top'] = df['top'].astype('float64')
df[' Average salary '] = (df['bottom']+df['top'])/2 * 10
df.head()
mean = df.groupby(' Education ')[' Average salary '].mean().sort_values()
x = mean.index.tolist()
y = mean.values.tolist()
c = (
Bar()
.add_xaxis(x)
.add_yaxis(
" Education ",
y
)
.set_global_opts(title_opts=opts.TitleOpts(title=" Average salary for different degrees "),datazoom_opts=opts.DataZoomOpts())
.set_series_opts(label_opts=opts.LabelOpts(is_show=False))
)
c.render_notebook()
color_js = """new echarts.graphic.LinearGradient(0, 1, 0, 0,
[{
offset: 0, color: '#63e6be'}, {
offset: 1, color: '#0b7285'}], false)"""
color_js1 = """new echarts.graphic.LinearGradient(0, 0, 0, 1, [{

offset: 0,
color: '#ed1941'
}, {

offset: 1,
color: '#009ad6'
}], false)"""
dq = df.groupby(' City ')[' Position '].count().to_frame(' Number ').sort_values(by=' Number ',ascending=False).reset_index()
x_data = dq[' City '].values.tolist()[:20]
y_data = dq[' Number '].values.tolist()[:20]
b1 = (
Bar(init_opts=opts.InitOpts(theme=ThemeType.DARK,bg_color=JsCode(color_js1),width='1000px',height='600px'))
.add_xaxis(x_data)
.add_yaxis('',
y_data ,
category_gap="50%",
label_opts=opts.LabelOpts(
font_size=12,
color='yellow',
font_weight='bold',
font_family='monospace',
position='insideTop',
formatter = '{b}\n{c}'
),
)
.set_series_opts(
Source code 、 answer 、 Tutorial can be added Q skirt :261823976 Free collection
itemstyle_opts={

"normal": {

"color": JsCode(color_js),
"barBorderRadius": [15, 15, 0, 0],
"shadowColor": "rgb(0, 160, 221)",
}
}
)
.set_global_opts(
title_opts=opts.TitleOpts(title=' recruit To hire Count The amount front 20 Of city City District Domain ',
title_textstyle_opts=opts.TextStyleOpts(color="yellow"),
pos_top='7%',pos_left = 'center'
),
legend_opts=opts.LegendOpts(is_show=False),
xaxis_opts=opts.AxisOpts(axislabel_opts=opts.LabelOpts(rotate=-15)),
yaxis_opts=opts.AxisOpts(name="",
name_location='middle',
name_gap=40,
name_textstyle_opts=opts.TextStyleOpts(font_size=16)),
datazoom_opts=[opts.DataZoomOpts(range_start=1,range_end=50)]
)
)
b1.render_notebook()
boss = df[' Education '].value_counts()
x = boss.index.tolist()
y = boss.values.tolist()
data_pair = [list(z) for z in zip(x, y)]
c = (
Pie(init_opts=opts.InitOpts(width="1000px", height="600px", bg_color="#2c343c"))
.add(
series_name=" Proportion of educational needs ",
data_pair=data_pair,
label_opts=opts.LabelOpts(is_show=False, position="center", color="rgba(255, 255, 255, 0.3)"),
)
.set_series_opts(
tooltip_opts=opts.TooltipOpts(
trigger="item", formatter="{a} <br/>{b}: {c} ({d}%)"
),
label_opts=opts.LabelOpts(color="rgba(255, 255, 255, 0.3)"),
)
.set_global_opts(
title_opts=opts.TitleOpts(
title=" Proportion of educational needs ",
pos_left="center",
pos_top="20",
title_textstyle_opts=opts.TextStyleOpts(color="#fff"),
),
legend_opts=opts.LegendOpts(is_show=False),
)
.set_colors(["#D53A35", "#334B5C", "#61A0A8", "#D48265", "#749F83"])
)
c.render_notebook()
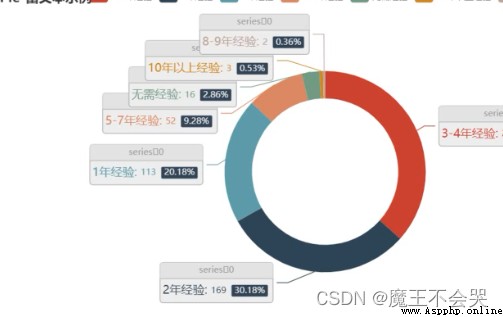
boss = df[' Experience '].value_counts()
x = boss.index.tolist()
y = boss.values.tolist()
data_pair = [list(z) for z in zip(x, y)]
c = (
Pie(init_opts=opts.InitOpts(width="1000px", height="600px", bg_color="#2c343c"))
.add(
series_name=" Proportion of experience demand ",
data_pair=data_pair,
label_opts=opts.LabelOpts(is_show=False, position="center", color="rgba(255, 255, 255, 0.3)"),
)
.set_series_opts(
tooltip_opts=opts.TooltipOpts(
trigger="item", formatter="{a} <br/>{b}: {c} ({d}%)"
),
label_opts=opts.LabelOpts(color="rgba(255, 255, 255, 0.3)"),
)
.set_global_opts(
title_opts=opts.TitleOpts(
title=" Proportion of experience demand ",
pos_left="center",
pos_top="20",
title_textstyle_opts=opts.TextStyleOpts(color="#fff"),
),
legend_opts=opts.LegendOpts(is_show=False),
)
.set_colors(["#D53A35", "#334B5C", "#61A0A8", "#D48265", "#749F83"])
)
c.render_notebook()
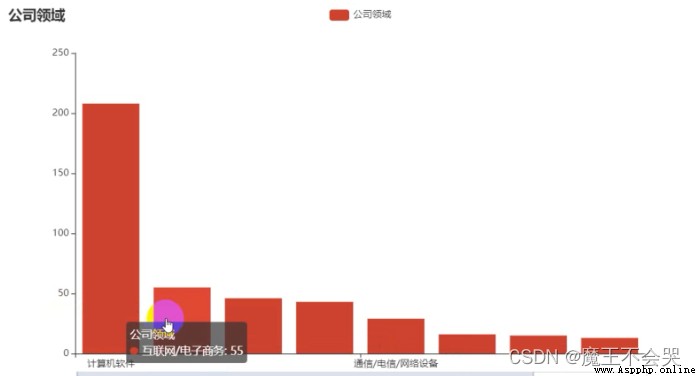
boss = df[' Company area '].value_counts()
x = boss.index.tolist()
y = boss.values.tolist()
data_pair = [list(z) for z in zip(x, y)]
c = (
Pie(init_opts=opts.InitOpts(width="1000px", height="600px", bg_color="#2c343c"))
.add(
series_name=" The company's field accounts for ",
data_pair=data_pair,
label_opts=opts.LabelOpts(is_show=False, position="center", color="rgba(255, 255, 255, 0.3)"),
)
.set_series_opts(
tooltip_opts=opts.TooltipOpts(
trigger="item", formatter="{a} <br/>{b}: {c} ({d}%)"
),
label_opts=opts.LabelOpts(color="rgba(255, 255, 255, 0.3)"),
)
.set_global_opts(
title_opts=opts.TitleOpts(
title=" The company's field accounts for ",
pos_left="center",
pos_top="20",
title_textstyle_opts=opts.TextStyleOpts(color="#fff"),
),
legend_opts=opts.LegendOpts(is_show=False),
)
.set_colors(["#D53A35", "#334B5C", "#61A0A8", "#D48265", "#749F83"])
)
c.render_notebook()
from pyecharts import options as opts
from pyecharts.charts import Pie
from pyecharts.faker import Faker
boss = df[' Experience '].value_counts()
x = boss.index.tolist()
y = boss.values.tolist()
data_pair = [list(z) for z in zip(x, y)]
Source code 、 answer 、 Tutorial can be added Q skirt :832157862 Free collection
c = (
Pie()
.add("", data_pair)
.set_colors(["blue", "green", "yellow", "red", "pink", "orange", "purple"])
.set_global_opts(title_opts=opts.TitleOpts(title=" Proportion of experience requirements "))
.set_series_opts(label_opts=opts.LabelOpts(formatter="{b}: {c}"))
)
c.render_notebook()
from pyecharts import options as opts
from pyecharts.charts import Pie
from pyecharts.faker import Faker
boss = df[' Experience '].value_counts()
x = boss.index.tolist()
y = boss.values.tolist()
data_pair = [list(z) for z in zip(x, y)]
c = (
Pie()
.add(
"",
data_pair,
radius=["40%", "55%"],
label_opts=opts.LabelOpts(
position="outside",
formatter="{a|{a}}{abg|}\n{hr|}\n {b|{b}: }{c} {per|{d}%} ",
background_color="#eee",
border_color="#aaa",
border_width=1,
border_radius=4,
rich={

"a": {
"color": "#999", "lineHeight": 22, "align": "center"},
"abg": {

"backgroundColor": "#e3e3e3",
"width": "100%",
"align": "right",
"height": 22,
"borderRadius": [4, 4, 0, 0],
},
"hr": {

"borderColor": "#aaa",
"width": "100%",
"borderWidth": 0.5,
"height": 0,
},
"b": {
"fontSize": 16, "lineHeight": 33},
"per": {

"color": "#eee",
"backgroundColor": "#334455",
"padding": [2, 4],
"borderRadius": 2,
},
},
),
)
.set_global_opts(title_opts=opts.TitleOpts(title="Pie- Rich text examples "))
)
c.render_notebook()
gsly = df[' Company area '].value_counts()[:10]
x1 = gsly.index.tolist()
y1 = gsly.values.tolist()
c = (
Bar()
.add_xaxis(x1)
.add_yaxis(
" Company area ",
y1
Source code 、 answer 、 Tutorial can be added Q skirt :261823976 Free collection
)
.set_global_opts(title_opts=opts.TitleOpts(title=" Company area "),datazoom_opts=opts.DataZoomOpts())
.set_series_opts(label_opts=opts.LabelOpts(is_show=False))
)
c.render_notebook()
gsgm = df[' The company size '].value_counts()[1:10]
x2 = gsgm.index.tolist()
y2 = gsgm.values.tolist()
c = (
Bar()
.add_xaxis(x2)
.add_yaxis(
" The company size ",
y2
)
.set_global_opts(title_opts=opts.TitleOpts(title=" The company size "),datazoom_opts=opts.DataZoomOpts())
.set_series_opts(label_opts=opts.LabelOpts(is_show=False))
)
c.render_notebook()
import stylecloud
from PIL import Image
welfares = df[' welfare '].dropna(how='all').values.tolist()
welfares_list = []
for welfare in welfares:
welfares_list += welfare.split(',')
pic_name = ' Welfare word cloud .png'
stylecloud.gen_stylecloud(
text=' '.join(welfares_list),
font_path='msyh.ttc',
palette='cartocolors.qualitative.Bold_5',
max_font_size=100,
icon_name='fas fa-yen-sign',
background_color='#212529',
output_name=pic_name,
)
Image.open(pic_name)


There is no fast track to success , There is no highway to happiness .
All the successes , All come from tireless efforts and running , All happiness comes from ordinary struggle and persistence
—— Inspirational quotes
This article is finished ~ Interested partners can copy the code to try
Your support is my biggest motivation !! Remember Sanlian ~ Welcome to read previous articles ~