前言
主題切換
ttkbootstrap一些簡單使用介紹
標簽
按鈕
輸入框
文本框
日期輸入
單選按鈕
多選按鈕
組合框
Frame和Labelframe
儀表
進度條
Scale
水尺
滾動條
消息提示框
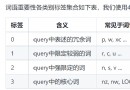
查詢框
子窗口
菜單
面板
樹視圖
加載gif動圖
打開本地文件
打開浏覽器
前言tkinter是python自帶的標准gui庫,對於我們自己日常做一些小程序出來給自己使用是非常不錯的。因為tkinter相比較其它強大的gui庫(PyQT,WxPython等等)而言要簡單、方便、學起來也容易得很多,基本上兩三天就能學會,所以非常是nice的。但是喃,它做出來的界面,如果你是沒有一定的經驗與技術是做不出來好看界面的,這樣就很難受額。也會很影響我們把自己做的小程序分享給別個使用。不管怎麼說都現在這個時代了,要是讓別人拿個20年前的界面程序來盯著看也非常難受不是,哈哈哈!!!熟話說,愛美之心人皆有之,那何況對於我們自己的作品而言喃,那肯定還是要追求一下完美好看,不是?
所以,ttkbootstrap(第三方庫)官方就很nice啊,直接把他倆結合了起來,並給它穿上了一件“皮膚”(叮:tkinter,您的外掛已到賬!)。簡單來說就是會tkinter了,那麼也就基本上也會ttkbootstrap了,如果不會,那直接學ttkbootstrap難度也與tkinter差不多,簡直就是太nice了,哈哈哈。
那麼,之所以推出ttkbootstrap出來當然是為了解決界面好看的問題,它自己封裝了很多主題來供用戶選擇,裡面的主題切換出來的效果也很現代化好看。所以,我們要學簡單的gui庫那麼就學ttkbootstrap吧!!!好了,接下來我們就開始對它做一些簡單的使用了解吧!對了,學習ttkbootstrap的小伙伴們一定要去官方文檔裡面的查看內容,裡面也提供了好幾個項目來供大家參考!
(提示:本文是考慮在對tkinter有一定了解的基礎上與大家分享學習的,因為下面的內容大多數都沒注釋,所以沒有基礎的小伙伴還請見諒!)
官方文檔:https://ttkbootstrap.readthedocs.io/en/latest/
這兩張圖片是截取官網上提供的展示效果圖:
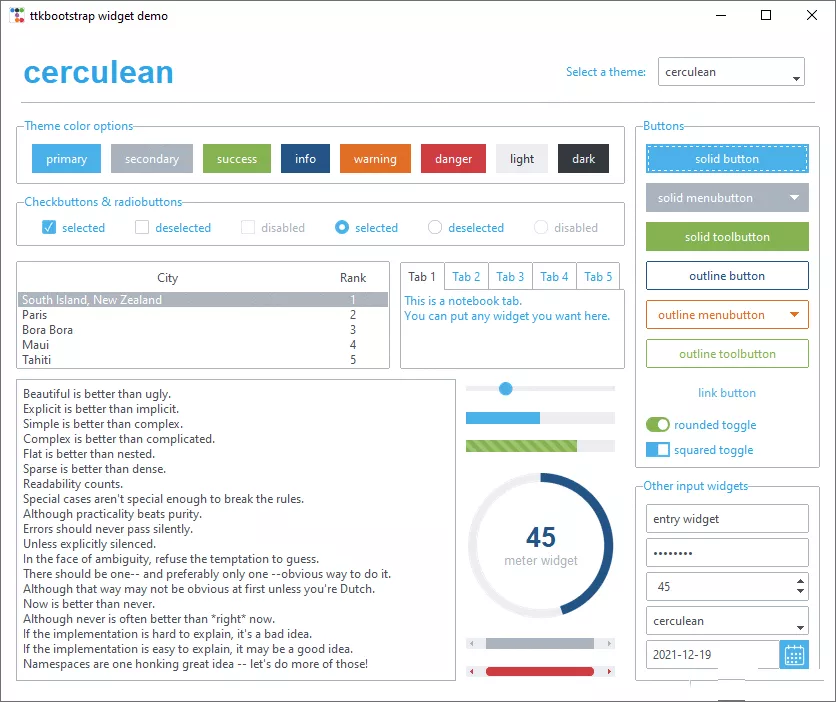
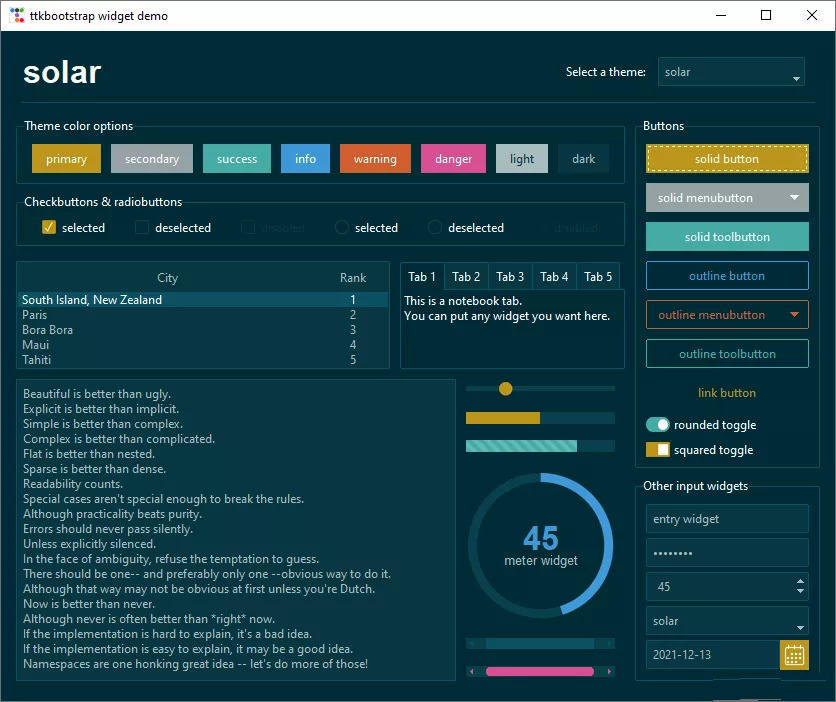
簡單的主題切換,由於當前窗口上組件很少,所以感覺效果不明顯,但是當組件布局很多時就會很好看。
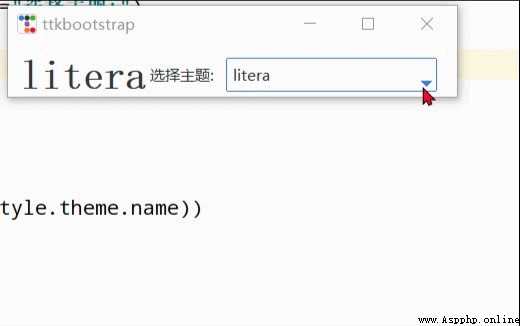
import ttkbootstrap as ttkfrom ttkbootstrap.constants import *root = ttk.Window()style = ttk.Style()theme_names = style.theme_names()#以列表的形式返回多個主題名theme_selection = ttk.Frame(root, padding=(10, 10, 10, 0))theme_selection.pack(fill=X, expand=YES)lbl = ttk.Label(theme_selection, text="選擇主題:")theme_cbo = ttk.Combobox( master=theme_selection, text=style.theme.name, values=theme_names,)theme_cbo.pack(padx=10, side=RIGHT)theme_cbo.current(theme_names.index(style.theme.name))lbl.pack(side=RIGHT)def change_theme(event): theme_cbo_value = theme_cbo.get() style.theme_use(theme_cbo_value) theme_selected.configure(text=theme_cbo_value) theme_cbo.selection_clear()theme_cbo.bind('<<ComboboxSelected>>', change_theme)theme_selected = ttk.Label( master=theme_selection, text="litera", font="-size 24 -weight bold")theme_selected.pack(side=LEFT)root.mainloop()ttkbootstrap一些簡單使用介紹首先對它實例化創建應用程序窗口的一些簡單介紹。
import ttkbootstrap as ttk#實例化創建應用程序窗口root = ttk.Window( title="窗口名字", #設置窗口的標題 themename="litera", #設置主題 size=(1066,600), #窗口的大小 position=(100,100), #窗口所在的位置 minsize=(0,0), #窗口的最小寬高 maxsize=(1920,1080), #窗口的最大寬高 resizable=None, #設置窗口是否可以更改大小 alpha=1.0, #設置窗口的透明度(0.0完全透明) )# root.place_window_center() #讓顯現出的窗口居中# root.resizable(False,False) #讓窗口不可更改大小# root.wm_attributes('-topmost', 1)#讓窗口位置其它窗口之上root.mainloop()標簽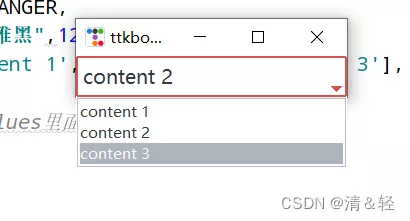
import ttkbootstrap as ttkfrom ttkbootstrap.constants import *root = ttk.Window()ttk.Label(root,text="標簽1",bootstyle=INFO).pack(side=ttk.LEFT, padx=5, pady=10)ttk.Label(root,text="標簽2",boot).pack(side=ttk.LEFT, padx=5, pady=10)ttk.Label(root,text="標簽3",boot).pack(side=ttk.LEFT, padx=5, pady=10)ttk.Label(root, text="標簽4", bootstyle=WARNING, font=("微軟雅黑", 15), background='#94a2a4').pack(side=LEFT, padx=5, pady=10)root.mainloop()'''# bootstyle colorsPRIMARY = 'primary'SECONDARY = 'secondary'SUCCESS = 'success'DANGER = 'danger'WARNING = 'warning'INFO = 'info'LIGHT = 'light'DARK = 'dark'# bootstyle typesOUTLINE = 'outline'LINK = 'link'TOGGLE = 'toggle'INVERSE = 'inverse'STRIPED = 'striped'TOOLBUTTON = 'toolbutton'ROUND = 'round'SQUARE = 'square''''按鈕按鈕樣式:

import ttkbootstrap as ttkfrom ttkbootstrap.constants import *root = ttk.Window()ttk.Button(root, text="Button 1", bootstyle=SUCCESS).pack(side=LEFT, padx=5, pady=10)ttk.Button(root, text="Button 2", bootstyle=(INFO, OUTLINE)).pack(side=LEFT, padx=5, pady=10)ttk.Button(root, text="Button 3", bootstyle=(PRIMARY, "outline-toolbutton")).pack(side=LEFT, padx=5, pady=10)ttk.Button(root, text="Button 4", boot).pack(side=LEFT, padx=5, pady=10)ttk.Button(root, text="Button 5", boot).pack(side=LEFT, padx=5, pady=10)ttk.Button(root, text="Button 6", state="disabled").pack(side=LEFT, padx=5, pady=10) #在禁用狀態下創建按鈕root.mainloop()按鈕點擊:

import ttkbootstrap as ttkfrom ttkbootstrap.constants import *root = ttk.Window()#為按鈕添加點擊事件#法一def button1(): print("Button1點擊了一下!")ttk.Button(root,text="Button1", bootstyle=(PRIMARY, "outline-toolbutton"),command=button1).pack(side=LEFT, padx=5, pady=10)#法二def button2(event): #這裡要加一個參數,不然會報錯 print("Button2點擊了一下!") button_text = event.widget["text"] #得到按鈕上的文本 print(button_text)b = ttk.Button(root,text="Button2", bootstyle=(PRIMARY, "outline-toolbutton"))b.pack(side=LEFT, padx=5, pady=10)b.bind("<Button-1>", button2) #<Button-1>鼠標左鍵root.mainloop()輸入框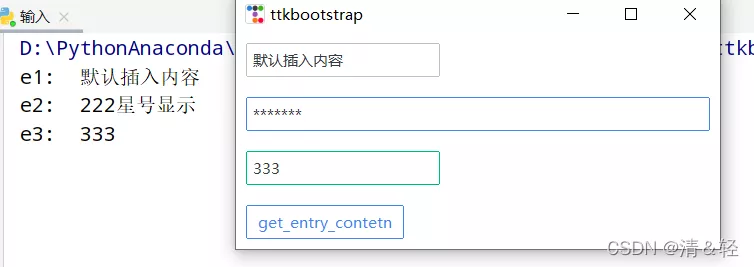
import ttkbootstrap as ttkfrom ttkbootstrap.constants import *root = ttk.Window()e1 = ttk.Entry(root,show=None)e1.insert('0',"默認插入內容")e1.grid(row=5, column=1, sticky=ttk.W, padx=10,pady=10)e2 = ttk.Entry(root,show="*",width=50,bootstyle=PRIMARY)e2.grid(row=10, column=1, sticky=ttk.W, padx=10, pady=10)e3_content = ttk.StringVar()e3 = ttk.Entry(root,bootstyle='success', textvariable=e3_content).grid(row=15, column=1, sticky=ttk.W, padx=10, pady=10)def get_entry_contetn(): print("e1: ",e1.get()) print("e2: ",e2.get()) print("e3: ",e3_content.get())ttk.Button(root,text="get_entry_contetn", bootstyle=(PRIMARY, "outline-toolbutton"),command=get_entry_contetn).grid(row=20, column=1, sticky=ttk.W, padx=10, pady=10)root.mainloop()文本框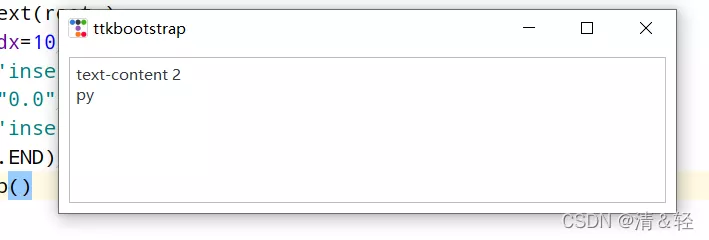
import ttkbootstrap as ttkfrom ttkbootstrap.constants import *root = ttk.Window()text = ttk.Text(root,)text.pack(padx=10,pady=10,fill=BOTH)text.insert('insert','text-content 1') #插入內容text.delete("0.0",'end') #刪除內容text.insert('insert','text-content 2\npy')text.see(ttk.END) #光標跟隨著插入的內容移動root.mainloop()日期輸入
import ttkbootstrap as ttkfrom ttkbootstrap.constants import *root = ttk.Window()de1 = ttk.DateEntry()de1.grid(row=6, column=1, sticky=ttk.W,padx=10, pady=10)print(de1.entry.get())de2 = ttk.DateEntry(boot,dateformat=r"%Y") #r"%Y-%m-%d"de2.grid(row=6, column=2, sticky=ttk.W,padx=10, pady=10)def get_dataentry(): print(de2.entry.get())ttk.Button(root,text="get_dataentry", bootstyle=(PRIMARY, "outline-toolbutton"),command=get_dataentry).grid(row=20, column=1, sticky=ttk.W, padx=10, pady=10)root.mainloop()單選按鈕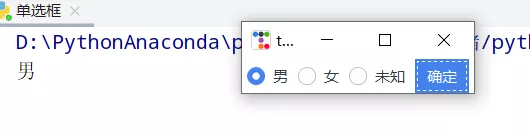
import ttkbootstrap as ttkroot = ttk.Window()variable_value = ttk.StringVar()variable_value_dist = { "0":"男", "1":"女", "2":"未知"}ttk.Radiobutton(root, text='男', variable=variable_value, value=0).pack(side=ttk.LEFT, padx=5)ttk.Radiobutton(root, text='女', variable=variable_value, value=1).pack(side=ttk.LEFT, padx=5)ttk.Radiobutton(root, text='未知', variable=variable_value, value=2).pack(side=ttk.LEFT, padx=5)def ensure(): print(variable_value_dist[variable_value.get()])ttk.Button(text="確定", command=ensure).pack(side=ttk.LEFT, padx=5)root.mainloop()多選按鈕
import ttkbootstrap as ttkroot = ttk.Window()variable_content = [ [ttk.StringVar(),"111"], [ttk.StringVar(),"222"], [ttk.StringVar(),"333"], [ttk.StringVar(),"666"]]ttk.Checkbutton(root, text="111", variable=variable_content[0][0]).pack(side=ttk.LEFT, padx=5)ttk.Checkbutton(root, text="222", variable=variable_content[1][0], boot).pack(side=ttk.LEFT, padx=5)ttk.Checkbutton(root, text="333", variable=variable_content[2][0], boot).pack(side=ttk.LEFT, padx=5)ttk.Checkbutton(root, text="666", variable=variable_content[3][0]).pack(side=ttk.LEFT, padx=5)def ensure(): print([v for i, v in variable_content if i.get()])ttk.Button(text="確定",command=ensure).pack(side=ttk.LEFT, padx=5)root.mainloop()組合框
import ttkbootstrap as ttkfrom ttkbootstrap.constants import *root = ttk.Window()cbo = ttk.Combobox( master=root, bootstyle = DANGER, font = ("微軟雅黑",12), values=['content 1', 'content 2', 'content 3'], )cbo.current(1) #首先展示values裡面索引的對應的值cbo.pack()# cbo.set('set other')def ensure(event): print(cbo.get())cbo.bind('<<ComboboxSelected>>', ensure)root.mainloop()Frame和Labelframe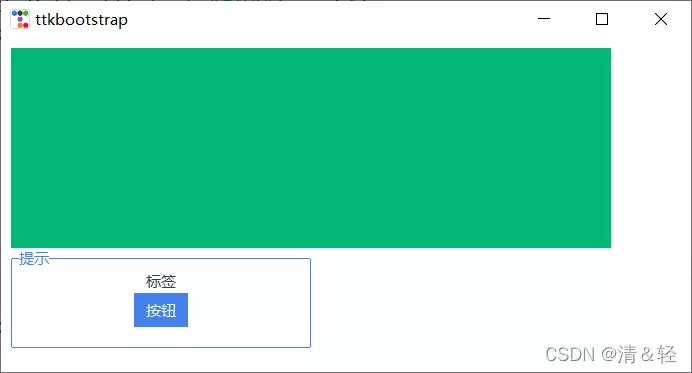
import ttkbootstrap as ttkfrom ttkbootstrap.constants import *root = ttk.Window()f = ttk.Frame(bootstyle=SUCCESS)f.place(x=10,y=10,width=600,height=200)lf = ttk.Labelframe(text="提示",bootstyle=PRIMARY,width=100,height=60)lf.place(x=10,y=210,width=300,height=100)ttk.Label(lf,text="標簽").pack()ttk.Button(lf,text="按鈕").pack()root.mainloop()儀表
import psutil,time,threadingimport ttkbootstrap as ttkfrom ttkbootstrap.constants import *root = ttk.Window()ttk.Meter( master=root, bootstyle=DEFAULT, metertype="full",#將儀表顯示為一個完整的圓形或半圓形(semi) wedgesize=5, #設置弧周圍的指示器楔形長度,如果大於 0,則此楔形設置為以當前儀表值為中心的指示器 amounttotal=50, #儀表的最大值,默認100 amountused=10, #儀表的當前值 metersize=200,#儀表大小 showtext=True, #指示是否在儀表上顯示左、中、右文本標簽 interactive=True, #是否可以手動調節數字的大小 textleft='左邊', #插入到中心文本左側的短字符串 textright='右邊', textfont="-size 30", #中間數字大小 subtext="文本", subtextstyle=DEFAULT, subtextfont="-size 20",#文本大小 ).pack(side=ttk.LEFT, padx=5)def _(): meter = ttk.Meter( metersize=180, padding=50, amountused=0, metertype="semi", subtext="當前網速(kB/s)", subtext, interactive=False, bootstyle='primary', ) meter.pack(side=ttk.LEFT, padx=5) while True: meter.configure(amountused=round(getNet(),2))def getNet(): recv_before = psutil.net_io_counters().bytes_recv time.sleep(1) recv_now = psutil.net_io_counters().bytes_recv recv = (recv_now - recv_before)/1024 return recvt = threading.Thread(target=_)t.setDaemon(True)t.start()root.mainloop()進度條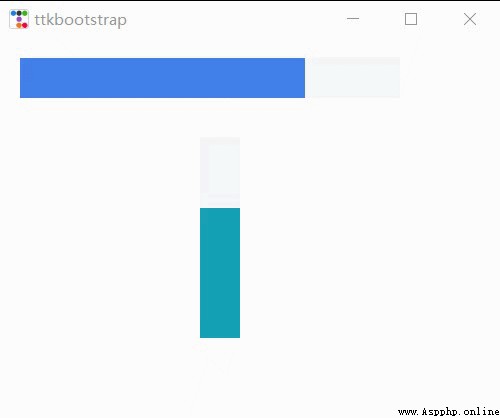
import time,threadingimport ttkbootstrap as ttkfrom ttkbootstrap.constants import *root = ttk.Window(size=(500,380))def _(): f = ttk.Frame(root).pack(fill=BOTH, expand=YES) p1 = ttk.Progressbar(f, bootstyle=PRIMARY) p1.place(x=20, y=20, width=380, height=40) p1.start() #間隔默認為50毫秒(20步/秒) p2 = ttk.Progressbar(f, bootstyle=INFO,orient=VERTICAL) p2.place(x=200, y=100, width=40, height=200) p2.step(10) #步長 while True: for i in range(0,50,5): p2.step(i) #以步長i增長 # p2.stop()#停止 time.sleep(1)t = threading.Thread(target=_)t.setDaemon(True)t.start()root.mainloop()Scale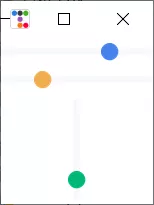
import threading,timeimport ttkbootstrap as ttkfrom ttkbootstrap.constants import *root = ttk.Window()ttk.Scale( master=root, orient=HORIZONTAL, value=75, from_=0, to=100).pack(fill=X, pady=5, expand=YES)ttk.Scale(master=root,orient=HORIZONTAL,bootstyle=WARNING,value=75,from_=100,to=0).pack(fill=X, pady=5, expand=YES)def scale(): s2 = ttk.Scale( master=root, bootstyle=SUCCESS, orient=VERTICAL, value=0, from_=100, to=0 ) s2.pack(fill=X, pady=5, expand=YES) for i in range(101): s2.configure(value=i) time.sleep(0.1) # print(s2.get())t = threading.Thread(target=scale)t.setDaemon(True)t.start()root.mainloop()水尺
import ttkbootstrap as ttkfrom ttkbootstrap.constants import *root = ttk.Window()fg1 = ttk.Floodgauge( master=None, cursor=None, font=None, length=None, maximum=100, mode=DETERMINATE, orient=HORIZONTAL, bootstyle=PRIMARY, takefocus=False, text=None, value=0, mask=None,)fg1.pack(side=ttk.LEFT, padx=5)fg1.start()fg2 = ttk.Floodgauge( master=root, boot, font=("微軟雅黑",12), #文本字體 length=100, #水尺長度 maximum=10, #增加到10 mode=INDETERMINATE, #來回不確定 orient=VERTICAL, #放置垂直方向 text="文本", #文本)fg2.pack(side=ttk.LEFT, padx=5)fg2.start()fg3 = ttk.Floodgauge( root, bootstyle=INFO, length=300, maximum=200, font=("微軟雅黑", 18, 'bold'), mask='loading...{}%',)fg3.pack(side=ttk.LEFT, padx=5)fg3.start()# fg3.stop()# fg3.configure(mask='...{}%')fg3.configure(value=25) #初始值fg3.step(50) #將上面25該值增加50步root.mainloop()滾動條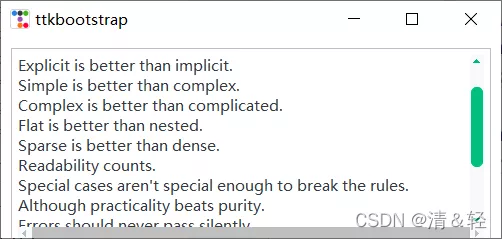
import ttkbootstrap as ttkfrom ttkbootstrap.constants import *root = ttk.Window(size=(500,200))f = ttk.Frame(root).pack(fill=BOTH, expand=YES)text_content = '''The Zen of Python, by Tim PetersBeautiful is better than ugly.Explicit is better than implicit.Simple is better than complex.Complex is better than complicated.Flat is better than nested.Sparse is better than dense.Readability counts.Special cases aren't special enough to break the rules.Although practicality beats purity.Errors should never pass silently.Unless explicitly silenced.In the face of ambiguity, refuse the temptation to guess.There should be one-- and preferably only one --obvious way to do it.Although that way may not be obvious at first unless you're Dutch.Now is better than never.Although never is often better than *right* now.If the implementation is hard to explain, it's a bad idea.If the implementation is easy to explain, it may be a good idea.Namespaces are one honking great idea -- let's do more of those!'''# t = ttk.Text(f)# t.insert("0.0",text_content)# t.place(x=10,y=10,width=480,height=200)# sl_x = ttk.Scrollbar(t,orient=HORIZONTAL) #使滾動條水平放置# #放到窗口的底部, 填充X軸豎直方向# sl_x.pack(side=ttk.BOTTOM, fill=ttk.X)# sl_y = ttk.Scrollbar(t,boot) #滾動條默認垂直放置# #放到窗口的右側, 填充Y軸豎直方向# sl_y.pack(side=ttk.RIGHT, fill=ttk.Y)# #兩個控件相關聯# sl_x.config(command=t.xview)# t.config(yscrollcommand=sl_x.set)# sl_y.config(command=t.yview)# t.config(yscrollcommand=sl_y.set)##滾動文本框from ttkbootstrap.scrolled import ScrolledTextst = ScrolledText(f, padding=5, height=10, autohide=True)st.pack(fill=BOTH, expand=YES)st.insert(END, text_content)root.mainloop()消息提示框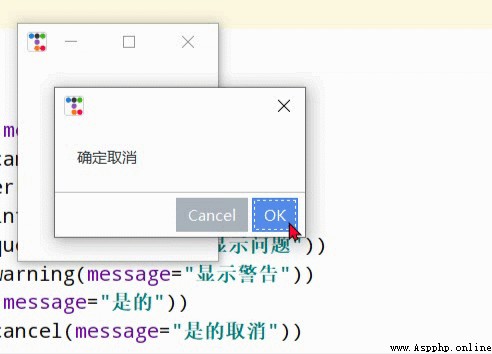
import ttkbootstrap as ttkfrom ttkbootstrap.dialogs import Messageboxroot = ttk.Window()print("ok: ",Messagebox.ok( message="要在消息框中顯示的消息", title="消息框的標題", alert=False, #指定是否響鈴,默認False))print("okcancel: ",Messagebox.okcancel(message="確定取消"))print("retrycancel: ",Messagebox.retrycancel(message="重試取消"))print("retrycancel: ",Messagebox.show_error(message="顯示錯誤"))print("retrycancel: ",Messagebox.show_info(message="顯示信息"))print("retrycancel: ",Messagebox.show_question(message="顯示問題"))print("retrycancel: ",Messagebox.show_warning(message="顯示警告"))print("retrycancel: ",Messagebox.yesno(message="是的"))print("retrycancel: ",Messagebox.yesnocancel(message="是的取消"))root.mainloop()查詢框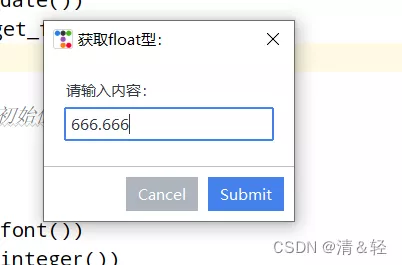
import ttkbootstrap as ttkfrom ttkbootstrap.dialogs import Queryboxroot = ttk.Window()print("獲取日期:",Querybox.get_date())print("獲取float型:",Querybox.get_float( prompt="請輸入內容:", title="獲取float型: ", initialvalue=666.666, #設置初始值 # minvalue=None, # maxvalue=None))print("獲取字體:",Querybox.get_font())print("獲取整數:",Querybox.get_integer())print("獲取字符串:",Querybox.get_string())root.mainloop()子窗口
import ttkbootstrap as ttkroot = ttk.Window()root.wm_attributes('-topmost', 1)#讓主窗口置頂def my(): ttk.Style("solar") #print(ttk.Style().theme_names())#可設置主題風格['cyborg', 'journal', 'darkly', 'flatly', 'solar', 'minty', 'litera', 'united', 'pulse', 'cosmo', 'lumen', 'yeti', 'superhero'] mytoplevel = ttk.Toplevel(root,alpha=0.5)##裡面的參數和Window()父窗口一致ttk.Button(text="my_Toplevel ",command=my).pack()root.mainloop()菜單新增,之前總是感覺好像缺了點什麼,今天才想起來,哈哈哈!!!
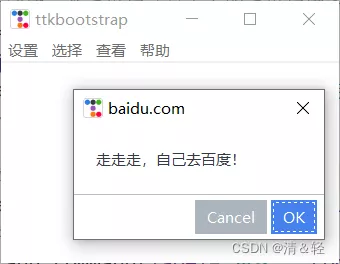
import ttkbootstrap as ttkfrom ttkbootstrap.dialogs import Messageboxroot = ttk.Window()# 在窗口上創建一個菜單欄(最上方的菜單欄橫條)menubar = ttk.Menu(root)def dianji(): #定義一個點擊事件方法 Messagebox.show_info(title='走走走!', message='該功能還未開放!') #消息提示框窗口# 定義一個豎條filemenu = ttk.Menu(menubar)# 在菜單單元中添加一個菜單項Filemenubar.add_cascade(label='設置', menu=filemenu)# 在設置菜單項添加命令選項filemenu.add_command(label='更多', command=dianji)# 添加一條分割線filemenu.add_separator()# 定義一個子菜單條submenu = ttk.Menu(filemenu) # 和上面定義菜單一樣,不過此處是在設置上創建一個空的菜單submenu.add_command(label="背景") # 給submenu添加功能選項submenu.add_command(label="字體")submenu.add_command(label="大小")# 添加一個展開下拉菜單,並把上面的子菜單嵌入給它filemenu.add_cascade(label='個性化', menu=submenu, underline=0)# 同樣的在File中加入Exit小菜單,此處對應命令為window.quitfilemenu.add_command(label='退出', command=root.quit)# 在頂部再添加多個菜單項otherfunction = ttk.Menu(menubar)menubar.add_cascade(label='選擇', menu=otherfunction)menubar.add_cascade(label='查看', menu=otherfunction)otherfunction.add_command(label='該功能未開放!')#幫助def baidu(): Messagebox.okcancel(title='baidu.com', message='走走走,自己去百度!')help = ttk.Menu(menubar, tearoff=0)menubar.add_cascade(label='幫助', menu=help)help.add_command(label='help', command=baidu)# 將菜單配置給窗口root.config(menu=menubar)root.mainloop()面板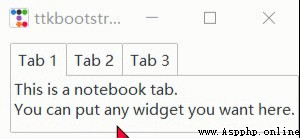
import ttkbootstrap as ttkfrom ttkbootstrap.constants import *root = ttk.Window()f = ttk.Frame(root)f.pack(pady=5, fill=X, side=TOP)nb = ttk.Notebook(f)nb.pack( side=LEFT, padx=(10, 0), expand=YES, fill=BOTH)nb_text = "This is a notebook tab.\nYou can put any widget you want here."nb.add(ttk.Label(nb, text=nb_text), text="Tab 1", sticky=NW)nb.add( child=ttk.Label(nb, text="notebook tab 2."), text="Tab 2", sticky=NW)f2 = ttk.Frame(nb)ttk.Button(f2,text="notebook button").pack(side=ttk.LEFT, padx=5, pady=10)nb.add(f2, text='Tab 3')root.mainloop()樹視圖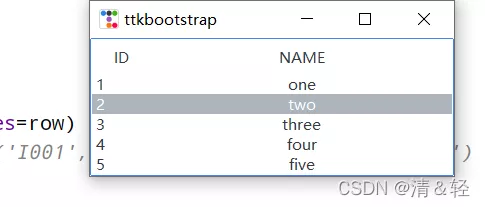
import ttkbootstrap as ttkfrom ttkbootstrap.constants import *root = ttk.Window()tv = ttk.Treeview( master=root, columns=[0, 1], show=HEADINGS, height=5 )table_data = [ (1,'one'), (2, 'two'), (3, 'three'), (4, 'four'), (5, 'five')]for row in table_data: tv.insert('', END, values=row)# print(tv.get_children())#('I001', 'I002', 'I003', 'I004', 'I005')tv.selection_set('I002')tv.heading(0, text='ID')tv.heading(1, text='NAME')tv.column(0, width=60)tv.column(1, width=300, anchor=CENTER)tv.pack(side=LEFT, anchor=NE, fill=X)root.mainloop()加載gif動圖左邊是官網上提供的方法,右邊是一個自己定義的方法。

from pathlib import Pathfrom itertools import cycleimport ttkbootstrap as ttkfrom ttkbootstrap.constants import *from PIL import Image, ImageTk, ImageSequenceclass AnimatedGif(ttk.Frame): def __init__(self, master): super().__init__(master, width=400, height=300) # open the GIF and create a cycle iterator file_path = Path(__file__).parent / "guanwang.gif" with Image.open(file_path) as im: # create a sequence sequence = ImageSequence.Iterator(im) images = [ImageTk.PhotoImage(s) for s in sequence] self.image_cycle = cycle(images) # length of each frame self.framerate = im.info["duration"] self.img_container = ttk.Label(self, image=next(self.image_cycle)) self.img_container.pack(fill="both", expand="yes") self.after(self.framerate, self.next_frame) def next_frame(self): """Update the image for each frame""" self.img_container.configure(image=next(self.image_cycle)) self.after(self.framerate, self.next_frame)def loadingGif(app): numIdx = 12 # gif的幀數 file_path = Path(__file__).parent / "TestGif.gif" frames = [ttk.PhotoImage(file=file_path, format='gif -index %i' % (i)) for i in range(numIdx)] def run(rate): frame = frames[rate] rate += 1 gif_label.configure(image=frame) # 顯示當前幀的圖片 gif_label.after(100, run, rate % numIdx) # 0.1秒(100毫秒)之後繼續執行函數(run) gif_label = ttk.Label(app) gif_label.pack(side=LEFT,padx=20,fill=BOTH, expand=YES) run(0)if __name__ == "__main__": app = ttk.Window("Animated GIF", themename="litera") gif = AnimatedGif(app) gif.pack(side=LEFT,padx=20,fill=BOTH, expand=YES) loadingGif(app) app.mainloop()打開本地文件import ttkbootstrap as ttkfrom ttkbootstrap.constants import *from tkinter.filedialog import askopenfilenameroot = ttk.Window()def open_file(): path = askopenfilename() # print(path) if not path: returnttk.Button(root, text="打開文件", command=open_file).pack(fill=X, padx=10, pady=10)root.mainloop()打開浏覽器import ttkbootstrap as ttkfrom ttkbootstrap.constants import *import webbrowserroot = ttk.Window()def open_url(event): webbrowser.open("http://www.baidu.com", new=0) # 啟動web浏覽器訪問給定的URLlabel = ttk.Label(root,text="https://www.baidu.com/",bootstyle=PRIMARY)label.pack(fill=BOTH)label.bind("<Button-1>", open_url)root.mainloop()到此這篇關於Python GUI利用tkinter皮膚ttkbootstrap實現好看的窗口的文章就介紹到這了,更多相關Python GUI 窗口內容請搜索軟件開發網以前的文章或繼續浏覽下面的相關文章希望大家以後多多支持軟件開發網!