1. install memcached
Here we use Centos Take how to install as an example , Run the following command , install memcached
sudo yum install memcachedTest for successful installation
memcached -helpIf no error is reported , It means that the installation is successful
2. function memcached
memcached -d -m 64 -l 127.0.0.1 -p 11211 -u root-d: Indicates that the daemon is started in the background
-m: Indicates how much memory is used , Use here 64M
-l: It's a listening server IP Address , Here we fill in the local , If you want other machines to access , It's written in 0.0.0.0
-p: It's the port number , The default is 11211
-u: Specify which user to run , Designated here root
see memcached Whether it runs successfully or not , Use the following command
ps -ef|grep memcachedIf the display is as shown in the figure below , Indicates successful startup
You can use the following command to turn off memcached process
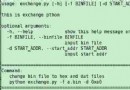
killall -9 memcachedUse telnet De link , Install first telnet, Following commands
sudo yum install telnetAfter installation , Use the following command to connect memcached
telnet 127.0.0.1 11211The following interface appears , Indicates successful connection , function quit Exit connection
thus , We installed it successfully memcached, And can run successfully , Let's introduce Django How the project uses it
In their own projects python Installation in environment , In the case of virtualization , Run the virtual environment before installing , The order is as follows
pip install python-memcachedIn our project setting.py In the document , Join in CACHE Options , as follows
CACHES = {
'default': {
'BACKEND': 'django.core.cache.backends.memcached.MemcachedCache',
'LOCATION': '127.0.0.1:11211',
}
}Then according to the actual situation of your project , Set the required cache time , My personal Blog The cache time is set to one day , namely 60*60*24 second
CACHE_MIDDLEWARE_SECONDS=60*60*24Last , We are working on middleware MIDDLEWARE add to memcached what is needed Django middleware , Because I chose to cache the whole site , So the things we need are as follows : Pay attention to the position and order of middleware
'django.middleware.cache.UpdateCacheMiddleware',# Put it in the first place of the middleware
...... # Other middleware
'django.middleware.cache.FetchFromCacheMiddleware',# Put it in the last position of the middleware The above is all our configuration and installation , restart nginx and uwsgi Then you can open the website for speed measurement , It may be slow to open for the first time , Because you just put your request in the cache , When you open it again , Or open it within the cache time you just set , It's all on in seconds .
Because we set up 24 Hour cache , So during the cache period , If you write a blog post , Your website won't show up immediately , Wait until the cache time expires , Will be updated , If you want to show it right away , You need to clean up the cache manually , Is the cache expired , The website will re cluster the database to get data , Manual cache expiration , Use the following command
# Connect first memcached
telnet 127.0.0.1 11211
# Clear cache
flush_all